Project – BFF
Here, we’re pausing our discussion of microservices concepts and relevant patterns to work through a practical project, demonstrating how the BFF pattern works in practice. This is a long chapter, so feel free to take a break before diving into this project.
This project leverages the BFF design pattern to reduce the complexity of using the low-level API of the REPR project we created in Chapter 18, Request-EndPoint-Response (REPR). The BFF endpoints act as the several types of gateway we have explored.
This design makes two layers of APIs, so let’s start here.
Layering APIs
From a high-level architecture perspective, we can leverage multiple layers of APIs to group different levels of operation granularity. For example, in this case, we have two layers:
- Low-level APIs that offer atomic foundational operations
- High-level APIs that offer domain-specific functionalities
Here’s a diagram that represents this concept (high-level APIs are BFFs in this case, but the design could be nuanced):
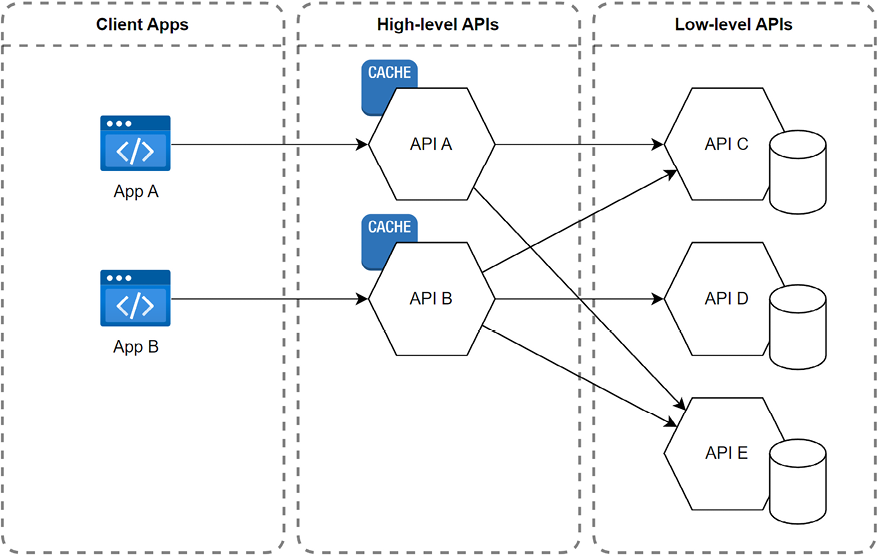
Figure 19.24: A diagram showcasing a two-layer architecture
The low-level layer showcases atomic foundational operations, like adding an item to the shopping basket and removing an item from it. Because those operations are simple, they are more complicated to use. For example, loading the products in the user’s shopping cart requires multiple API calls, one to get the items and quantity, and one per item to get the product details like its name and price.
The high-level layer offers domain-specific functionalities like business capabilities, which are easier to use but can become more complex. For example, as we are about to implement, a single endpoint could handle adding, updating, and deleting items from the shopping basket, making its usage trivial for its consumer but its logic more complex to implement. Moreover, the product team might prefer a shopping cart to a shopping basket, so the endpoint’s URL could reflect this.
Let’s have a look at the advantages and disadvantages.
Advantages of a layered API design
- Separation of concerns: Separates generic from domain-specific functionalities, promoting modularity and making maintenance easier by isolating issues within specific layers.
- Scalability and flexibility: Allows independent scaling of each layer and reusing low-level APIs across business capabilities.
- Efficiency: Optimizes data fetching by aggregating responses, reducing payload sizes, and simplifying consumption.
- Customization and security: Facilitates tailored experiences for different client types while allowing domain-specific security measures without complicating low-level APIs.
Disadvantages of a layered API design
- Increased complexity and development overhead: Introducing additional layers adds complexity to deployment and monitoring and requires more effort in development, due to the need to manage and consider multiple layers, especially upfront.
- Performance and coupling concerns: Additional layers can introduce latency and, without careful design, lead to tight coupling between layers, affecting performance and flexibility.
- Cross-team coordination issues: More coordination among teams is needed to align high-level functionalities with low-level APIs, with a risk of duplicating logic across different parts of the application or delays due to conflicting priorities.
- Risk of failures: Adding more APIs can increase the likelihood of failures or outages. For example, an incorrectly managed cache can lead to potential issues with stale data, which then cascade to the other APIs.
- While a layered API design can offer flexibility and optimization, it also introduces additional complexities. The decision to use such an architecture should be based on the specific needs of the project, the anticipated scale, and the capabilities of the development and operations teams.
We look at booting up our two-layer API design next.
Running the microservices
Let’s start by exploring the deployment topology. First, we split the Chapter 18 REPR project into two services: Baskets and Products. Then, we add a BFF API that fronts the two services to simplify using the system. We do not have a UI per se, but one http file per project exists to simulate HTTP requests. Here’s a diagram that represents the relationship between the different services:
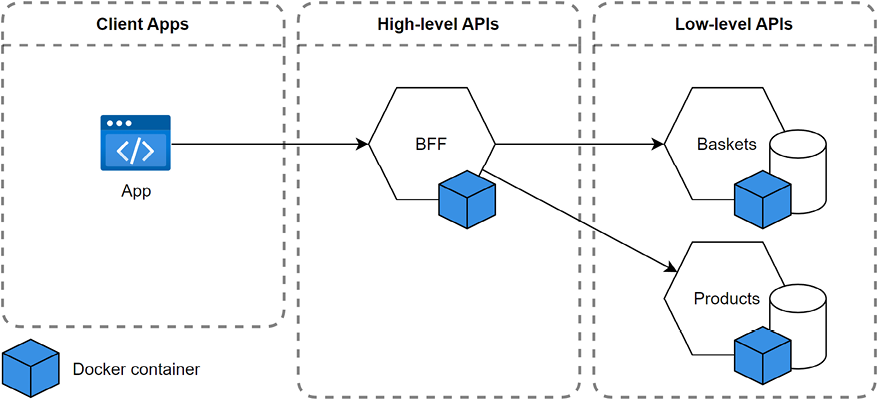
Figure 19.25: A diagram that represents the deployment topology and relationship between the different services
The easiest and most extendable way to start the projects is to use Docker, but it is optional; we can also start the three projects manually. Using Docker opens many possibilities, like using a real SQL Server to persist the data between runs and add more pieces to our puzzle, like a Redis cache or an event broker, to name a few.
Let’s begin by manually starting the apps.
Manually starting the projects
We have three projects and need three terminals to start them all. From the chapter directory, you can execute the following commands, one set per terminal window, and all the projects should start:
# In one terminal
cd REPR.Baskets
dotnet run
# In a second terminal
cd REPR.Products
dotnet run
# In a third terminal
cd REPR.BFF
dotnet run
Doing this should work. You can use the PROJECT_NAME.http files to test the APIs.
Next, let’s explore the second option that uses Docker.
Using Docker Compose to run the projects
At the same level as the solution file, the docker-compose.yml, docker-compose.override.yml, and various Dockerfile files are preconfigured to make the projects start in the correct order.
Here’s a link to get started with Docker: https://adpg.link/1zfM
Since ASP.NET Core uses HTTPS by default, we must register a development certificate with the container, so let’s start here.
Configuring HTTPS
This section quickly explores using PowerShell to set up HTTPS on Windows. If you are using a different operating system or if the instructions do not work, please consult the official documentation: https://adpg.link/o1tu
First, we must generate a development certificate. In a PowerShell terminal, run the following commands:
dotnet dev-certs https -ep "$env:APPDATA\ASP.NET\Https\adpg-net8-chapter-19.pfx" -p devpassword
dotnet dev-certs https --trust
The preceding commands create a pfx file with the password devpassword (you must provide a password, or it won’t work), and then tell .NET to trust the dev certificates.
From there, the ASPNETCORE_Kestrel__Certificates__Default__Path and ASPNETCORE_Kestrel__Certificates__Default__Password environment variables are configured in the docker-compose.override.yml file and will use the development certificate.
If you change the certificate location or the password, you must update the docker-compose.override.yml file.
Composing the application
Now that we have set up HTTPS, we can build the images using the following commands:
docker compose build
We can execute the following command to start the containers:
docker compose up
This uses the images to start the containers and feed you an aggregated log with a color per service. The beginning of the log trail should look like this:
[+] Running 3/0
Container c19-repr.products-1 Created 0.0s
Container c19-repr.baskets-1 Created 0.0s
Container c19-repr.bff-1 Created 0.0s
Attaching to c19-repr.baskets-1, c19-repr.bff-1, c19-repr.products-1
c19-repr.baskets-1 | info: Microsoft.Hosting.Lifetime[14]
c19-repr.baskets-1 | Now listening on: http://[::]:80
c19-repr.baskets-1 | info: Microsoft.Hosting.Lifetime[14]
c19-repr.baskets-1 | Now listening on: https://[::]:443
...
To stop the services, press Ctrl + C.
When you want to destroy the running application, enter the following command:
docker compose down
Now, with docker compose up, our services should be running. To make sure, let’s try them out.
Briefly testing the services
The project contains the following services, each containing an http file you can leverage to query the services, using Visual Studio (VS) or in VS Code using an extension:
|
Service |
HTTP file |
Host |
|
|
|
|
|
|
|
|
|
|
|
|
Table 19.3: Each service, HTTP file, and HTTPS hostname and port
We can leverage the HTTP requests from each directory to test the API. I suggest starting by trying the low-level APIs, and then the BFF, so you know if something is wrong with them directly instead of wondering what is wrong with the BFF (which calls the low-level APIs).
I use the REST Client extension in VS Code (https://adpg.link/UCGv) and the built-in support in VS 2022 version 17.6 or later.
Here’s a part of the REPR.Baskets.http file:
@Web_HostAddress = https://localhost:60280
@ProductId = 3
@CustomerId = 1
GET {{Web_HostAddress}}/baskets/{{CustomerId}}
###
POST {{Web_HostAddress}}/baskets
Content-Type: application/json
{
    "customerId": {{CustomerId}},
    "productId": {{ProductId}},
    "quantity": 10
}
...
The highlighted lines are variables that the requests reuse. The ### characters act as a separator between requests. In VS or VS Code, you should see a Send request button on top of each request. Executing the POST request and then the GET should output the following:
HTTP/1.1 200 OK
Content-Type: application/json; charset=utf-8
[
  {
    "productId": 3,
    "quantity": 10
  }
]
If you can reach one endpoint, this means the service is running. Nonetheless, feel free to play with the requests, modify them, and add more.
I did not move the tests over from Chapter 18. Automating the validation of our deployment could be a good exercise for you to test your testing skills.
After you validate that the three services are running, we can continue and look at how the BFF communicates with the Baskets and Products services.
Creating typed HTTP clients using Refit
The BFF service must communicate to the Baskets and Products services. The services are REST APIs, so we must leverage HTTP. We could leverage the out-of-the-box ASP.NET Core HttpClient class and IHttpClientFactory interface, and then send raw HTTP requests to the downstream APIs. On the other hand, we could also create a typed client, which translates the HTTP calls to simple method calls with evocative names. We explore the second option, encapsulating the HTTP calls inside the typed clients.
The concept is simple: we create one interface per service and translate its operation into methods. Each interface revolves around a service. Optionally, we can aggregate the services under a master interface to inject the aggregate service and have access to all child services. Moreover, this central access point allows us to reduce the number of injected services to one and improve discoverability with IntelliSense.
Here’s a diagram representing this concept:
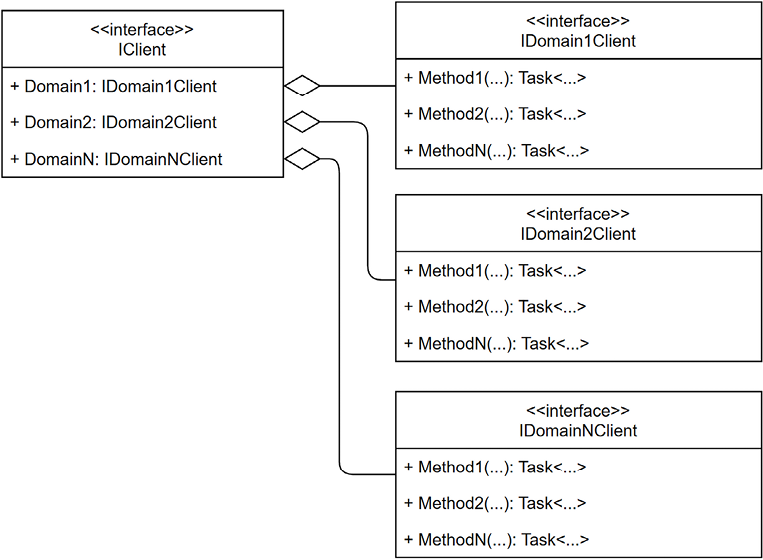
Figure 19.26: UML class diagram representing a generic typed client class hierarchy
In the preceding diagram, the IClient interface is composed and exposes the other typed clients, each of which queries a specific downstream API.
In our case, we have two downstream services, so our interface hierarchy looks like the following:
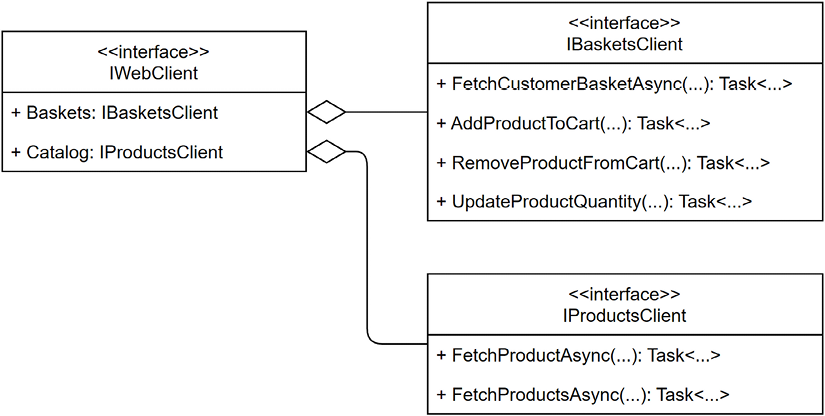
Figure 19.27: UML class diagram representing the BFF downstream typed client class hierarchy
After implementing this, we can query the downstream APIs from our code without worrying about their data contract because our client is strongly typed.
We leverage Refit, an open-source library, to implement the interfaces automatically.
We could use any other library or barebone ASP.NET Core HttpClient; it does not matter. I picked Refit to leverage its code generator, save myself the trouble of writing the boilerplate code, and save you the time of reading through such code. Refit on GitHub: https://adpg.link/hneJ
I used the out-of-the-box IHttpClientFactory functionalities in the past, so if you want to reduce the number of dependencies in your project, you can also use that instead. Here’s a link to help you get started: https://adpg.link/HCj7
Refit acts like Mapperly and generates code based on attributes, so all we have to do is define our methods, and Refit writes the code.
The BFF project references the Products and Baskets projects to reuse their DTOs. I could have architected this in many different ways, including hosting the typed client in a library of its own so we could share it between many projects. We could also extract the DTOs from the web applications to one or more shared projects so that we don’t depend on the web applications themselves. For this demo, there is no need to overengineer the solution.
Let’s look at the typed client interfaces, starting with the IBasketsClient interface:
using Refit;
using Web.Features;
namespace REPR.BFF;
public interface IBasketsClient
{
    [Get("/baskets/{query.CustomerId}")]
    Task<IEnumerable<Baskets.FetchItems.Item>> FetchCustomerBasketAsync(
        Baskets.FetchItems.Query query,
        CancellationToken cancellationToken);
    [Post("/baskets")]
    Task<Baskets.AddItem.Response> AddProductToCart(
        Baskets.AddItem.Command command,
        CancellationToken cancellationToken);
    [Delete("/baskets/{command.CustomerId}/{command.ProductId}")]
    Task<Baskets.RemoveItem.Response> RemoveProductFromCart(
        Baskets.RemoveItem.Command command,
        CancellationToken cancellationToken);
    [Put("/baskets")]
    Task<Baskets.UpdateQuantity.Response> UpdateProductQuantity(
        Baskets.UpdateQuantity.Command command,
        CancellationToken cancellationToken);
}
The preceding interface leverages Refit’s attributes (highlighted) to explain to its code generator what to write. The operations themselves are self-explanatory and carry the features’ DTOs over HTTP.
Next, we look at the IProductsClient interface:
using Refit;
using Web.Features;
namespace REPR.BFF;
public interface IProductsClient
{
    [Get("/products/{query.ProductId}")]
    Task<Products.FetchOne.Response> FetchProductAsync(
        Products.FetchOne.Query query,
        CancellationToken cancellationToken);
    [Get("/products")]
    Task<Products.FetchAll.Response> FetchProductsAsync(
        CancellationToken cancellationToken);
}
The preceding interface is similar to IBasketsClient but creates a typed bridge on the Products API.
The generated code contains much gibberish code and would be hard to clean enough to make it relevant to study, so let’s assume those interfaces have working implementations instead , forcing us to program against interfaces (a good thing).
Next, let’s look at our aggregate:
public interface IWebClient
{
    IBasketsClient Baskets { get; }
    IProductsClient Catalog { get; }
}
The preceding interface exposes the two clients we had Refit generate for us. Its implementation is fairly straightforward:
public class DefaultWebClient : IWebClient
{
    public DefaultWebClient(IBasketsClient baskets, IProductsClient catalog)
    {
        Baskets = baskets ?? throw new ArgumentNullException(nameof(baskets));
        Catalog = catalog ?? throw new ArgumentNullException(nameof(catalog));
    }
    public IBasketsClient Baskets { get; }
    public IProductsClient Catalog { get; }
}
The preceding default implementation composes itself through constructor injection, exposing the two typed clients.
Of course, dependency injection means we must register services with the container. Let’s start with some configuration. To make the setup code parametrizable and allow the Docker container to override those values, we extract the services’ base addresses to the settings file like this (appsettings.Development.json):
{
  "Downstream": {
    "Baskets": {
      "BaseAddress": "https://localhost:60280"
    },
    "Products": {
      "BaseAddress": "https://localhost:57362"
    }
  }
}
The preceding code defines two keys, one per service, which we then load individually in the Program.cs file, like this:
using Refit;
using REPR.BFF;
using System.Collections.Concurrent;
using System.Net;
var builder = WebApplication.CreateBuilder(args);
var basketsBaseAddress = builder.Configuration
    .GetValue<string>("Downstream:Baskets:BaseAddress") ?? throw new NotSupportedException("Cannot start the program without a Baskets base address.");
var productsBaseAddress = builder.Configuration
    .GetValue<string>("Downstream:Products:BaseAddress") ?? throw new NotSupportedException("Cannot start the program without a Products base address.");
The preceding code loads the two configurations into variables.
We can leverage all the techniques we learned in Chapter 9, Application Configuration and the Options Pattern, to create a more elaborate system.
Next, we register our Refit clients like this:
builder.Services
    .AddRefitClient<IBasketsClient>()
    .ConfigureHttpClient(c => c.BaseAddress = new Uri(basketsBaseAddress))
;
builder.Services
    .AddRefitClient<IProductsClient>()
    .ConfigureHttpClient(c => c.BaseAddress = new Uri(productsBaseAddress))
;
In the preceding code, calling the AddRefitClient method replaces the .NET AddHttpClient method and registers our auto-generated client with the container. Because Refit registration returns an IHttpClientBuilder interface, we can use the ConfigureHttpClient method to configure the HttpClient as we would any other typed HTTP client. In this case, we set the BaseAddress property to the values of the previously loaded settings.
Next, we must also register our aggregate:
builder.Services.AddTransient<IWebClient, DefaultWebClient>();
I picked a transient state because the service only fronts other services, so it serves the other services as they are registered, regardless of whether it is the same instance every time. Moreover, it needs a transient or scoped lifetime because the BFF must manage who is the current customer, not the client. It would be quite a security vulnerability to allow users to decide who they want to impersonate for every request.
The project does not authenticate the users, but the service we explore next is designed to make this evolve, abstracting and managing this responsibility so that we can add authentication without impacting the code we are writing.
Let’s explore how we manage the current user.
Creating a service that serves the current customer
To keep the project simple, we are not using any authentication or authorization middleware, yet we want our BFF to be realistic and to handle who’s querying the downstream APIs.
To achieve this, let’s create the ICurrentCustomerService interface, which abstracts this away from the consuming code:
public interface ICurrentCustomerService
{
    int Id { get; }
}
The only thing that interface does is provide us with the identifier representing the current customer. Since we do not have authentication in the project, let’s implement a development version that always returns the same value:
public class FakeCurrentCustomerService : ICurrentCustomerService
{
    public int Id => 1;
}
Finally, we must register it in the Program.cs class like this:
builder.Services.AddScoped<ICurrentCustomerService, FakeCurrentCustomerService>();
With this last piece, we are ready to write some features in our BFF service.
In a project that uses authentication, you can inject the IHttpContextAccessor interface into a class to access the current HttpContext object that contains a User property, enabling access to the current user’s ClaimsPrincipal object, which should include the current user’s CustomerId. Of course, you must ensure the authentication server returns such a claim. You must register the accessor using the following method before using it: builder.Services.AddHttpContextAccessor().
Features
The BFF service serves a non-existing user interface, yet we can imagine what it needs to do; it must:
- Serve the product catalog so that customers can browse the shop.
- Serve a specific product to render a product details page.
- Serve the list of items in a user’s shopping cart.
- Enable users to manage their shopping cart by adding, updating, and removing items.
Of course, the list of features could go on, like allowing the users to purchase the items, which is the ultimate goal of an e-commerce website. However, we are not going that far. Let’s start with the catalog.
Fetching the catalog
The catalog acts as a routing gateway and forwards the requests to the Products downstream service.
The first endpoint serves the whole catalog by using our typed client (highlighted):
app.MapGet(
    "api/catalog",
    (IWebClient client, CancellationToken cancellationToken)
        => client.Catalog.FetchProductsAsync(cancellationToken)
);
Sending the following requests should hit the endpoint:
GET https://localhost:7254/api/catalog
The endpoint should respond with something like the following:
HTTP/1.1 200 OK
Content-Type: application/json; charset=utf-8
{
  "products": [
    {
      "id": 2,
      "name": "Apple",
      "unitPrice": 0.79
    },
    {
      "id": 1,
      "name": "Banana",
      "unitPrice": 0.30
    },
    {
      "id": 3,
      "name": "Habanero Pepper",
      "unitPrice": 0.99
    }
  ]
}
Here’s a visual representation of what happens:

Figure 19.28: A sequence diagram representing the BFF routing the request to the Products service
The other catalog endpoint is very similar and also simply routes the request to the correct downstream service:
app.MapGet(
    "api/catalog/{productId}",
    (int productId, IWebClient client, CancellationToken cancellationToken)
        => client.Catalog.FetchProductAsync(new(productId), cancellationToken)
);
Sending an HTTP call will result in the same as calling it directly because the BFF only acts as a router.
We explore a more exciting feature next instead.
Fetching the shopping cart
The Baskets service only stores the customerId, productId, and quantity properties. However, a shopping cart page displays the product name and price, but the Products service manages those two properties.
To overcome this problem, the endpoint acts as an aggregation gateway. It queries the shopping cart and loads all the products from the Products service before returning an aggregated result, removing the burden of managing this complexity from the client/UI.
Here’s the main feature code:
app.MapGet(
    "api/cart",
    async (IWebClient client, ICurrentCustomerService currentCustomer, CancellationToken cancellationToken) =>
    {
        var basket = await client.Baskets.FetchCustomerBasketAsync(
            new(currentCustomer.Id),
            cancellationToken
        );
        var result = new ConcurrentBag<BasketProduct>();
        await Parallel.ForEachAsync(basket, cancellationToken, async (item, cancellationToken) =>
        {
            var product = await client.Catalog.FetchProductAsync(
                new(item.ProductId),
                cancellationToken
            );
            result.Add(new BasketProduct(
                product.Id,
                product.Name,
                product.UnitPrice,
                item.Quantity
            ));
        });
        return result;
    }
);
The preceding code starts by fetching the items from the Baskets service and then loads the products using the Parallel.ForEachAsync method, before returning the aggregated result.
The Parallel class allows us to execute multiple operations in parallel, in this case, multiple HTTP calls. There are many ways of achieving a similar result using .NET, and this is one of them. When an HTTP call succeeds, it adds a BasketProduct item to the result collection. Once all operations are completed, the endpoint returns the collection of BasketProduct objects, which contains all the combined information required by the user interface to display the shopping cart. Here’s the BasketProduct class:
public record class BasketProduct(int Id, string Name, decimal UnitPrice, int Quantity)
{
    public decimal TotalPrice { get; } = UnitPrice * Quantity;
}
The sequence of this endpoint is like this (the loop represents the Parallel.ForEachAsync method):
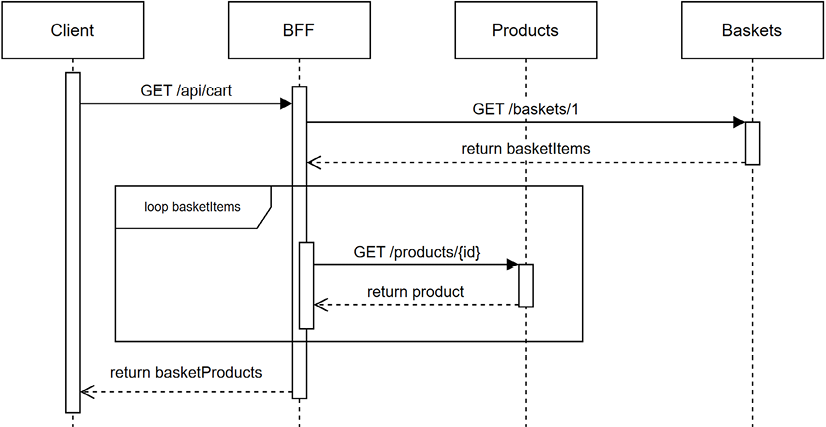
Figure 19.29: A sequence diagram representing the shopping cart endpoint interacting with the Products and the Baskets downstream services
Since the requests to the Products service are sent in parallel, we cannot predict the order they will complete. Here is an excerpt from the application log depicting what can happen (I omitted the logging code in the book, but it is available on GitHub):
trce: GetCart[0]
      Fetching product '3'.
trce: GetCart[0]
      Fetching product '2'.
trce: GetCart[0]
      Found product '2' (Apple).
trce: GetCart[0]
      Found product '3' (Habanero Pepper).
The preceding trace shows that we requested products 3 and 2 but received inverted responses (2 and 3). This is a possibility when running code in parallel.
When we send the following request to the BFF:
GET https://localhost:7254/api/cart
The BFF returns a response similar to the following:
HTTP/1.1 200 OK
Content-Type: application/json; charset=utf-8
[
  {
    "id": 3,
    "name": "Habanero Pepper",
    "unitPrice": 0.99,
    "quantity": 10,
    "totalPrice": 9.90
  },
  {
    "id": 2,
    "name": "Apple",
    "unitPrice": 0.79,
    "quantity": 5,
    "totalPrice": 3.95
  }
]
The preceding example showcases the aggregated result, simplifying the logic the client (UI) must implement to display the shopping cart.
Since we are not ordering the results, the items will not always be in the same order. As an exercise, you could sort the results using one of the existing properties, or add a property that saves when a customer adds the item to the cart and sort the items using this new property; the first item added is displayed first, and so on.
Let’s move to the last endpoint and explore how the BFF manages the shopping cart items.
Managing the shopping cart
One of the primary goals of our BFF is to reduce the frontend’s complexity. When examining the Baskets service, we realized it would add a bit of avoidable complexity if we were only to serve the raw operation, so instead, we decided to encapsulate all of the shopping cart logic behind a single endpoint. When a client sends a POST request to the api/cart endpoint, it:
- Adds the item when it is not yet in the shopping cart.
- Updates the item’s quantity when it is already in the shopping cart.
- Removes an item that has a quantity equal to 0 or less.
With this endpoint, the clients don’t have to worry about adding or updating. Here’s a simplified sequence diagram that represents this logic:
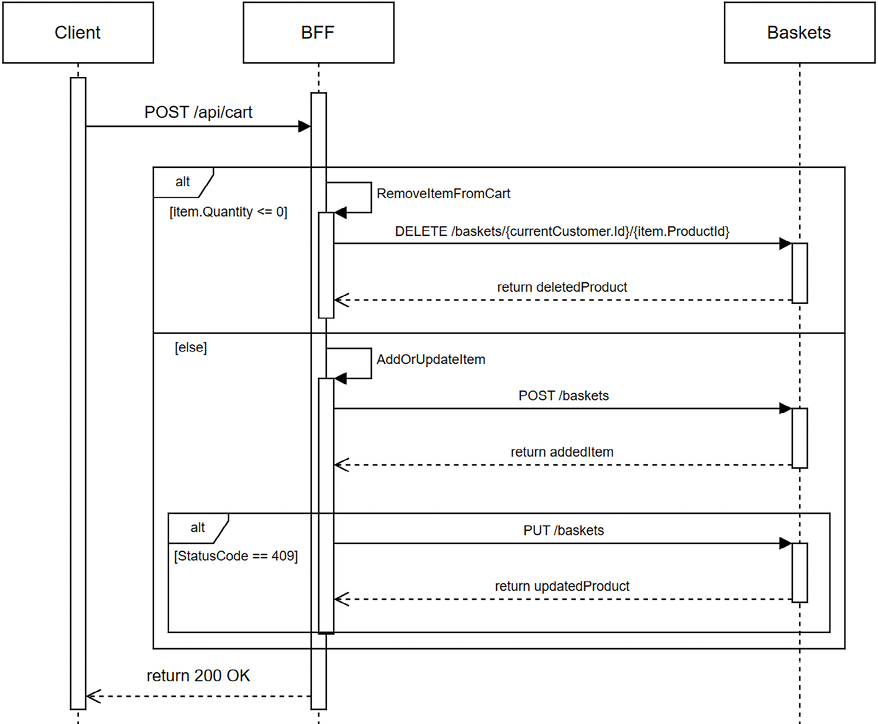
Figure 19.30: A sequence diagram that displays the high-level algorithm of the cart endpoint
As the diagram depicts, we call the remove endpoint if the quantity is inferior or equal to zero. Otherwise, we try to add the item to the basket. If the endpoint returns a 409 Conflict, we try to update the quantity. Here’s the code:
app.MapPost(
    "api/cart",
    async (UpdateCartItem item, IWebClient client, ICurrentCustomerService currentCustomer, CancellationToken cancellationToken) =>
    {
        if (item.Quantity <= 0)
        {
            await RemoveItemFromCart(
                item,
                client,
                currentCustomer,
                cancellationToken
            );
        }
        else
        {
            await AddOrUpdateItem(
                item,
                client,
                currentCustomer,
                cancellationToken
            );
        }
        return Results.Ok();
    }
);
The preceding code follows the same pattern but contains the previously explained logic. We explore the two highlighted methods next, starting with the RemoveItemFromCart method:
static async Task RemoveItemFromCart(UpdateCartItem item, IWebClient client, ICurrentCustomerService currentCustomer, CancellationToken cancellationToken)
{
    try
    {
        var result = await client.Baskets.RemoveProductFromCart(
            new Web.Features.Baskets.RemoveItem.Command(
                currentCustomer.Id,
                item.ProductId
            ),
            cancellationToken
        );
    }
    catch (ValidationApiException ex)
    {
        if (ex.StatusCode != HttpStatusCode.NotFound)
        {
            throw;
        }
    }
}
The highlighted code of the preceding block leverages the typed HTTP client and sends a remove item command to the Baskets service. If the item is not in the cart, the code ignores the error and continues. Why? Because it does not affect the business logic or the end-user experience. Maybe the customer clicked the remove or update button twice. However, the code propagates to the client any other error.
Let’s explore the AddOrUpdateItem method’s code:
static async Task AddOrUpdateItem(UpdateCartItem item, IWebClient client, ICurrentCustomerService currentCustomer, CancellationToken cancellationToken)
{
    try
    {
        // Add the product to the cart
        var result = await client.Baskets.AddProductToCart(
            new Web.Features.Baskets.AddItem.Command(
                currentCustomer.Id,
                item.ProductId,
                item.Quantity
            ),
            cancellationToken
        );
    }
    catch (ValidationApiException ex)
    {
        if (ex.StatusCode != HttpStatusCode.Conflict)
        {
            throw;
        }
        // Update the cart
        var result = await client.Baskets.UpdateProductQuantity(
            new Web.Features.Baskets.UpdateQuantity.Command(
                currentCustomer.Id,
                item.ProductId,
                item.Quantity
            ),
            cancellationToken
        );
    }
}
The preceding logic is very similar to the other method. It starts by adding the item to the cart. If it receives a 409 Conflict, it tries to update its quantity. Otherwise, it lets the exception bubble up the stack to let the exception middleware catch it later to uniformize the error messages.
With that code in place, we can send POST requests to the api/cart endpoint for adding, updating, and removing an item from the cart. The three operations return an empty 200 OK response.
Assuming we have an empty shopping cart, the following request adds 10 Habanero Peppers (id=3) to the shopping cart:
POST https://localhost:7254/api/cart
Content-Type: application/json
{
    "productId": 3,
    "quantity": 10
}
The following request adds 5 Apples (id=2) to the cart:
POST https://localhost:7254/api/cart
Content-Type: application/json
{
    "productId": 2,
    "quantity": 5
}
The following request updates the quantity to 20 Habanero Peppers (id=3):
POST https://localhost:7254/api/cart
Content-Type: application/json
{
    "productId": 3,
    "quantity": 20
}
The following request removes the Apples (id=2) from the cart:
POST https://localhost:7254/api/cart
Content-Type: application/json
{
    "productId": 2,
    "quantity": 0
}
Leaving us with 20 Habanero Peppers in our shopping cart (GET https://localhost:7254/api/cart):
[
  {
    "id": 3,
    "name": "Habanero Pepper",
    "unitPrice": 0.99,
    "quantity": 20,
    "totalPrice": 19.80
  }
]
The requests of the previous sequence are all in the same format, reaching the same endpoint but doing different things, which makes it very easy for the frontend client to manage.
If you prefer having the UI to manage the operations individually or want to implement a batch update feature, you can; this is only an example of what you can leverage a BFF for.
We are now done with the BFF service.
Conclusion
In this section, we learned about using the BFF design pattern to front a micro e-commerce web application. We discussed layering APIs and the advantages and disadvantages of a two-layer design. We autogenerated strongly typed HTTP clients using Refit, managed a shopping cart, and fetched the catalog from the BFF. We learned how to use a BFF to reduce complexity by moving domain logic from the frontend to the backend by implementing multiple Gateway patterns.
Here are a few benefits that we explored:
- The BFF pattern can significantly simplify the interaction between frontend and backend systems. It provides a layer of abstraction that can reduce the complexity of using low-level atomic APIs. It separates generic and domain-specific functionalities and promotes cleaner, more modular code.
- A BFF can act as a gateway that routes specific requests to relevant services, reducing the work the frontend has to perform. It can also serve as an aggregation gateway, gathering data from various services into a unified response. This process can simplify frontend development by reducing the complexity of the frontend and the number of separate calls the frontend must make. It can also reduce the payload size transported between the frontend and backend.
- Each BFF is tailored to a specific client, optimizing the frontend interaction.
- A BFF can handle issues in one domain without affecting the low-level APIs or the other applications, thus providing easier maintenance.
- A BFF can implement security logic, such as specific domain-aligned authentication and authorization rules.
Despite these benefits, using a BFF may also increase complexity and introduce potential performance overhead. Using a BFF is no different than any other pattern and must be counter-balanced and adapted to the specific needs of a project.
Next, we revisit CQRS on a distributed scale.


