(For more resources related to this topic, see here.)
Getting ready
We will create the ice and the snow using a single material, and mix them using a new technique. Select the iceberg mesh and add a new material to it.
How to do it...
We will now see the steps required to create the ice as well as the snow material.
Creating ice
The following are the steps to create ice:
- Add Glossy BSDF and Glass BSDF and mix them using a Mix Shader node. Let's put Glossy in the first socket and Glass in the second one.
- As input for the color of both the BSDFs, we will use a color Mix node with Color1 as white and Color2 as RGB 0.600, 1.00, 0.760.
- As input for the Fac value of the color Mix node, we will use a Voronoi Texture node with the Generated coordinates, Intensity mode, and Scale 100. Invert the color output using an Invert node and plug it into the Fac value of the color Mix node.
- As the input for Roughness of the Glossy BSDF, we will use the Layer Weight node's Facing output with a Blend value of 0.800. Then we will plug this into a ColorRamp node and set the color stops as shown in the following screenshot. The first color stop is HSV 0.000, 0.000, 0.090 and the second one is HSV 0.000, 0.000, 0.530. Remember to plug the ColorRamp node into the Glossy BSDF roughness socket.
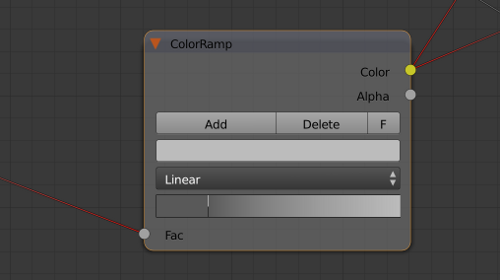
- Finally, set Glass BSDF node's IOR to 1.310 and Roughness to 0.080.
- Now we will create the Fac input for the Shader Mix node of the two BSDFs. Now we will add Noise Texture to the Generated coordinates with a Scale of 130, Detail of 1, and Distortion of 0.500. Plug this into a ColorRamp node and set the color stops as shown in the the following screenshot:
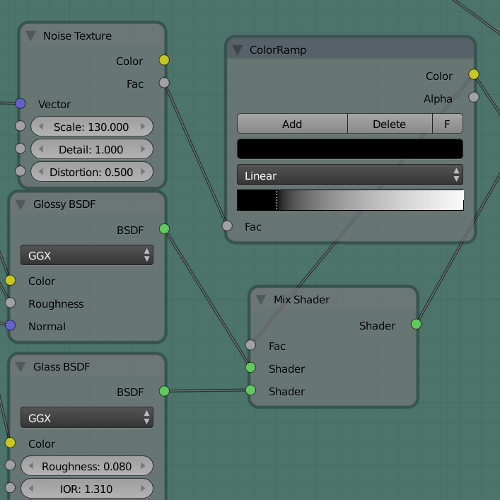
- Let's now add a Subsurface Scattering node. Set the mode to Compatible, the Scale to 10.000 and the Radius to 0.070, 0.070, 0.10.
- As a color input, let's add another color Mix node with Color1 as RGB 0.780, 0.960, 1.000 and Color2 as RGB 0.320, 0.450, 0.480.
- The Fac input for the color Mix node will be the same as for the color Mix node of the Glass and Glossy BSDFs. Now mix the SSS node with the mix of the other two BSDFs, using an Add Shader node.
- Now, we will create the normals for the shader. Add three Image Texture nodes. In the first one, let's load the IceScratches.jpg file. We will use the Generated coordinates with a Scale of XYZ 20.000, 20.000, 20.000. Set the projection mode to Box and the Blend to 0.500.
- In the second Image Texture node, load the ice_snow_DISP.pngfile, using the UV coordinates.
- Finally, load the ice_snow_NRM.png file in the third Image Texture node, using again the UV textures.
- Now let's mix the IceScratches.jpg with the ice_snow_DISP.png textures, using a color Mix node with the Displacement Texture into the Color1 socket and the scratches texture into the Color2 socket. Set the Fac value to 0.100.
- Plug the mix of the textures into the Height socket of a Bump node and then plug the ice_snow_NRM.png texture into the Color socket of a Normal Map node. Finally, plug this one into the Normal socket of the Bump node.
- Set the Normal Map node's Strength to 0.050, the Bump node's Strength to 0.500 and the Distance to 1.000.
- Plug the Bump node into all of the BSDFs we added so far.
- Frame every node we created and label the frame ICE.
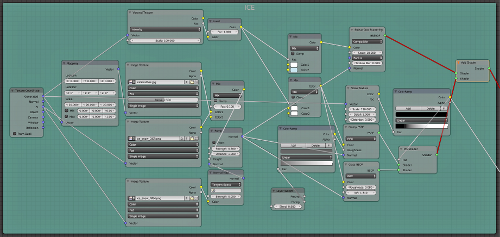
Creating snow
- The nodes we will add now will still be within the same material, but outside the ICE group we just created. Add a Glossy and a Subsurface Scatter BSDF nodes. Mix them using a Mix Shader node with 20 percent of influence from the Glossy BSDF node.
- Set both the colors to white. Also, set the SSS Scale to 3.00 and the Radius to 0.400, 0.400, 0.450. Set the Glossy mode to GGX and the Roughness to 0.600.
- Add a Noise Textures node and set Scale to 2000.000, Detail to 2.000 and Distortion to 0.000. We will use Generated coordinates for this texture.
- Connect the Fac output of the Noise Texture node to the Height socket of the Bump node and set the Strength to 0.200 and the Distance to 1.000. Connect the Normal output of the Noise Texture node to the Normal input of the Subsurface Scatter BSDF and Glossy BSDF nodes.
- Now let's mix the Mix Shader node of the Subsurface Scatter BSDF and Glossy BSDF nodes with an Emission shader using another Mix Shader node.
- Add new Noise Textures, this time with Scale as 2500.000, Detail as 2.000, and Distortion as 0.000.
- Connect the Fac output of the Noise Texture node to the Color input of the Gamma node, with a Gamma value of 8.000, and then add the Color output of the Gamma node to the Fac input of the ColorRamp node. We will set up the color stops as seen in the next screenshot.
- Connect the ColorRamp node's Color socket to the Fac socket of the previous Mix Shader node. Remember to use the Color output of the ColorRamp node.
- Frame all these nodes and label the frame SNOW.
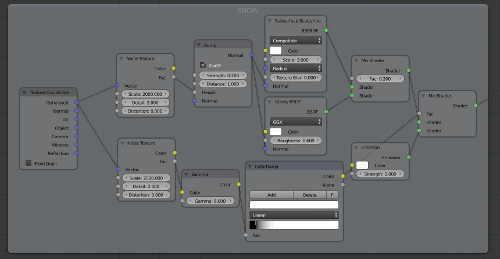
Mixing ice and snow
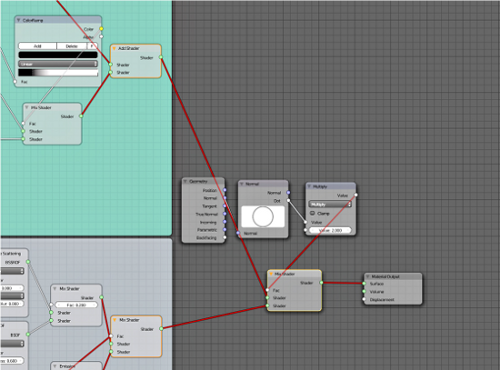
- Add a Geometry(Add | Input) and a Normal node (Add | Vectors). Connect the Normal output from the Geometry node to the Normal input of the Normal node.
- Now connect the Dot output of the Normal node to the first socket of a Multiply node and set the mode to Multiply and the second value to 2.000.
- Add a Mix shader node and connect the ICE frame into the first Shader socket and the SNOW frame into the second one. Finally, connect the output of the Multiply node into the Fac value of the Mix Shader node.
How it works...
Let's see the most interesting points of this material in detail. For the ice material, we used a Voronoi Texture node to create a pattern for the surface color. Then we mixed the Glass and Glossy BSDF nodes using a Noise Texture node to simulate both, the more and less transparent areas: for example, the ice may be less transparent due to some part of it being covered with snow, difference in purity of the water, or the thickness of the ice. Then we mixed the two BSDFs with a Subsurface Scatter node to simulate the dispersion of the lighting inside the ice. Note that we used the ColorRamp node quite often in order to fine tune the various mixing and inputs.
Unlock access to the largest independent learning library in Tech for FREE!
Get unlimited access to 7500+ expert-authored eBooks and video courses covering every tech area you can think of.
Renews at $19.99/month. Cancel anytime
The snow material is quite similar for the main concept, but is missing the refractive part of the ice. Here we did something else. We used a Noise Texture node with some tweaking (Gamma and ColorRamp) to make it really contrasted to mix an emission shader to the rest of the material. This will create a small emission dot over the snow surface that we will use in compositing to create the flakes.
It is really interesting how we mixed the two materials. We wanted the snow to be placed only on the flat surfaces of the iceberg, while we wanted the slopes to be just ice. To obtain this effect, we extracted the normal information about the mesh and used it to understand which part of the mesh is facing upward. We must imagine the normals to be working like the sunlight falling on the surface of the earth. Half of the sphere is in darkness, and half is hit by the light. We can decide from which direction the light hits the surface. Now imagine the same principle applied to the shape of our mesh. In this way we can create a white mask on the areas that are hit by the normal sphere direction. With the Normal node, we can orient this effect wherever we want. The default position of the sphere is exactly what we needed: the parts of the mesh that are faced upward are made white, while the rest of the mesh is black. Turning the sphere around will make the direction of the ramp that has been created, change accordingly.
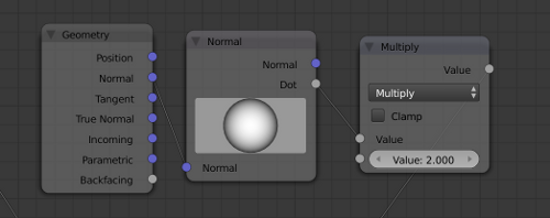
The sphere, maybe, is not the best way to set these kind of things as it lacks a bit of precision (as for the setting of the sky), but this will probably change in the future with something that allows more precise settings. Finally we used a Multiply node to multiply the value coming from the Normal node and increased the contrast of the mask.
There's more...
The normal method we just saw in this article is not the only way of mixing materials. Just some time ago, two new plugins have been developed. The first one allows us to obtain the same results we got in this article by creating a weight map or a vertex paint based on the slope of the mesh, while the second creates the same based on the altitude. This opens up many possibilities not only in terms of material creation, but also for the distribution of particle systems! The plugins can be downloaded from the following links, where we can find some instructions about them:
http://blenderthings.blogspot.nl/2013/09/height-to-vertex-weights-blender-addon.html
See also
In the following link, Andrew Price teaches us how to create a different kind of ice material; for example, material that is more suitable for ice cubes. Surely worth a watch!
 United States
 Great Britain
 India
India
 Germany
 France
 Canada
 Russia
 Spain
Spain
 Brazil
 Australia
 Singapore
 Hungary
 Ukraine
 Luxembourg
 Estonia
 Lithuania
 South Korea
 Turkey
 Switzerland
 Colombia
 Taiwan
 Chile
Chile
 Norway
 Ecuador
 Indonesia
 New Zealand
 Cyprus
 Denmark
 Finland
 Poland
 Malta
Malta
 Czechia
 Austria
 Sweden
 Italy
Italy
 Egypt
Egypt
 Belgium
 Portugal
 Slovenia
 Ireland
 Romania
 Greece
 Argentina
 Netherlands
 Bulgaria
 Latvia
 South Africa
 Malaysia
 Japan
Japan
 Slovakia
 Philippines
 Mexico
 Thailand


