Getting PowerShell 7
In this section, we’ll look at some of the ways to get PowerShell onto your machine, where it goes and why, and how you can control aspects of your installation. This chapter will only cover installation on Windows; for detailed installation on Linux, macOS, and ARM systems, please have a read of Chapter 14, PowerShell 7 for Linux and macOS, or Chapter 15, PowerShell 7 and the Raspberry Pi, and come back for the next two sections of this chapter.
It’s possible to have more than one version of PowerShell running simultaneously on your machine – I usually have three at once: Windows PowerShell, PowerShell 7 (current version), and PowerShell 7 Preview. This is not just for when I’m writing a book – we need to know that the scripts we write will run in different environments and rewrite them if necessary. It’s also useful to be able to control the installation when you’re intending to run PowerShell on a remote machine that may not have it installed yet. Windows PowerShell is included in the Windows operating system and is installed in the \Windows\system32 folder; that’s where it lives, and you can’t move it anywhere else. In contrast, PowerShell 7 can be installed wherever you like, within reason. We’re going to cover the three most common methods of installation:
- Installation from an
.msifile with Windows installer - Installation from a
.zipfile - Installation with winget
There are two other methods that we will cover briefly: installing from the Microsoft Store, and installing as a .NET Global tool.
If you want to experiment a little, and you have Windows 10 Pro or Enterprise, then you can enable the Windows Sandbox feature in Control Panel | Programs and Features | Turn Windows features on or off.
This will give you a completely blank, secure Windows environment to play around in. Be careful – when you turn it off, it’s gone for good. The next time you turn it on, all your changes will be lost:
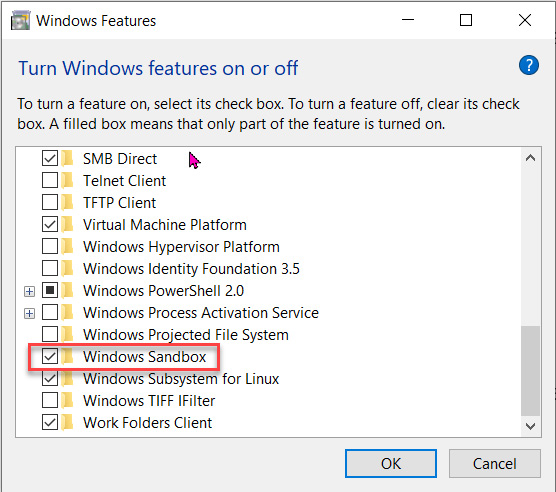
Figure 1.2 – Turning on Windows Sandbox
Full details of the requirements for running Windows Sandbox can be found here: https://docs.microsoft.com/en-us/Windows/security/threat-protection/Windows-sandbox/Windows-sandbox-overview.
Let’s get started. Make sure you have met the technical requirements listed at the beginning of the chapter.
Installation from an .msi file
All of the official PowerShell distributions can be found on the PowerShell GitHub page at https://github.com/PowerShell/PowerShell:
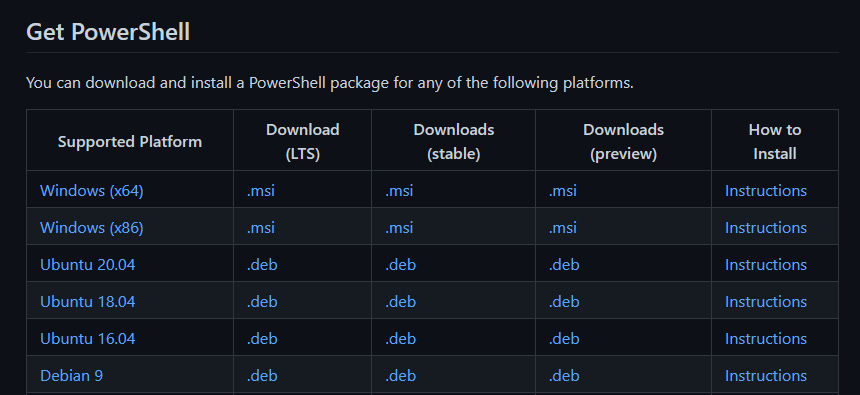
Figure 1.3 – Get PowerShell from the GitHub page
As you can see, for most operating systems and platforms, there are three types of release: LTS, stable, and preview. LTS stands for Long Term Support. LTS releases come out on a slow cadence, to ensure stability in environments that are risk-averse, and they usually only contain critical security updates and software fixes, not new features. The PowerShell LTS releases are based on the underlying LTS version of .NET. The preview release is the next version of PowerShell. It may have exciting new features, but it will also likely be unstable and have some flaws. Stable releases are updated every month or so and may include new functionality, as well as software fixes and security updates. Each release is supported for six months after the next release.
Let’s go ahead and install the most common release, the stable release for Windows x64:
- Browse to the GitHub Releases page for PowerShell here: https://github.com/PowerShell/PowerShell.
- Click to download the stable
.msipackage for Windows x64. - Locate the
.msifile in yourDownloadsfolder and run it. This will start the setup wizard. - The first choice you must make is the install location. By default, it will install into a numbered folder under
C:\Program Files\PowerShell, where the number matches the major version – in our case,7. If you are installing a preview version, then the folder will have a-previewsuffix. This is a pretty good location, but you may want to put it somewhere else, for example, if you are running multiple versions of PowerShell side by side. Go ahead and accept the default this time:
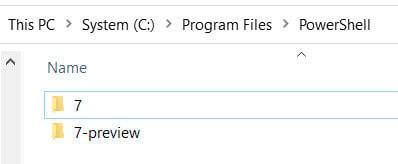
Figure 1.4 – The default install location
- Now we get to the Optional Actions menu:
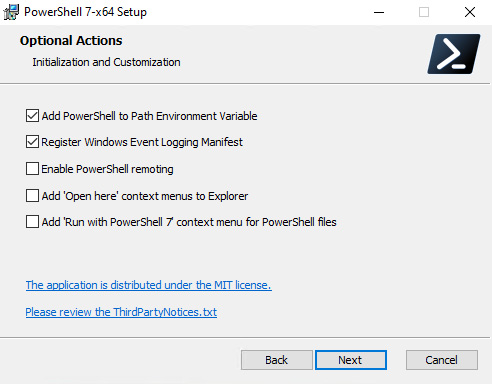
Figure 1.5 – Optional Actions
There are five options here:
- Add PowerShell to Path Environment Variable: You will almost certainly want to choose this. With this option enabled, you can start PowerShell from any location. Be aware that if you install a different version side by side, it will overwrite the installation path variable and you will need to manually navigate to the location of
pwsh.exeto run this one. - Register Windows Event Logging Manifest: You will want to enable this as well. This will create a new Windows Event log called PowerShell Core and start logging PowerShell events to it.
- Enable PowerShell remoting: Enabling PowerShell remoting will make the machine listen for incoming connections from PowerShell sessions. This is obviously a bit of a security vulnerability, so you should only enable it if you need it and your machine is on a private network. You don’t need to enable it to connect to remote sessions on other machines.
- Add ‘Open here’ context menus to Explorer: This will allow you to open a PowerShell session in a folder in File Explorer – the PowerShell session will open with the path set to the folder you selected.
- Add ‘Run with PowerShell 7’ context menu for PowerShell files: This will allow you to right-click a file and open it with PowerShell 7. For reasons we will see later, this might not always be desirable.
- After Optional Actions, we come to the Microsoft Update option. You can use Microsoft Update to keep PowerShell updated; this is highly recommended as it can automatically download security patches for you and apply them according to your existing update schedule. Be aware that this setting can be overridden by group policy if you are working in a domain-joined environment. There are two checkboxes; the first enables updates for PowerShell, while the second enables Microsoft Update on the system. Note that unchecking this box only disables Microsoft Update; if your environment uses a configuration manager such as Windows Software Update Services (WSUS) or System Center Configuration Manager (SCCM), then they will still work.
- Finally, we’re ready to install by pressing the Install button. This is a short process and should be done in a minute or two. Click Finish, and we’re all set.
There is an alternative to using the GUI. You can run the .msi file from the command line with msiexec.exe, as documented here: https://docs.microsoft.com/en-gb/powershell/scripting/install/installing-powershell-on-Windows?view=powershell-7.2#install-the-msi-package-from-the-command-line.
To silently install PowerShell on Windows Sandbox as you’ve just been shown, you can run the following:
msiexec.exe /package c:\Users\WDAGUtilityAccount\Downloads\PowerShell-7.2.1-win-x64.msi /quiet REGISTER_MANIFEST=1 USE_MU=1 ENABLE_MU=1
Notice that there is no property for enabling or disabling Add PowerShell to Path Environment Variable. If you run the .msi file from the command line, then PowerShell will automatically get added. Because we’ve used the /quiet switch, there is no output to this command, but if it is successful, then you will see PowerShell in your Start menu.
Activity 1
How might you enable the file context menu when installing PowerShell from an .msi file using the command line? (Hint: Check the link in the earlier paragraph to find out.)
Installation from the .zip file
Another popular way to install PowerShell is from the .zip file. With this method, we simply extract the binaries and associated files to a suitable folder. The disadvantage is that the prerequisite checking and options that are available with the .msi install are lost; for instance, you can’t automatically add PowerShell to the PATH environment variable or enable PowerShell remoting. The advantage is that it is much easier to script the installation of PowerShell as part of a DevOps or Infrastructure as Code pipeline, and you can enable other features as part of the script.
In Windows, there’s no native way to install a file from the internet via scripting. You need to either already have PowerShell (which you automatically do in the form of Windows PowerShell on a Windows machine), or install a tool such as curl.
Here’s how you do it with Windows PowerShell:
Invoke-WebRequest https://github.com/PowerShell/PowerShell/releases/download/v7.2.1/PowerShell-7.2.1-win-x64.zip
If you run the preceding cmdlet, then you should see output like this. Notice that it’s an HTTP response, and so a StatusCode result of 200 is good:
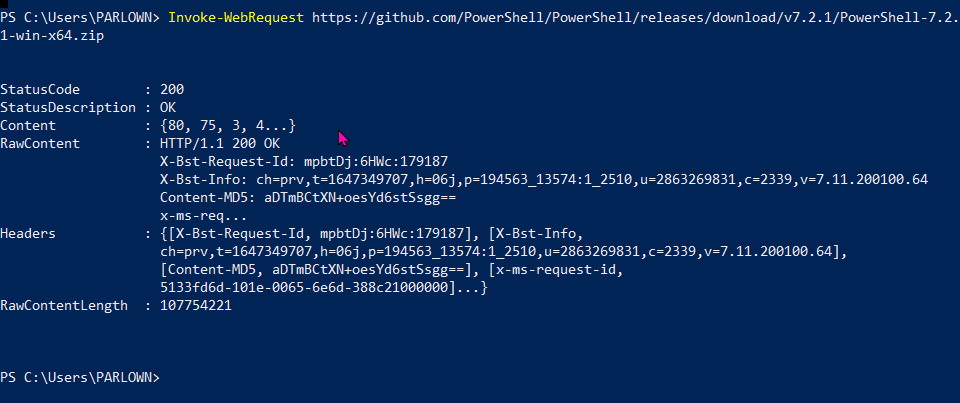
Figure 1.6 – Downloading PowerShell 7 with Windows PowerShell
You can run the entire process like this with four lines of code:
New-Item -Path c:\scratch\myPowershell\7.2 -ItemType Directory
Invoke-WebRequest https://github.com/PowerShell/PowerShell/releases/download/v7.2.1/PowerShell-7.2.1-win-x64.zip -OutFile C:\scratch\myPowershell\7.2\PowerShell-7.2.1-win-x64.zip
Expand-Archive C:\scratch\myPowershell\7.2\PowerShell-7.2.1-win-x64.zip -DestinationPath C:\scratch\myPowershell\7.2\
Remove-Item C:\scratch\myPowershell\7.2\PowerShell-7.2.1-win-x64.zip
Don’t worry too much about the preceding commands – we’ll be covering all of them in due course. In summary, the first line creates a new folder. The second line downloads the .zip package from GitHub to your new folder. The third line unzips everything, making it ready for you to run, and the fourth line removes the downloaded package.
There are two errors you may experience with this. Firstly, you may see a red error message:
Invoke-WebRequest : The request was aborted: Could not create SSL/TLS secure channel"
This is because, by default, Windows PowerShell will use TLS v1.0, and many websites no longer accept this protocol. If you do see this, run the following .NET code and try again:
[Net.ServicePointManager]::SecurityProtocol = "Tls, Tls11, Tls12, Ssl3"
The other error you may see is a message saying this:
Invoke-WebRequest : The response content cannot be parsed because the Internet Explorer engine is not available, or Internet Explorer's first-launch configuration is not complete. Specify the UseBasicParsing parameter and try again
In this case, run the Invoke-WebRequest cmdlet with the –UseBasicParsing parameter:
Invoke-WebRequest https://github.com/PowerShell/PowerShell/releases/download/v7.2.1/PowerShell-7.2.1-win-x64.zip -UseBasicParsing
Replace the second line of the script with this line. It’s exactly the same but adds the –UseBasicParsing parameter.
Installation with winget
winget, also known as the Windows Package Manager, is a free, open source package manager from Microsoft for Windows Clients. It is bundled with Windows 11 and may be downloaded for Windows 10 via the Microsoft Store. It is similar in functionality to Linux package managers such as APT, YUM, and DNF. It supports .exe, .msi, and .msix packages – you can’t use it to install the .zip release. When you run winget, it searches for, downloads, and installs the PowerShell .msi release of your choice. You do it like this:
- First, run a search for PowerShell packages. From the Windows PowerShell Command Prompt, run this line:
winget search microsoft.powershell
This will return the versions of PowerShell available to winget.
- You then need to install a package. I’m choosing to install the preview by running the following:
winget install --id microsoft.powershell.preview --source winget
And that’s it. There are a few things to note here. Firstly, you’re installing the .msi file, so unless you suppress them, you will see several GUI messages. You can do this with the --silent switch. Unless you are happy with the default choices, you will also need a way to pass parameters to the .msi file you are calling. You can do this with the –-override switch, and then by passing the command-line switches for the .msi package that we looked at before. Secondly, if you have User Access Control enabled, you will need to give permission for PowerShell to be installed. If you’re using the --silent switch, then you won’t see this prompt. If you want to do a silent install, you’ll need to run Windows PowerShell with administrator privileges.
Here’s how the whole install looks if you run it from a Windows PowerShell command line with administrator privileges:
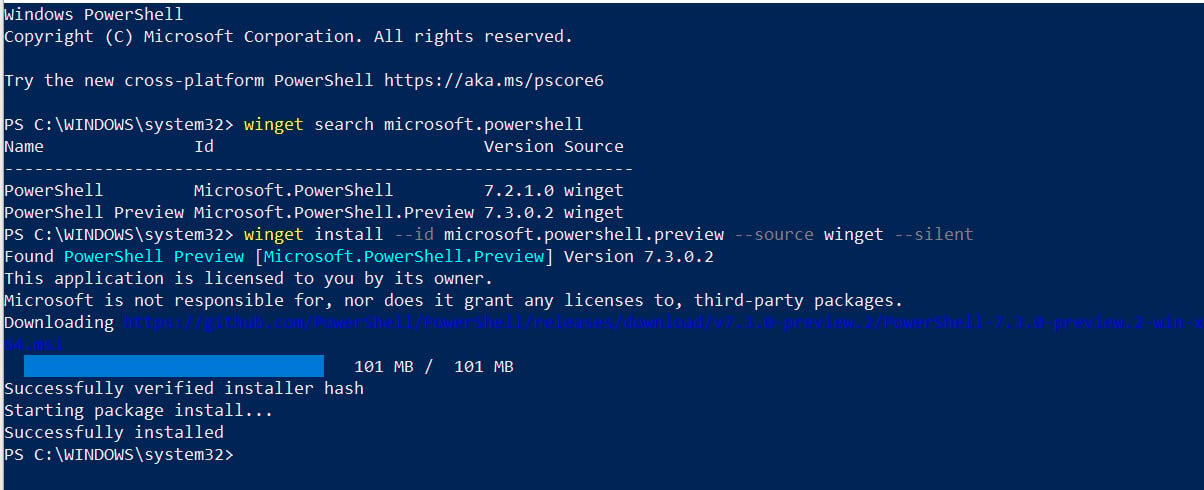
Figure 1.7 – Silently installing PowerShell with winget
The main advantage of winget is that it has its own repository for community-created packages; anyone can bundle an app by writing a manifest and uploading it. The repository is secured with Microsoft SmartScreen to stop malicious code from finding its way into the repository. There’s a lot more on winget here:
https://docs.microsoft.com/en-us/Windows/package-manager/winget/.
In summary, you’re not really doing anything with winget that you didn’t do by running msiexec.exe previously, but it’s a bit newer and cooler, has a useful repository, and is slightly easier to use. In a couple of years, we’ll wonder how we ever did without it, especially if they make it available on Windows servers.
Other ways to install
There are two other ways to install PowerShell that we should discuss. Neither is likely to be applicable to us. Firstly, if you have the .NET Software Development Kit (SDK) installed, then we can use that to install PowerShell as a global tool. This is only really useful for software developers, and it doesn’t make much sense to install the SDK just for PowerShell.
The other way you can install PowerShell on Windows is through the Microsoft Store as an app. The big drawback to this method is that Store apps run in a sandbox environment that restricts access to the application’s root folder. This means that several PowerShell features just won’t work properly.
Note
A sandbox is not necessarily the same as Windows Sandbox. The generic term “sandbox” refers to a secure computing environment with separate resources, meaning that whatever is running in there cannot interfere with anything outside the sandbox. Windows Sandbox is a specific example of a generic sandbox.


