Working with selections
This section will teach us to use some of the most important features of creating selection sets. Becoming efficient with creating and using selection sets is crucial to improving your overall efficiency with AutoCAD.
Control the Lasso
First, let’s learn how to use the new Lasso selection method to gather up those objects and corral them into place quickly! Lasso is available, by default, when you left-click and drag the cursor around existing objects:
- Open the
2-2_SelectingObjects.dwgfile. - Using the In-Canvas View Controls, restore the Custom Model Views | 1-Using LASSO to apply the named view to the current viewport.
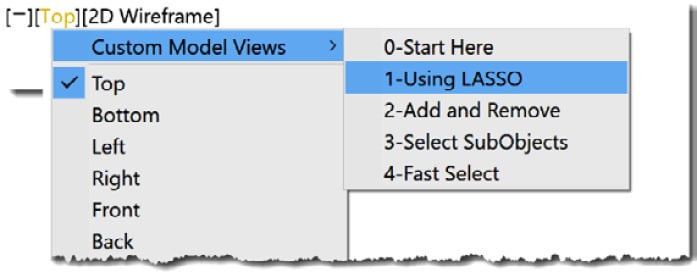
Figure 2.6: Custom Model Views | 1-Using Lasso
- Left-click and drag the cursor around the objects to select.
- Release the left mouse button to complete the selection. Use any command to modify the selection.
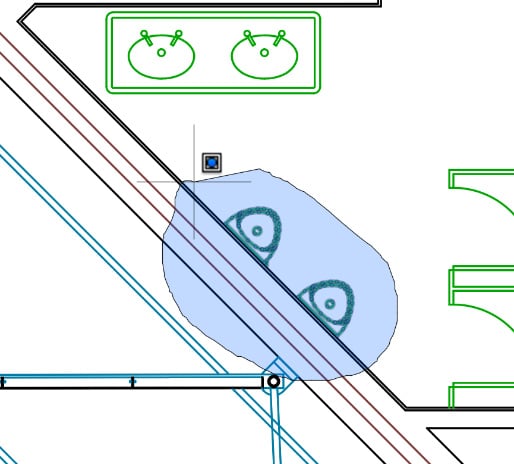
Figure 2.7: Lasso objects
Note
Remember, when selecting objects, drag right-to-left (counter-clockwise) to use an implied “green” crossing (overlap) selection, and drag left-to-right (clockwise) to use an implied “blue” window (inside) selection.
Many users find the Lasso selection method too intrusive to use regularly. You can disable it using Options | Selection | Selection Modes.
I prefer to disable it by default and assign a shortcut key to enable it when needed, as demonstrated in the following steps:
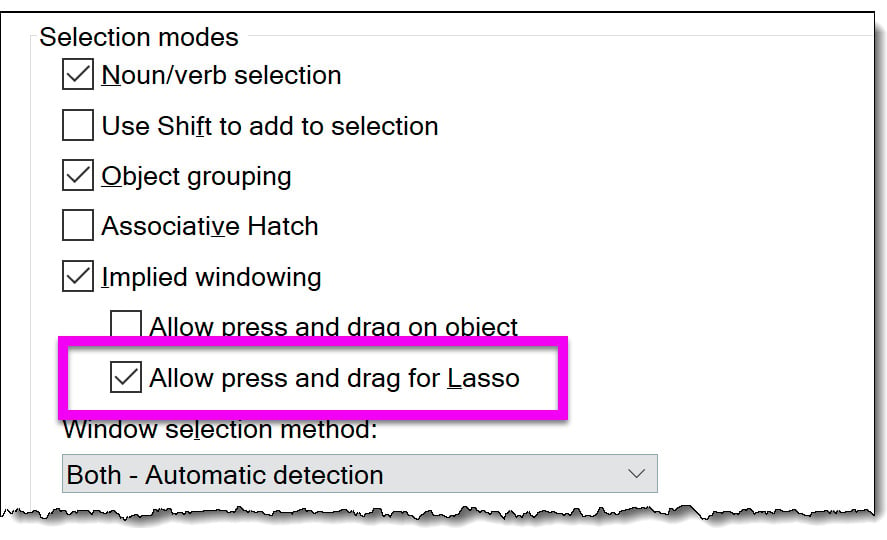
Figure 2.8: Lasso options
Assigning Lasso to a shortcut key
Before assigning a shortcut key, you must learn how to enable and disable the Lasso feature using a system variable. Using the following system variable, we can change PICKAUTO to 1 to disable the Lasso feature:
|
PICKAUTO |
|
|
Controls automatic windowing selection options for selecting objects. Type: Bitcode Saved In: Registry Initial Value: 5 |
|
|
0 |
Turns off the automatic window and crossing selection. |
|
1 |
A Window or Crossing selection begins even if the cursor is not directly over an object when you Left-click and drag. |
|
2 |
A window or crossing selection begins even if the cursor is directly over an object. This option applies only when you select objects before you start a command using the Left-Click and drag method. |
|
4 |
Begins a window or crossing lasso selection if the cursor is not directly over an object when you click and drag. Using Left-Click and drag will begin a free-form fence selection if the Fence option is active. |
In the next exercise, you will learn how to make a shortcut key to toggle the Lasso selection setting ON and OFF.
Creating a Lasso shortcut key
There are several methods for creating a custom command in AutoCAD. For this example, we will record an ACTION MACRO and assign it to a shortcut key.
First, we must record the macros to turn the Lasso setting ON and OFF using the Options dialog.
- Continue using the
2-2_SelectingObjects.dwgfile.
Macro Lasso-OFF
- Using the Manage ribbon and the Action Recorder panel, select the Record command.

- Using the Command Line, key in the
PICKAUTOsystem variable. - Key in the new
0value to turn OFF the Lasso selection method. - Using the ribbon, select the Stop command.
- Using the Action Macro dialog, key in the name
Lasso-OFF. - Click OK to save the new macro.
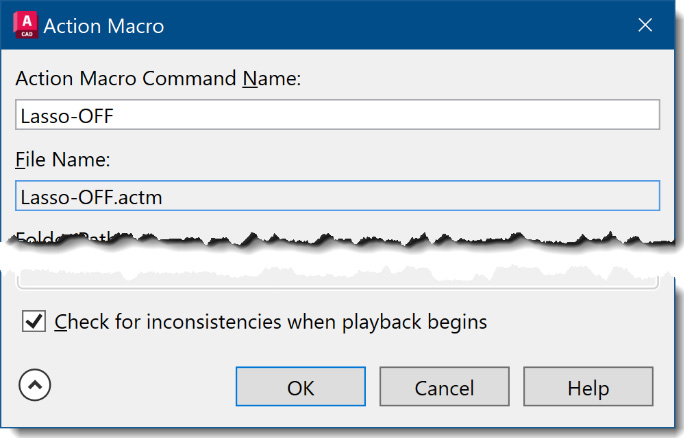
Figure 2.9: Lasso-OFF Macro
Macro Lasso-ON
- Using the ribbon, select the Record command.
- Using the Command Line, key in the
PICKAUTOsystem variable. - Key in the new
5value to turn ON the Lasso selection method ON. - Using the ribbon, select the Stop command.
- Using the Action Macro dialog, key in the name
Lasso-ON. - Click OK to save the new macro.
Next, we will learn to assign the two new macros to custom shortcut keys.
Creating shortcut keys
|
CUI |
Command Locations |
|
Ribbon |
Manage | Customization | User Interface |
|
Command Line |
CUI (CUI) |
Let’s create a new shortcut keys for our custom commands for Lasso-ON and Lasso-OFF.
- Continue using the
2-2_SelectingObjects.dwgfile. - Using the Command Line, key in the
CUIcommand. - Using the Customize User Interface dialog, select the (current) workspace from the TOP LEFT panel.
- Expand the Keyboard Shortcuts item in the list and expand Shortcut Keys.
Note
At the time of this printing, ACTION MACROS do not display in the CUI | Command List. To overcome this, we must create our own commands and assign the ACTION MACROS to the new commands using the Create a new command button.
- Using the LOWER LEFT portion of the dialog, locate the Command List section, and click the Create a new command button.

- Using the Properties section, located in the LOWER LEFT portion of the dialog, change the Name field from
Command1toLasso-ON. - Change the Macro field from
^C^Cto^C^C_Lasso-ONfor Lasso-ON and from^C^Cto^C^C_Lasso-OFFfor Lasso-OFF.
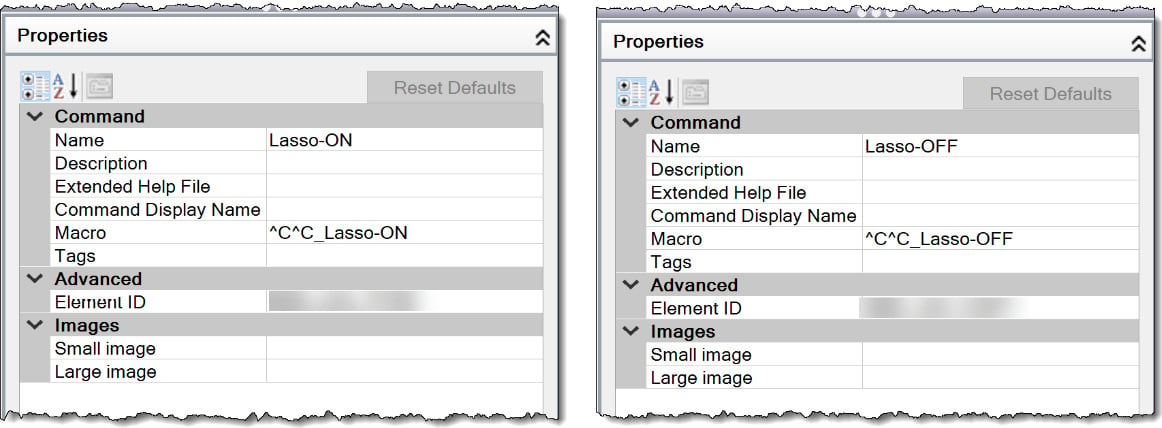
Figure 2.10: Custom commands-CUI
Note
The following syntax is used for macros:
^C This represents pressing the Esc key.
_ (underscore) This allows commands to work across multiple languages.
; (semi-colon) This represents pressing the Enter key.
. (period) This instructs AutoCAD to use the standard definition of a command.
\ (backslash) This represents a “pause” for user input.
(space) This represents pressing the Spacebar key.
Now that the new Lasso commands are available in the CUI dialog, we can assign them to keyboard shortcuts.
- Using the Command List search field, located in the LOWER LEFT section of the dialog, drag and drop the Lasso-ON command into the Keyboard Shortcuts | Shortcut Keys list.
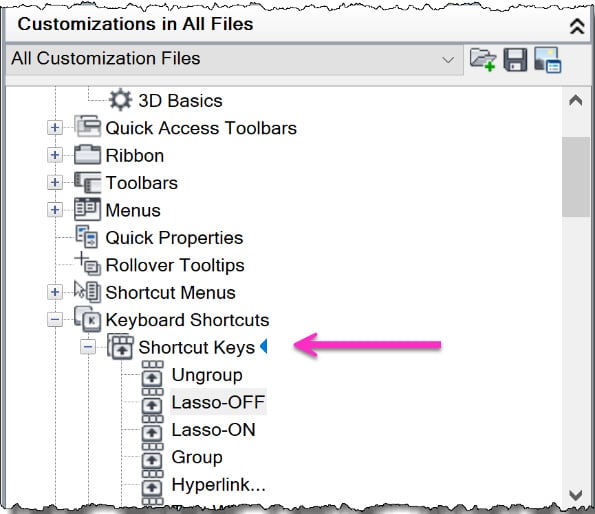
Figure 2.11: Drag-and-drop to Shortcut Key
- Repeat Step 5-8 from the previous exercise to create the Lasso-OFF command.
- Click Apply to save these changes.
Now, we will assign specific shortcut keys to these commands.
- Using the Keyboard Shortcuts | Shortcut Keys list, select Lasso-ON.
- Using the Properties section, located in the LOWER RIGHT portion of the dialog, select the Key(s) value, and click the Browse button to open the Shortcut Keys dialog.
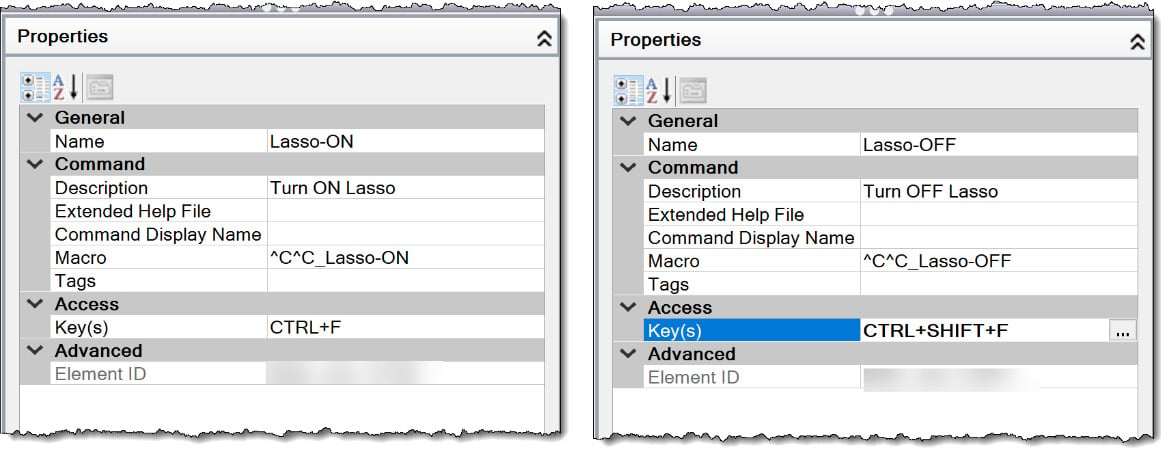
Figure 2.12: The Lasso ON/OFF shortcut key properties
Note
When defining the actual shortcut keys, select the Browse … button and key in the desired shortcut keys. If you do not get the correct keys when using the keyboard to set the shortcut keys, verify that the Caps Lock key is not activated on the keyboard.
- Click Apply to save these changes.
- Click OK to close the dialog.
- Test both keyboard shortcuts for Lasso ON (Ctrl + F) and Lasso OFF (Ctrl + Shift + F).
Note
There is also a FENCE option available during any selection operation. Key in F in the Command Line at the Select Objects prompt and left-click and drag a line through the objects you want to select. Repeat using the left mouse button to add additional fence selections.
In the next section, we will learn how to add and remove objects from an existing selection set.
Adding and removing objects
When working with an existing selection set, do you always get the perfect selection? Of course not! Do you use all the shortcut methods available for removing and adding objects to a selection set? Let’s find out:
- Continue using the
2-2_SelectingObjects.dwgfile. - Using the In-Canvas View Controls, restore the Custom Model Views | 2-Add and Remove to apply the named view to the current viewport.
- Drag a Window or Crossing selection around multiple objects in the drawing to select one of the elevator bays.
- Use the Shift key to add and remove objects from the selection set if you accidentally miss or select too many objects.
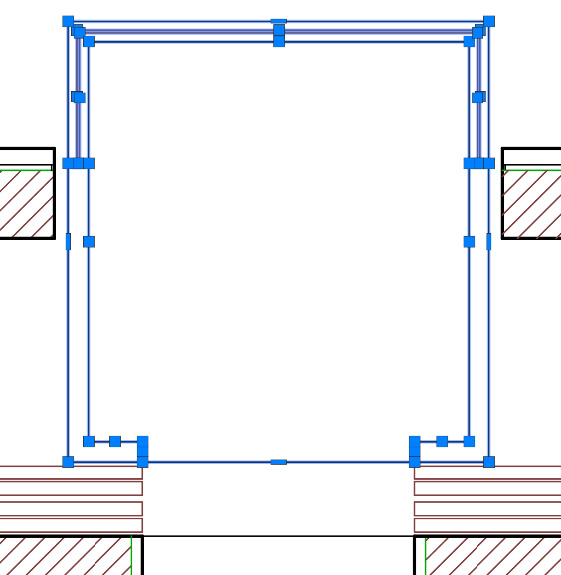
Figure 2.13: Select SubObjects
Select SubObjects
In this exercise, we want to remove the BOTTOM line that is displayed at the elevator door opening:
- Continue using the
2-2_SelectingObjects.dwgfile. - Using the In-Canvas View Controls, restore the Custom Model Views | 3-Select SubObjects to apply the named view to the current viewport.
- Select the exterior RECTANGLE object around the exterior of the elevators.
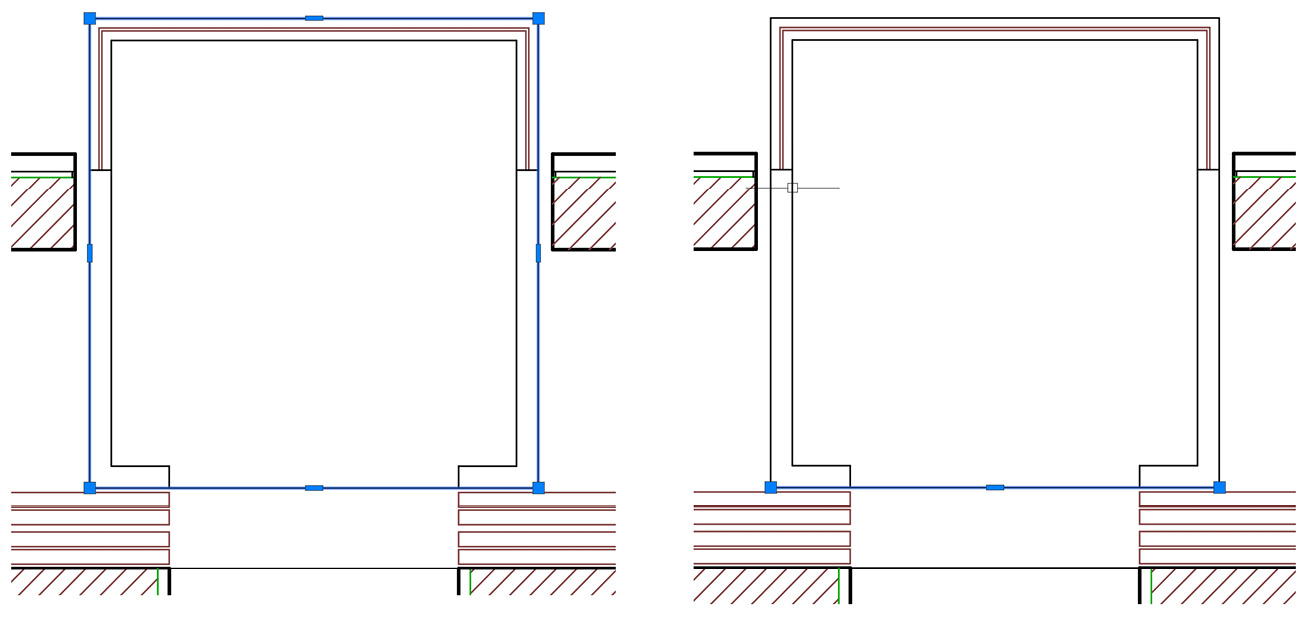
Figure 2.14: Selecting SubObjects
As you can see, the polyline is closed and cannot be deleted without deleting the entire polyline. I want to delete just the BOTTOM edge of the rectangle shape to allow for the door opening. Most users would use the EXPLODE command to break up the closed polyline and then use the DELETE command to remove the BOTTOM line. However, there is a quicker way! You can use the SubObject selection feature to select one object in the polyline to remove it.
- Use the Ctrl key to select the BOTTOM edge as a SubObject of the closed polyline. Then, with just the bottom edge selected, use the Delete key to delete the selected line. Using this shortcut, you can avoid using additional commands such as EXPLODE, ERASE, and JOIN.
In the next exercise, we will learn how to control the display of selected objects in AutoCAD.
Glowing selection effect
When selecting objects in AutoCAD, the objects are displayed using the “glowing” effect by default. If you do not like the “glowing” effect of the selected objects and you prefer the old “dashed” effect of the selected objects, you can modify the selection dynamic effects, and disable the “glowing” effect using the SELECTIONEFFECT system variable.
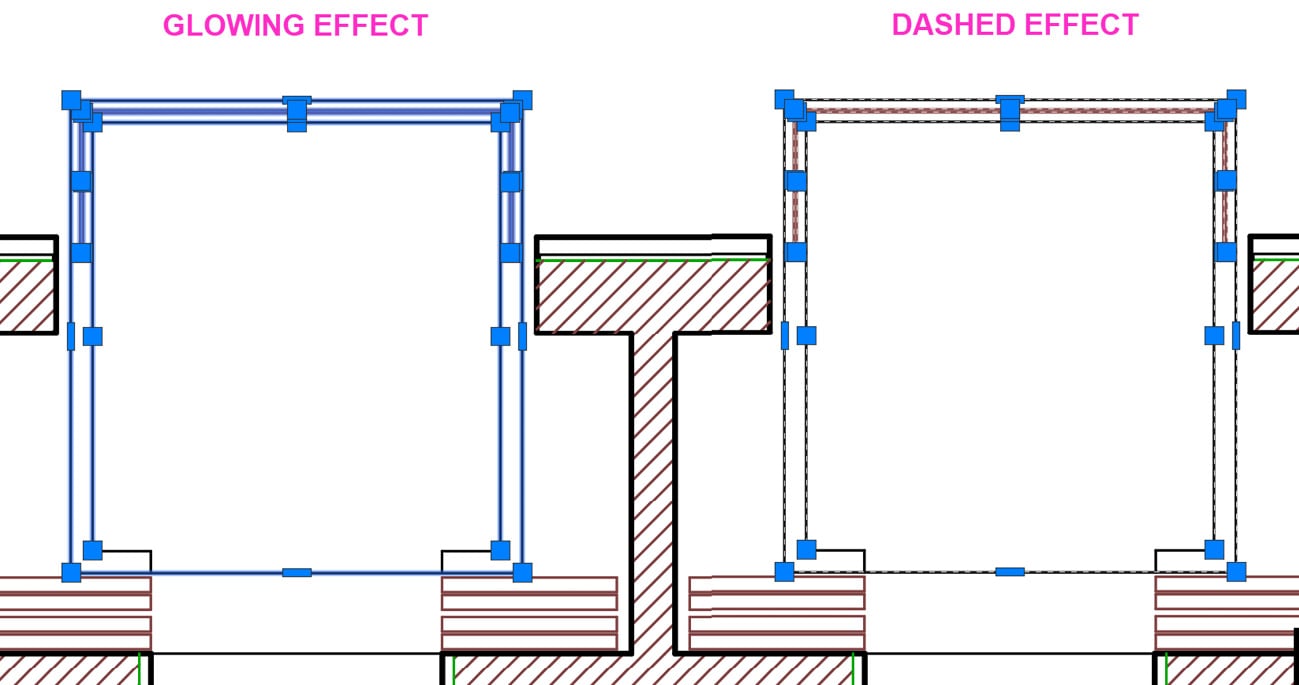
Figure 2.15: Glowing selection effect
|
SELECTIONEFFECT |
|
|
Specifies the visual effect used when objects are selected. Saved In: Registry Type: Integer |
|
|
0 |
Dashed lines |
|
1 (default) |
When hardware acceleration is on, displays a glowing line highlighting effect |
In the next exercise, we will learn how to use the Express Tool, Fast Select, to easily select all “touching” objects in a drawing.
Fast Select (Express Tool)
Selecting objects can be tricky sometimes when trying to avoid or select multiple objects. Use the Express Tool, Fast Select, to select all objects that “touch” a selected object. This command will select lines, polylines, circles, arcs, attribute definitions, text, mtext, ellipses, and images. To use this command, follow these steps:
|
FS |
Command Locations |
|
Command Line |
FS |
- Continue using the
2-2_SelectingObjects.dwgfile. - Using the In-Canvas View Controls, restore the Custom Model Views | 4-Fast Select to apply the named view to the current viewport.
- Using the Command Line, key in
FSto run the Fast Select command. - Select the perimeter lines of lots 9-15 at P1 and all the connected lines are selected automatically regardless of their properties.
- Use the Esc key to clear the current selection set.
Note
Use the key in 'FS to use this command “transparently” inside of another command at the SELECT OBJECTS prompt.
The behavior of the FS command is controlled using the FSMODE command:
|
FSMODE |
Command Locations |
|
Command Line |
FSMODE |
|
ON |
Selects all the objects that touch the selected object and any objects that are touching those objects. |
|
OFF |
Selects only the objects that are touching the selected object. |
- Using the Command Line, key in
FSMODEand key inONto change the functionality of the Fast Select command. With FSMODE set to ON, all the objects that are touching the selected object, and all objects that are touching those objects, are selected. - Using the Command Line, key in
FSto run the Fast Select command again. - Select the previously selected line at P1, and all the connected lines, and their touching objects, are selected automatically regardless of their properties.

Figure 2.16: The Fast Select results
- Use the Esc key to clear the current selection set.
After completing this exercise, you can fully take advantage of the selection tools provided in AutoCAD. With these additional commands, you can now better control your selection sets and common manipulations.
In the next section, we will take a look at how to use the OBJECT ISOLATION to control the view of objects in a drawing.
Using object isolation
When working in drawings with thousands of objects, using layers to “filter” your view display may not be enough. You can use the OBJECT ISOLATE tools to filter just what you need and minimize your view extent and your frustration. Working with a minimum number of objects displayed not only speeds up AutoCAD but also improves the tasks you need to perform.
Isolate objects
Use the ISOLATE OBJECTS command to filter the display of selected objects and turn off all objects not in the current selection set.
- Continue using the
2-2_SelectingObjects.dwgfile. - Select several objects in the view window and, using the Status Bar, left-click on the Isolate Objects icon
 to access the Isolate Objects command.
Only the selected objects are displayed in the drawing. All other objects are temporarily “hidden” from the view. The ISOLATE OBJECTS icon also changes to a blueish appearance, indicating that some objects in the file are hidden. ![]()
With objects isolated in the drawing, you have the following command options available when you left-click on the ISOLATE OBJECTS command in the Status Bar.
- Add Additional Objects: Create a new object selection set to isolate
- Hide Objects: This will hide additional objects in the view
- End Object Isolation: Use this to restore all objects in the view
With a selection set active, you can also access the ISOLATE OBJECTS command using the right-click menu:
- Continue using the
2-2_SelectingObjects.dwgfile. - Left-click on the Isolate Objects command
 in the Status Bar to access the End Object Isolation command and restore all objects in the view.
 - Again, select several objects in the view window and right-click to access the Isolate | Isolate Objects command.
- Right-click again to access the Isolate | Isolate Objects, Isolate | Hide Objects, or Isolate | End Object Isolation command.
In the next section, we will look at how to use Grips in AutoCAD more efficiently.


