A fundamental part of every application is the interaction with the user. Vue has shorthand to intercept most user events and connect them to relevant actions.
Reacting to events such as clicks and keystrokes
Getting Ready
To successfully complete this recipe, you should know how to create a list. If you don't, check out recipe Filtering a list with a computed property in Chapter 2, Basic Vue.js Features.
How to do it...
The following bit of code shows how to react to a click event:
- Fill in the following HTML:
        <div id="app">
          <button v-on:click="toast">Toast bread</button>
        </div>
- As for the JavaScript, write the following:
new Vue({el:'#app', methods:{toast(){alert('Tosted!')}}})
- Run the code! An event listener will be installed on the button.
- Click the button and you should see a popup that says Toasted!
How it works...
Running the preceding code will install an event handler on the button. The syntax is v-on:DOMevent="methodEventHandler". The handler must be a method, that is, a function in the methods option. In the preceding example, toast is the handler.
Two-way data binding
The v-on attribute will have you covered in most cases, especially if the event comes from the element. On the other hand, it may sometimes be too verbose for some tasks.
For example, if we had a textbox and we wanted to update a variable with the content of the textbox and ensure that the textbox always has an updated value of the variable (which is called two-way data binding), we would have to write a couple of handlers.
Instead, this operation is carried out by the v-model attribute, as the following code shows:
<div id="app">
  <button v-on:click="toast">Toast bread</button>
  <input v-model="toastedBreads" />
  Quantity to put in the oven: {{toastedBreads}}
</div>

new Vue({
  el: '#app',
  methods: {
    toast () {
      this.toastedBreads++
    }
  },
  data: {
    toastedBreads: 0
  }
})
Play a little with this application and notice how no handler is necessary to keep the textbox in sync. Every time toastedBreads is updated, the text will update too; conversely, every time you write a number, the quantity gets updated as well.
There's more
If you followed the first recipe in this chapter, you'll remember how we greeted a variable number of worlds; we can make the experience more interactive. Let's build a list of planets we'd like to greet:
<div id="app">
  <ul>
    <li v-for="world in worlds">{{world}}</li>
  </ul>
</div>

new Vue({
  el: '#app',
  data: {
    worlds: ['Terran', 'L24-D', 'Ares', 'New Kroy', 'Sebek', 'Vestra']
  }
})
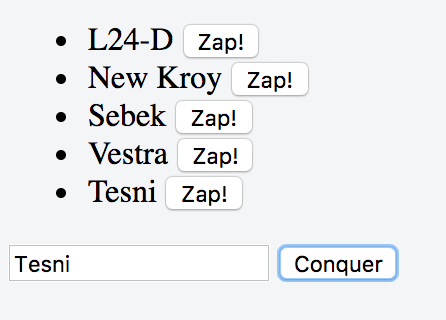
We want to be able to keep track of newly conquered worlds and delete the ones we destroy. This means adding and removing elements from the list. Consider the following HTML:
<ul>
  <li v-for="(world, i) in worlds">
    {{world}}
  <button @click="worlds.splice(i, 1)">Zap!</button>
  </li>
</ul>
<input v-model="newWorld"/>
<button @click="worlds.push(newWorld)">Conquer</button>
Here the @ symbol is the shorthand for v-on: Let's examine the modifications:
- We added a button to remove the planet (we needed to write out the index in the v-for)
- We placed a textbox that is bound to the data variable newWorld
- We placed a corresponding button that adds what's inside the textbox to the list
Running this code will work. But if you look at the console, you will see a warning when you update the text field:
[Vue warn]: Property or method "newWorld" is not defined on the instance but referenced during render. Make sure to declare reactive data properties in the data option. (found in root instance)
This is because we never declared newWorld in our Vue instance, but that's easy to fix:
new Vue({
  el: '#app',
  data: {
    worlds: ['Terran', 'L24-D', 'Ares', 'New Kroy', 'Sebek', 'Vestra'],
    newWorld: ''
  }
})


