Searching and navigating
Visual Studio provides many ways to make maneuvering through your code easier and more efficient.
Getting ready
To best see this in action, open a project that has multiple files available for editing. This can be the sample project or one of your own choice. Once it is open, simply open a couple of source files.
How to do it…
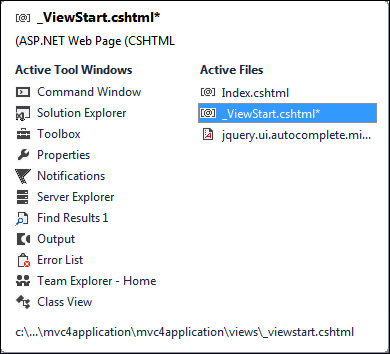
Pressing Ctrl + Tab provides easy access to a couple of different ways to navigate around Visual Studio. If Ctrl + Tab is pressed and immediately released, Visual Studio will alternate between the two most recent files that you have opened in the editor window. This provides a quick way to move back and forth. If Ctrl + Tab is pressed and Tab is released, a pop-up window will appear. Continue to hold down Ctrl when it appears, and then arrow keys can be used to maneuver around the list of all active files and windows. To make a selection, either release Ctrl while highlighting the desired target, or while holding Ctrl, press Enter. This is shown in the following example's screenshot, where active files currently open in Visual Studio are shown in the right-hand side column, while open tool windows are shown in the left-hand side column:

There's more…
If you would rather take a hybrid (mouse + keyboard) approach, the window Ctrl + Tab produces also supports selection by mouse. Start in the same manner as done earlier in this recipe, holding down Ctrl + Tab to bring up the window. Release Tab while holding down the Ctrl key and then use your mouse to left-click directly on the file you would like to switch to.
Quickly searching your code
Searching a project file to find specific strings of text is a common daily task performed by developers. Visual Studio tries to make this easy by offering specific tools to find and replace text at various levels of your code base. Several options are available under Edit | Find and Replace, including Quick Find, Quick Replace, Find In Files, and Replace In Files.
Tip
The Incremental Search option (Ctrl + I) is a quick way to search within the file you are currently editing. When activated, a Find dialog box appears in your active editor window, allowing you to enter search terms.
The Quick Find (Ctrl + F) and Quick Replace (Ctrl + H) options share a common dialog box. Both provide the ability to search the current code block, the current project, all open documents, or the entire solution. If your search options include the file that's currently open, the vertical scroll bar will highlight any matches found. This provides quick visual feedback on the frequency of a search item:

Another feature that Quick Find and Quick Replace share is the ability to set the following search options: match case, match whole word, and whether or not regular expressions can be used. The use of regular expressions allows for more complex queries to be used, allowing users to extract more detailed information from their searches.
The Find In Files (Ctrl + Shift + F) and Replace In Files (Ctrl + Shift + H) options provide a more advanced method of conducting searches across a code base. They expand on the functionality offered by the quick tools by allowing you to specify certain file types that should be searched (for example, all HTML and JavaScript files) and provide the ability to display the results of an operation in a separate window.

In the preceding example's screenshot, a simple regular expression was used to search the entire solution using the specified file mask. The results were outputted to Find Results 1, which is a live window. This means that you can click on a line with a particular search result and you will go directly to that file where the match was made.


