Getting started with the CSS 3D renderer
HTML and CSS are getting more and more powerful each day. Modern browsers, both mobile and desktop variants, have great support for these two standards. The latest versions of CSS also support 3D transformations. With the THREE.CSS3DRenderer object, we can directly access these CSS 3D features and transform an arbitrary HTML element in 3D space.
Getting ready
To use the CSS 3D renderer, we first have to download the specific JavaScript file from the Three.js site, as it hasn't been included in the standard Three.js distribution. You can download this file directly from GitHub at https://raw.githubusercontent.com/mrdoob/three.js/master/examples/js/renderers/CSS3DRenderer.js or look in the lib directory of the sources provided with this book.
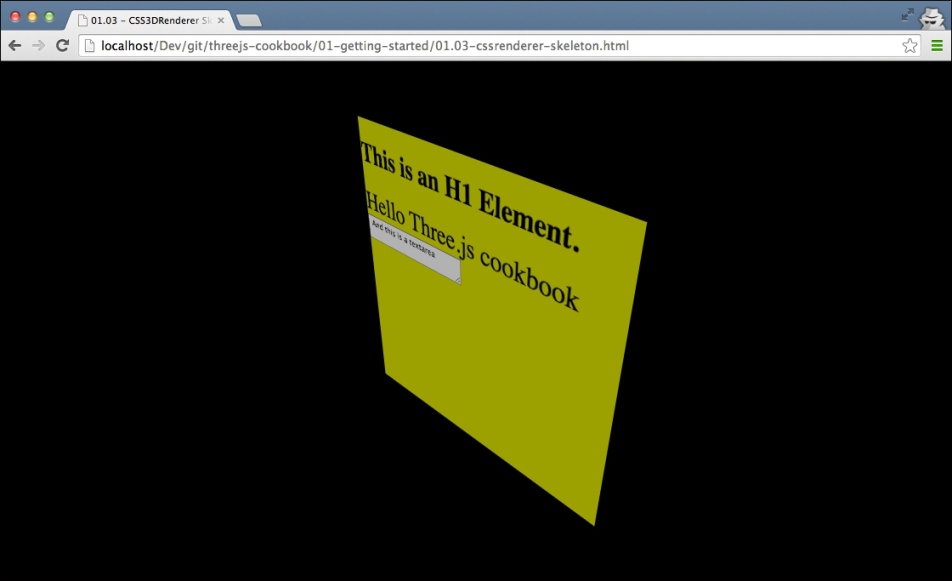
To see the CSS3DRenderer scene in action, you can open the example 01.03-cssrenderer-skeleton.html in your browser:

What you see here is a standard HTML div element, rendered in 3D with the THREE.CSS3DRenderer object.
How to do it...
To set up a THREE.CSS3DRenderer based scene, we need to perform a couple of simple steps:
- Before we get started with the
THREE.CSS3DRendererspecific information, first, you have to set up a simple basic HTML page as we did in the Getting started with the WebGL renderer recipe. So walk through the first three steps of that recipe, and then continue with the next step. - After the initial setup, the first thing that we need to do is to add the correct JavaScript to our head element:
<script src="../libs/CSS3DRenderer.js"></script>
Next, we'll start with the definition of the global variables that we need:
var content = '<div>' + '<h1>This is an H1 Element.</h1>' + '<span class="large">Hello Three.js cookbook</span>' + '<textarea> And this is a textarea</textarea>' + '</div>'; // global variables, referenced from render loop var renderer; var scene; var camera; - What we define here is a string representation of the element that we want to render. As the
THREE.CSS3DRendererobject works with the HTML elements, we won't use any of the standard Three.js geometries here, but just plain HTML. The renderer, scene, and camera are simple variables for the corresponding Three.js elements, so that we can easily access them from therender()function, which we'll see later on. - Similar to the other skeletons we will initialize the scene in the
init()function. The function that you need to add to theTHREE.CSS3DRendererobject is shown as follows:function init() { scene = new THREE.Scene(); camera = new THREE.PerspectiveCamera(45, window.innerWidth / window.innerHeight, 0.1, 1000); // create a CSS3DRenderer renderer = new THREE.CSS3DRenderer(); renderer.setSize(window.innerWidth, window.innerHeight); document.body.appendChild(renderer.domElement); // position and point the camera to the center of the scene camera.position.x = 500; camera.position.y = 500; camera.position.z = 500; camera.lookAt(scene.position); var cssElement = createCSS3DObject(content); cssElement.position.set(100, 100, 100); scene.add(cssElement); render(); } - We'll focus on the highlighted parts in this code fragment. For an explanation of the other parts of this function, we will take a look at the Getting started with the WebGL renderer recipe. As you can see in this fragment, this time we will create a
THREE.CSS3DRendererobject. Just as we did with the other renderers, we also need to set the size. Since we want to fill the screen, we will use thewindow.innerwidthandwindow.innerheightproperties. The rest of the code stays the same. - Now, all we need to do to finish this skeleton is add an element. With the CSS 3D renderer, we can only add
THREE.CSS3DObjectelements. For this step, just add the following function:function createCSS3DObject(content){ // convert the string to dome elements var wrapper = document.createElement('div'); wrapper.innerHTML = content; var div = wrapper.firstChild; // set some values on the div to style it. // normally you do this directly in HTML and // CSS files. div.style.width = '370px'; div.style.height = '370px'; div.style.opacity = 0.7; div.style.background = new THREE.Color(Math.random() * 0xffffff).getStyle(); // create a CSS3Dobject and return it. var object = new THREE.CSS3DObject(div); return object; }This function takes an HTML string as the input, converts it to an HTML element, sets some CSS styles, and uses this as the input to create a
THREE.CSS3DObjectobject, which is added to the scene.
If you open this file in your browser, you'll see something that resembles the example we showed in the Getting ready section of this recipe. You can use the HTML page and JavaScript as a template for the entirety of your CSS 3D renderer project.
How it works...
With CSS 3D, you can apply all kinds of transformations to the HTML elements. For instance, you can apply a specific rotation around an axis using the transform property. The interesting thing is that you can also apply matrix transformations. Three.js uses matrix transformations internally to position and rotate the elements. With the THREE.CSS3DRenderer object, Three.js hides the internal CSS 3D specific transformations and styles and provides a nice abstraction level, which you can use to work with the HTML elements in 3D.
See also
- If you can use the WebGL approach from the Getting started with the WebGL renderer recipe, you should really use it. It provides more features than those that are available with the CSS-based approach, but has less support for mobile devices. If, on the other hand, you're looking to manipulate the HTML elements on screen, the
THREE.CSS3DRendererobject is a great solution.


