Understanding the Creality Ender 3
Founded in 2014, Creality is a Chinese-based 3D printer manufacturer. Their products include the CR-10, CR-6, and Ender series Fused Deposition Modeling (FDM) printers. The Ender 3 series of 3D printers is arguably among the most iconic 3D printers not only for Creality but for the maker community at large. Some may view the Ender 3 series as entry level, but they are much more than that. The dependability, ease of use, and upgrade options available for the Ender 3 series printers make them a favorite with everyone from beginners to those with years of experience with 3D printing.
What Is Fused Deposit Modeling?
FDM is a technique of 3D printing where plastic filament stored on a roll is melted and deposited in place by a moving head. FDM may be referred to as Fused Filament Fabrication (FFF). FFF is the name used prior to the patent expiration of FDM in 2009.
In the following sections, we will learn about the Ender 3 series of 3D printers with a focus on the Ender 3 V2. Although the concepts covered do apply to other 3D printers, having an Ender 3 will make this section a little easier to navigate.
Ender 3 models
The first Ender 3 was released in 2018 and its design was open sourced a few months after. The following are versions of the Ender 3 printer, starting with the basic version.
Ender 3
Sporting a 220 mm by 220 mm by 250 mm build area, the Ender 3 is the least expensive of the series and is considered the entry-level version. Aluminum extrusions provide the printer with a solid frame and both the print head and heated bed slide along their respective axes on v-slot wheels. The standard Ender 3 comes with a BuildTak-like sticker applied to the bed to provide adhesion for the first layer. We will discuss first-layer adhesion more in the upcoming Leveling the print bed section.
What Is BuildTak?
BuildTak is a proprietary product made by the company of the same name, a manufacturer of surfaces for use in 3D printing. The textured pre-cut sheets offer better adhesion than traditional methods such as painter's tape or glue sticks.
Ender 3 Pro
The Ender 3 Pro is an upgraded version of the Ender 3, though it has the same build area as the Ender 3 (220 mm by 220 mm by 250 mm) and is made with the same aluminum extrusions for the frame. The cooling fan for the main electronics board has been moved to vent underneath the printer to prevent bits of filament jamming the fan. The power supply has been upgraded and a removable magnetic flexible build plate has been added. This allows us to easily remove the build plate and "flex" off the printed part, as we can see in Figure 1.1:
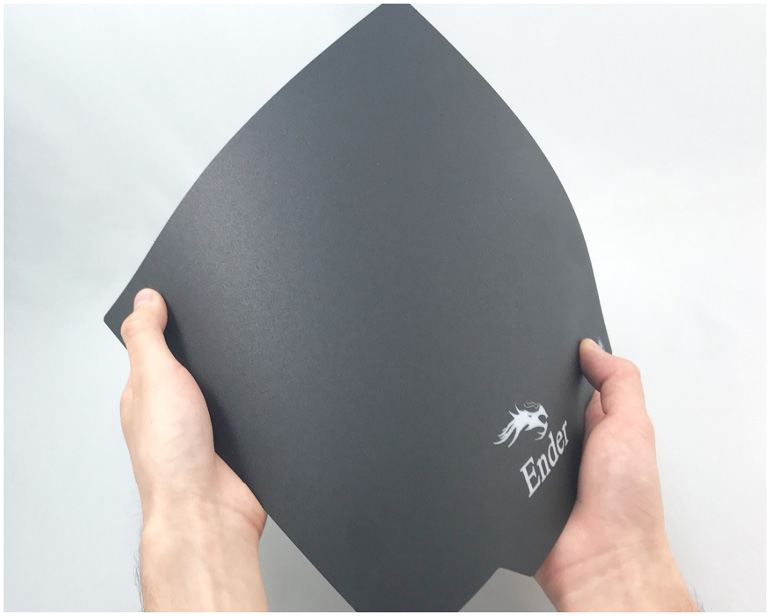
Figure 1.1 – Magnetic flexible build plate
Although having a removable flexible build plate certainly has its advantages, the magnetic layer of the build plate is limited to temperatures of around 80 degrees Celsius. This somewhat limits the types of materials that can be printed with this machine. We will discuss the different types of materials in the upcoming Materials available for 3D printing section.
The biggest upgrade of the Ender 3 Pro is the wider aluminum extrusion for the y axis. This upgrade provides more stability to the y axis, resulting in better prints.
Ender 3 Max
The Ender 3 Max offers a 300 mm by 300 mm by 340 mm build area and a glass bed upgrade. The glass bed allows for printing with materials that require a high bed temperature for adhesion. The H-shaped base on the Ender 3 Max provides the extra stability required for a printer of this size.
Ender 3 V2
Coming with a new 109-mm (4.3-inch) HD color screen the Ender 3 V2 is an upgrade to the Ender 3 and Ender 3 Pro. Keeping the same build area as the Ender 3 and Ender 3 Pro (220 mm by 220 mm by 250 mm), the Ender 3 V2 adds belt tighteners to the x and y axes. A small tool drawer has been added to the bottom of the machine for storing things like print nozzles, pliers, and scrapers.
In Figure 1.2, we can see the printer with its major parts identified:
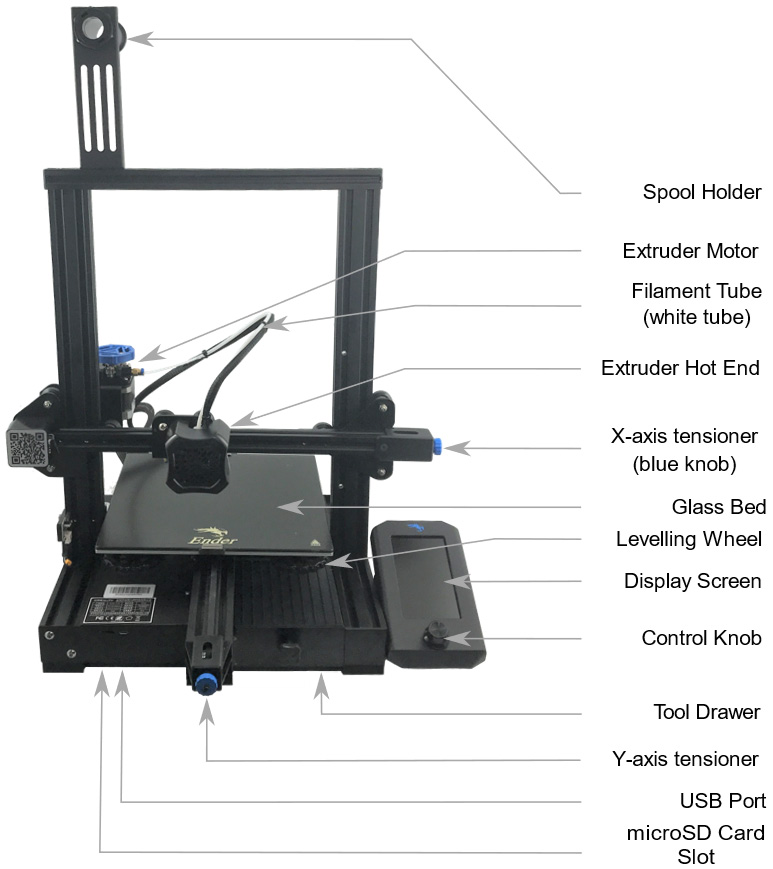
Figure 1.2 – The Ender 3 V2
We will be using the Ender 3 V2 throughout the rest of the book as our demonstration machine. The projects and descriptions using this printer that follow can not only be applied to other Ender 3 series printers but to almost all modern FDM printers on the market today.
Ender 3 S1
The Ender 3 S1 is the latest version of the Ender 3 series. Unlike the previous versions of the Ender 3, the Ender 3 S1 comes with a direct drive extruder and built in auto bed levelling. The build area is slightly higher (220 mm by 220 mm by 270 mm) than the Ender 3 and Ender 3 V2. We will be exploring direct drive extruders in the upcoming section, Direct drive conversion kit where we look at upgrades for Ender 3 series 3D printers.
Understanding the parts of the Ender 3
Using Figure 1.2 as a reference, let's take a closer look at the parts of an Ender 3 V2. The following are the major components of an Ender 3 V2 3D printer.
Spool holder
Starting from the top of the machine we have the spool holder. This is where we hang the spool of filament we are printing with. Spool holders can be as simple as we see in Figure 1.2 or may be upgraded to include bearings for smoother operation. The position of the spool holder on the Ender 3 series of 3D printers has been criticized by some as the angle in which the filament enters the extruder is rather sharp. Customized upgrades such as a side spool mount (https://www.thingiverse.com/thing:3544593) may be added.
Extruder motor
The extruder motor pushes the filament through the filament tube, on its way to the extruder hot end where it is melted.
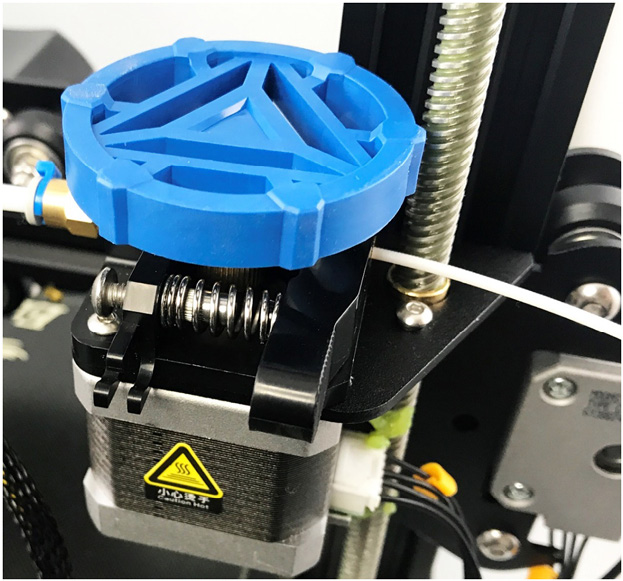
Figure 1.3 – Extruder motor
As we can see in Figure 1.3, the white filament on the right passes through the extruder, which is driven by a stepper motor (the black and silver part on the bottom). Figure 1.3 is dominated by a big blue knob on the top of the extruder, used to help load the filament by hand. Turning the blue knob counterclockwise loads the filament while turning it clockwise pulls the filament out of the machine. The blue knob also acts as a visual guide that the printer is extruding during printing.
Extruder hot end
The extruder hot end is the part on the 3D printer where the filament is melted. It contains a heater block and a heat sink, which is enhanced by the use of a fan. If we were to remove the extruder hot end's case we would see that the extruder hot end looks like Figure 1.4:
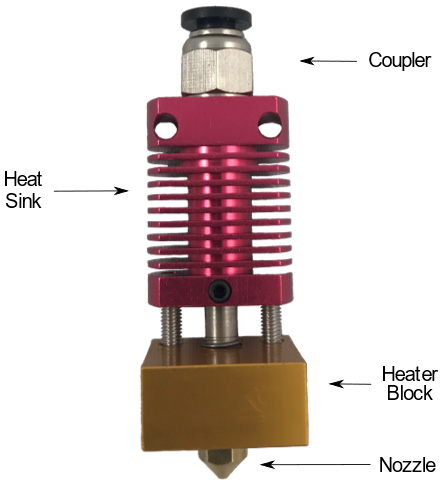
Figure 1.4 – Extruder hot end without casing
The filament tube enters the extruder hot end through the coupler at the top and is pushed through to the nozzle. The filament is heated using a heating cartridge connected to the heater block (not shown in Figure 1.4). A thermistor is also connected to the heater block and is used to monitor the temperature (not shown in Figure 1.4).
In Figure 1.5, we see a close-up of the extruder hot end. Note the indication of the two fans, one for cooling the heat sink (hot end fan) and the other for cooling the part (part-cooling fan) as it is printed, as shown here:
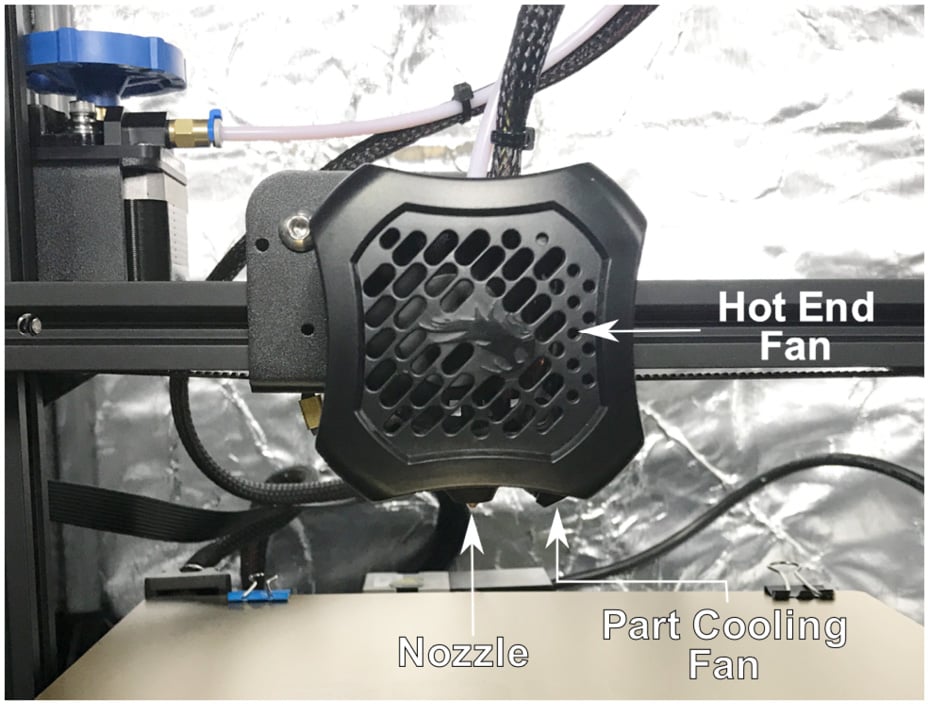
Figure 1.5 – Extruder hot end
The part-cooling fan speed is set during the creation of the print job and can also be adjusted manually using the display screen and control knob during printing. The amount of power and thus the strength of the part-cooling fan is variable and may be changed during a print job. This is not the case for the hot end fan as it is always on full power once the Ender 3 V2 is turned on.
Filament tube
Separating the extruder motor from the extruder hot end on our Ender 3 V2 is the filament tube. Our printing material is pushed along the tube by the extruder motor to the extruder hot end, where it is melted and deposited on the bed to form our print. Designs that use a filament tube to separate the extruder motor and extruder hot end are known as Bowden-style extrusion systems. The Ender 3 series of 3D printers utilizes this design.
What is PTFE?
Filament tubes are often called PTFE tubes as they are made from polytetrafluoroethylene (PTFE). PTFE was used in the 1950s to create the first non-stick cooking pans under the trade name Tefal. By being both non-stick and resistant to high temperatures, PTFE is ideal for use in 3D printer extrusion systems.
x axis and y axis tensioner
x axis and y axis tensioners are featured on the Ender 3 V2. They are the blue knobs at the end of their respective axes. Keeping the belts tight assists in creating better prints as the belts stretch over time.
Display screen and control knob
The biggest noticeable difference between the Ender 3 V2 and the other Ender 3 models is the screen. As we can see in Figure 1.6, the 109-mm (4.3-inch) color screen displays four menu options when we turn on the machine:
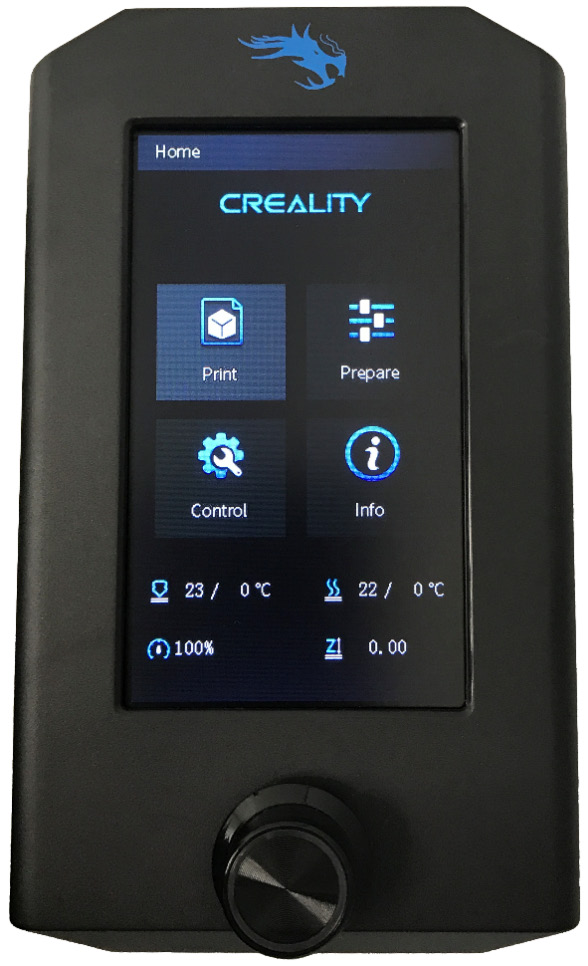
Figure 1.6 – Ender 3 V2 display screen
On display is the current temperature of the nozzle and bed, and the values that they are set to; as we can see, both the nozzle and bed are set to 0 degrees Celsius and are currently measuring 23 and 22 degrees for the hot end and the bed respectively. We may also see the value of the feed rate and the Z-axis offset.
The feed rate is a way of adjusting the speed of all four axes of the 3D printer (x, y, z, and extruder) together. It is adjusted during a print job to either speed up a print job or slow it down. The z-axis offset is used during printing to adjust the height of the print head relative to the bed. We may want to lower the z-axis offset if the filament is not sticking to the bed or raise it if the print head is scraping the build surface.
Feed Rate versus Flow Rate
Feed rate and flow rate are often confused with one another. The feed rate is controlled from the 3D printer's control panel and adjusts the speed in which the print job runs. Flow Rate controls the amount of material flowing from the nozzle and can either be set in the slicer before creating the 3D print job or adjusted during printing. We will discuss slicer programs in Chapter 2, What Are Slicer Programs?
Menu options are selected using the control knob. Turning the knob in one direction or another moves the selected menu option around. In Figure 1.6, the Print menu option is currently highlighted. Clicking on the knob selects the option. Please note that even though the screen may look like a touch screen, it is not.
Glass bed
Starting with the Ender 3 V2, a tempered glass bed was introduced. The tempered glass bed offers a flatter surface on which to print, compared to other bed materials. A coating added to the tempered glass bed further increases the adhesion of the filament to the bed.
Leveling wheels
Our Ender 3 V2 has four leveling wheels located underneath the four corners of the bed. As the name implies, these are used to level out the bed of our printer. We will use these wheels in the Leveling the print bed section.
USB port and microSD card slot
The USB port and microSD slot are located on the bottom left side of the machine. We use the microSD slot to load a microSD card containing our print jobs. We can also connect the printer to a computer using the USB.
Using a Standard SD Card
Some of us may find working with microSD cards a little troublesome due to their small size. A microSD-to-SD card extension adapter is a popular Ender 3 upgrade.
Upgrading the Ender 3
Due to the popularity of the Ender 3 series printers, many upgrades and additions exist. The following is a list of upgrades and additions that are available, but note that this is in no way a complete list.
Dual-gear extruder
A dual-gear extruder is a popular upgrade with the Ender 3 series printers. Adding dual gears to the extruder motor assembly adds extra grip, as we can see in Figure 1.7:
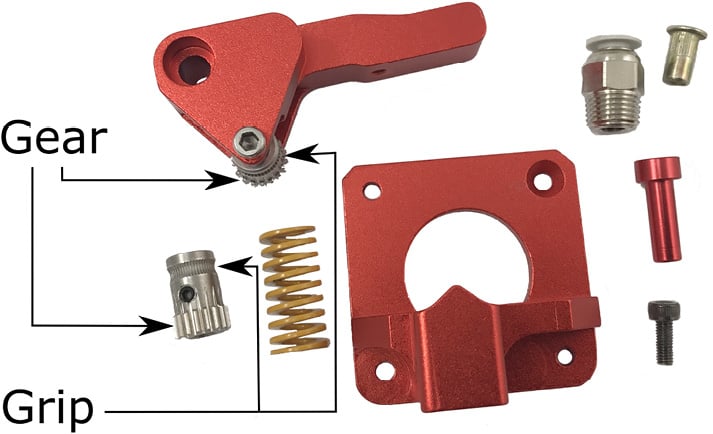
Figure 1.7 – Dual-gear extruder kit
Having the filament guided by two grips is only possible if the two sides of the rolling channel guiding the filament are synchronized or geared to each other. This extra gripping of the filament reduces skipping as the filament moves through the extruder.
As we can see in Figure 1.7, the spindle that is attached to the motor is geared at the bottom. When assembled, this lines up with the spindle that attaches to the arm of the extruder motor assembly. We can see that the gripping area of the motor spindle is above the geared area. When in place, this lines up with a similar grip on the arm spindle. The two spindles work in sync to pull the filament from the roll toward the extruder hot end.
Dual-gear extruder kits are relatively inexpensive and will assist in eliminating filament slippage. Please note that we must change the extruder motor steps per mm setting after installing a dual-gear extruder.
Nozzles
Typically, 3D printers come with a standard brass nozzle with a 0.4-mm hole; however, nozzles with different diameters may be purchased rather inexpensively. Nozzle hole diameters come in a variety of sizes, including 0.2 mm, 0.3 mm, 0.4 mm, 0.5 mm, 0.6 mm, 0.8 mm, and 1.0 mm.
Smaller hole diameters increase the printing time but produce more detailed prints. Larger nozzle holes reduce the printing time but at the cost of quality.
3D printer nozzles are typically made of brass. Brass offers excellent heat transfer for the price. Brass nozzles do tend to wear quickly however and are not well suited to materials that are a little rougher in texture such as wood and carbon fiber. For such materials, stainless steel and hardened steel nozzles are desired. In Figure 1.8, we can see from left to right a 0.4-mm brass nozzle, a 0.4-mm stainless steel nozzle, and a 0.6-mm hardened steel nozzle:
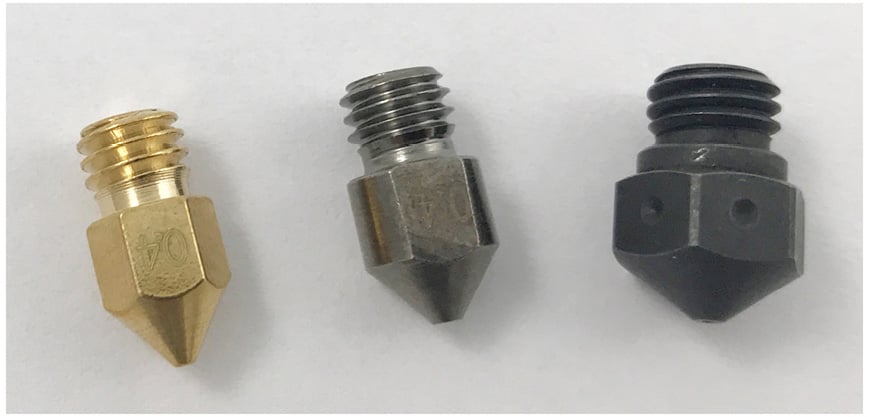
Figure 1.8 – Various 3D printer nozzles
As we see in in Figure 1.8 nozzles may have different thread sizes. For our Ender 3 V2, we need to use nozzles with M6 threading.
Direct drive conversion kit
Like many 3D printers on the market, the Ender 3 V2 comes equipped with a Bowden tube style extrusion system. To understand what exactly this is, let's look at the left-hand diagram in Figure 1.9:
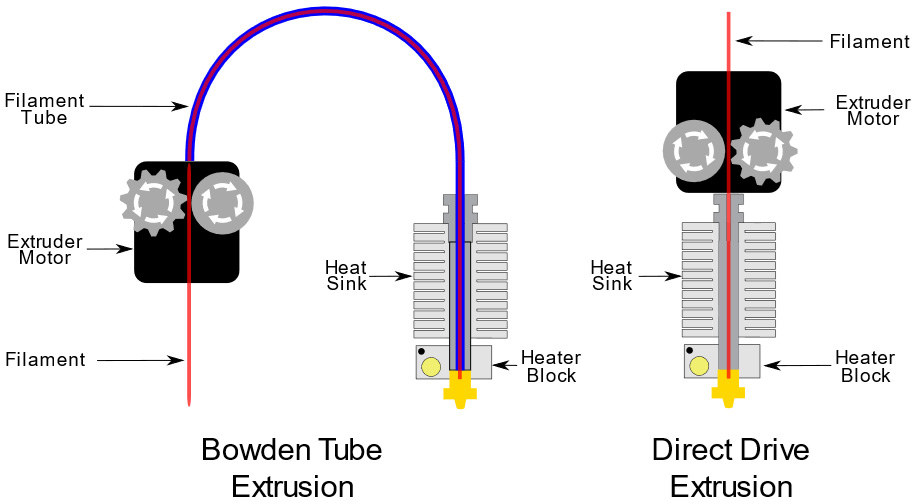
Figure 1.9 – Bowden tube extrusion versus direct drive extrusion
With Bowden tube extrusion, the filament is pushed through the PTFE tube (Filament Tube) into the heater block through the heat sink, where it is melted and deposited onto our printer bed. By contrast, as we can see in the right-hand diagram, a direct drive extrusion system pulls the filament toward the heater block through the heat sink to the nozzle.
With Bowden tube extrusion, the extruder motor is mounted separately from the other parts. With direct drive extrusion, the extruder motor is mounted with the heat sink and heater block.
Direct drive extrusion kits for the Ender 3 series printers are not particularly expensive and may be installed with relative ease. We will be using the stock Bowden tube extrusion setup for the projects in the book.
Is Direct Drive Better Than Bowden?
The debate as to which system (direct drive vs. Bowden) is better can be a heated one in the maker community. In a Bowden tube extrusion system, the print head (including the heat sink, heater block, and nozzle) moves more quickly than in a direct drive extrusion system due to its lighter weight (as the extruder motor is separate). However, direct drive extrusion systems tend to work better with flexible materials than Bowden tube extrusion systems as it is easier to pull a flexible filament into the heater block than it is to push it through a tube.
OctoPrint with a Raspberry Pi
Another popular 3D printer upgrade is OctoPrint. Using a Raspberry Pi connected to our 3D printer, we can use OctoPrint to run and monitor print jobs remotely. This includes hooking up a USB camera for video monitoring.
We can upgrade our OctoPrint setup with items such as OctoDash to provide a touchscreen interface to OctoPrint. With OctoDash, the 3D printer can be controlled right at the printer itself. Other additions to OctoPrint include the Enclosure plugin, which uses additional sensors to monitor the enclosure the printer may be in.
The Spaghetti Detective plugin and service for OctoPrint provides AI monitoring for our prints. An alert is sent when the Spaghetti Detective service determines that a print has failed.
Alternatives to OctoPrint include AstroPrint and Repetier-Server.
Tent enclosure
Arguably one of the best additions we can make to our 3D printer setup is an enclosure such as a tent. Tent enclosures are constructed like a tent used for camping and usually have more than enough room to fit our Ender 3 V2.
Enclosures allow a consistent temperature, resulting in better print quality. Enclosures are perfect for 3D printers that are used in garages. Adding a wireless dehumidifier inside the enclosure will help keep the humidity down and will assist in printing with filaments that are susceptible to retaining moisture. Tent enclosures also offer a layer of protection as they are generally fireproof.
In Figure 1.5, we can see an Ender 3 V2 inside a tent enclosure.
All-metal hot end
If we were to take the hot end of our stock Ender 3 V2 apart, we would see that the PTFE tube extends all the way to the nozzle. This is illustrated in the left-hand diagram in Figure 1.10:
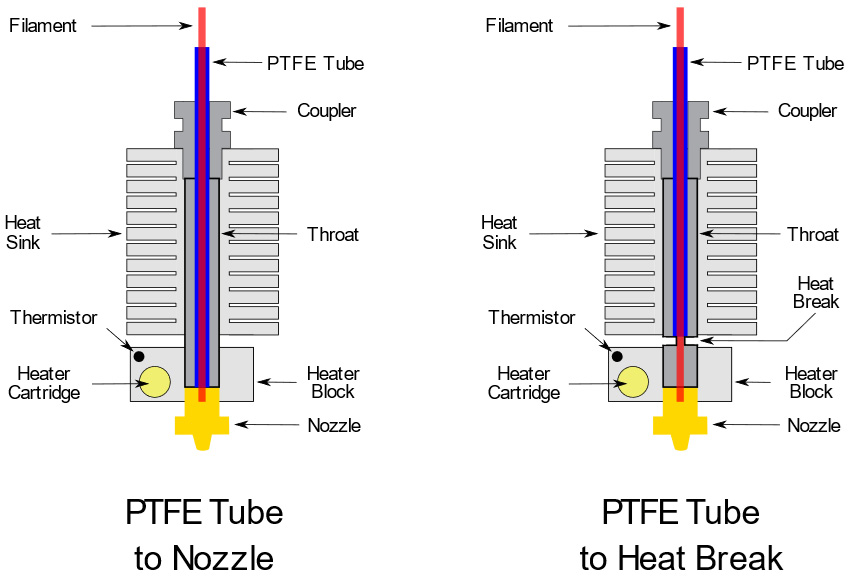
Figure 1.10 – A PTFE-tube-to-nozzle setup versus an all-metal hot end
This type of setup works well for materials with lower melting points such as PLA as temperatures above 230 degrees Celsius or so will start to melt the PTFE tube, causing blockages.
For higher-temperature materials such as ABS, an all-metal hot end is desired. As illustrated on the right in Figure 1.10, with an all-metal hot end the PTFE tube ends at the heat break, where the filament continues through to the heater block without the PTFE tube.
Bi-metal heat break
An upgrade for the all-metal hot end is a bi-metal heat break. The bi-metal heat break is made up of two separate metals, a stainless-steel inner tube, and a brass outer tube. We can see a picture of a bi-metal heat break in Figure 1.11:
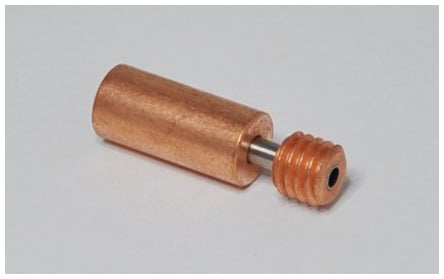
Figure 1.11 – Bi-metal heat break
Due to the poor temperature transfer from the thin inner stainless-steel tube to the outer brass, the bi-metal heat break keeps higher temperatures from creeping up the extruder hot end to the heat sink. This allows for faster extrusions and the ability to print with higher-temperature materials.
PEI build plate
PEI (or polyetherimide) build plates offer an excellent alternative to existing build plates. They are relatively maintenance-free, only requiring cleaning with isopropyl alcohol. Their flexibility makes it easy to "flex" a part off the build plate.
PEI build plates have great adhesion properties for 3D printer filament. Some PEI build plates for the Ender 3 series are two-sided, with a smooth side and textured side (for creating prints with a textured bottom layer).
Auto bed leveling sensor
Bed leveling for a stock Ender 3 series printer involves adjusting the leveling wheels under the print bed. Another option is to automate the process with an auto bed leveling sensor such as a BL Touch. In this book, we will be leveling our bed manually and will not be installing an auto leveling system.
Capricorn tubing
One upgrade for our PTFE filament tube is to use Capricorn PTFE tubing. Capricorn started out in 2016 with the goal of producing the best Bowden-style tubing. Capricorn tubing generally comes in blue and has a higher temperature rating than typical PTFE tubes.
DIY upgrades
Due to the popularity of the Ender 3 series printers, there are many DIY upgrades available to 3D print. In fact, the small tool drawer that exists on the Ender 3 V2 was adapted from DIY Ender 3 drawers found online. Websites such as www.thingiverse.com and www.myminifactory.com offer many 3D files of Ender 3 upgrades that we can download and print ourselves.
Now that we are more familiar with the Ender 3, let's perform the most necessary task for ensuring that our print jobs are successful – leveling the bed.


