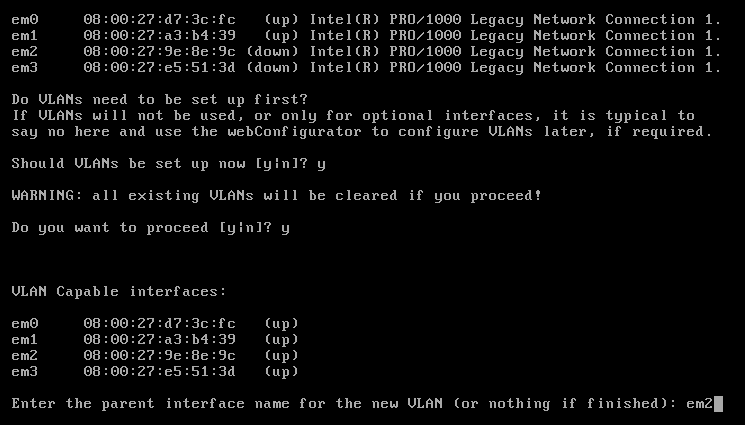
This recipe describes how to add a VLAN from the console menu.
Configuring VLANs from the console
Getting ready
In order to complete this recipe, there must be at least one interface that was not previously assigned.
Do not use the console if you don’t want to have to reassign all the interfaces (for example, WAN, LAN, and any optional interfaces), because the only way to create VLANs from the console is to use the Assign Interfaces option.
How to do it...
- From the console menu, type 1 and press Enter.
- pfSense will ask if VLANs should be created now. Type y and press Enter.
- pfSense will next warn you that if you proceed, all existing VLANs will be cleared. Type y and press Enter:

- pfSense will list all the VLAN-capable interfaces. Although, technically, you can make a previously-assigned interface into the parent interface of a VLAN, it is not recommended. Type the name of one of the unassigned interfaces (for example, eth0, eth1, em0, or em1) and press Enter.
- pfSense will next prompt you for the VLAN tag. Type the VLAN tag and press Enter.
- Repeat steps 4 and 5 for as many VLANs as you wish to create. When you are done, press Enter.
- pfSense will prompt you for the name of the WAN interface; type in the name and press Enter.
- pfSense will prompt you for the name of the LAN interface; type in the name and press Enter.
- pfSense will prompt you for the name of the Optional 1 interface. You can create a VLAN by using the name of the VLAN interface(s) assigned in steps 4 and 5. The name of the interface will have two numbers separated by a period. The first number will be the device number of the interface; the second number (after the period) will be the VLAN tag. Thus if the device name is em, and em2 is the parent interface of a VLAN tag of 3, the interface name will be em2.3. Type the interface name and press Enter.
- When you are done assigning interfaces, press Enter.
- pfSense will ask you whether you want to proceed. Type y and press Enter. Take note of the name of the newly created VLAN (for example, OPT1).
- You now have assigned a VLAN, but the VLAN doesn’t have an IP address. To set the VLAN’s IP address, type 2 and press Enter.
- Find the newly created VLAN in the list of interfaces and type the appropriate number and press Enter.
- pfSense will prompt you for the VLAN’s IPv4 address. Type in the address and press Enter.
- pfSense will prompt you for the subnet bit count (CIDR) of the address. Type in the bit count and press Enter.
- pfSense will prompt you for the IPv4 upstream gateway address. Since you don't need one, press Enter.
- PfSense will prompt you for the VLAN’s IPv6 address. You can type in an IPv6 address or just press Enter.
- If you entered an IPv6 address, pfSense will prompt you for the subnet bit count (CIDR). Enter the bit count and press Enter. If you didn’t enter an IPv6 address, skip to step 20.
- If you entered an IPv6 address, pfSense will prompt you for the IPv6 upstream gateway address. Since you don't need one, press Enter.
- pfSense will ask you whether you want to enable the DHCP server on the VLAN. Type y if you want to enable the DHCP server, and then type the range of available addresses. Otherwise, type n and press Enter.
- If you entered an IPv6 address pfSense will ask you whether you want to enable the DHCP6 server on the VLAN. Type y if you want to enable the DHCP6 server, and then type the range of available addresses. Otherwise, type n and press Enter.
- pfSense will ask you whether you want to revert to HTTP for the webConfigurator protocol. Unless you have a reason for not using HTTPS for the web GUI, type n and press Enter.
- pfSense will save the changes, and reload them. VLAN configuration is now complete.
How it works...
This recipe describes how to set up VLANs from the console. The process is somewhat cumbersome, but if you need to create a VLAN and don't have access to the web GUI, it can be done.
See also
-
The Configuring VLANs recipe


