Enabling Windows Subsystem for Linux
Software developers and system administrators often face a tough decision in choosing the appropriate hardware and operating system platform for the specific requirements of their work or environment. In the past, Windows professionals frequently discovered that some standard development tools, frameworks, or server components were available on the Linux or macOS platforms while lacking native support on Windows. Windows Subsystem for Linux (WSL) attempts to close this gap.
WSL is a Windows platform feature that provides a native GNU/Linux runtime along with the Windows desktop environment available for both versions 10 and 11 of Windows. WSL enables the seamless deployment and integration of select Linux distributions on top of the Windows kernel, without the need for a dedicated hypervisor. With WSL enabled, you can easily install and run Linux as a native Windows application.
Important note
Without WSL, we could only deploy and run a Linux distribution on a Windows platform by using a standalone hypervisor, such as Hyper-V, Oracle VM VirtualBox, or VMware Workstation. WSL eliminates the need for a dedicated hypervisor. At the time of writing, WSL is a Windows kernel extension with a hypervisor embedded.
In this section, we provide the steps required to enable WSL and run an Ubuntu distribution on Windows. Since Windows 11 version 21H2 and Windows 10 versions 21H2 and 22H2, WSL is available by default from the Windows Store, so there is no need to use the command line to install and set it up. Go to the Microsoft Store and search for WSL. From the list shown, select the application shown in the following figure:

Figure 1.9 – WSL application from the Windows Store
After installing WSL, all you need to do is to install any Linux distributions available for it. If you attempt to open the freshly installed WSL application, you will get a terminal message saying that the WSL has no distribution installed. This means that you will need to install a distro by going back to Microsoft Store and searching for one. For example, if you search for Linux inside Microsoft Store, you will get results including SUSE Linux Enterprise Server, Oracle Linux, Kali Linux, Ubuntu LTS, Debian, and openSUSE Leap, among others.
Important note
Make sure you have Hyper-V enabled in Windows, as it is the service responsible for running WSL. To enable it, go to Windows Features, and select Hyper-V from the list, then click on OK. After installing the necessary components, a restart is required. Hyper-V is available by default on Windows 11 Pro, Enterprise and Education, but NOT on Home edition.
Now you can install a Linux distribution from Microsoft Store. We will try doing this with Ubuntu for our demonstration. After installation, you can open the application, create a user, and start using it inside the command line – it is that easy. To open the new Linux distribution, enter its name in the search bar, hit Enter, and a new terminal window with the Linux distribution is opened directly in Windows Terminal application, as shown in the following screenshot:

Figure 1.10 – Ubuntu inside a Windows Terminal window using WSL
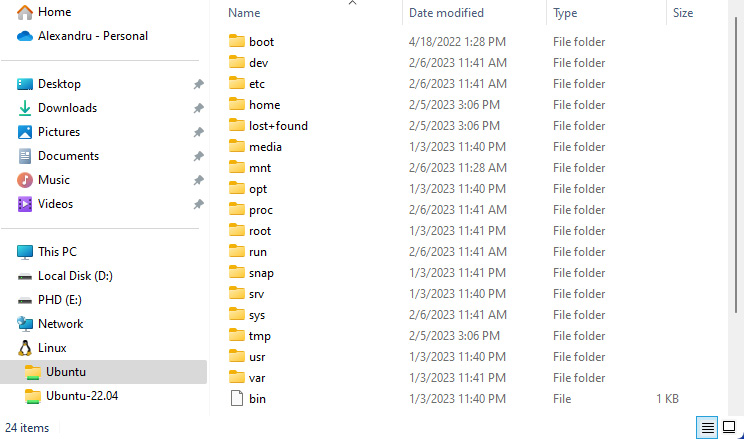
Furthermore, you will have access to the distribution’s filesystem directly from File Explorer inside Windows. The following screenshot shows the Ubuntu filesystem accessible from File Explorer:

Figure 1.11 – The Ubuntu filesystem in the File Explorer in Windows 11
WSL enables a swift adoption of Linux for a growing number of Windows professionals. As shown in this section, WSL is relatively easy to configure, and with WSL, there’s no need for a dedicated hypervisor to run a Linux instance.
By now, you have learned how to install Linux on a VM inside Windows using three different hypervisors, the VMware Workstation, Microsoft’s own Hyper-V, and Oracle’s VirtualBox. As we stated earlier, the installation process on macOS is very similar and there is no need for us to spend any more space covering it, as it would only duplicate the output. The interface of VMware Fusion on macOS is similar to the one used in Windows, with minor changes.
Installing on bare metal is similar; the only difference is that you require physical access to the destination machines. As stated at the beginning of this chapter, there is one more way to install Linux, and this is over the network. This is a more advanced task that requires more attention to detail along with basic networking knowledge. Also, understanding the Linux boot process is mandatory.
In the next section, we will provide some details about the network installation process.


