Using the Assimp library
Open Asset Import Library, which can be shortened to Assimp, is a portable open source C++ library that can be used to load various popular 3D model formats in a uniform manner.
Getting ready
We will use Assimp version 5.0 for this recipe. Here is the Bootstrap JSON snippet that you can use to download it:
{
  "name": "assimp",
  "source": {
    "type": "git",
    "url": "https://github.com/assimp/assimp.git",
    "revision": "a9f82dbe0b8a658003f93c7b5108ee4521458a18"
  }
}
Before we can link to Assimp, let's disable the unnecessary functionality in CMakeLists.txt. We will only be using the .obj and .gltf 3D format importers throughout this book:
set(ASSIMP_NO_EXPORT ON CACHE BOOL "")
set(ASSIMP_BUILD_ASSIMP_TOOLS OFF CACHE BOOL "")
set(ASSIMP_BUILD_TESTS OFF CACHE BOOL "")
set(ASSIMP_INSTALL_PDB OFF CACHE BOOL "")
set(  ASSIMP_BUILD_ALL_IMPORTERS_BY_DEFAULT OFF CACHE BOOL "")
set(ASSIMP_BUILD_OBJ_IMPORTER ON CACHE BOOL "")
set(ASSIMP_BUILD_GLTF_IMPORTER ON CACHE BOOL "")
The full source code can be found in Chapter2/07_Assimp.
How to do it...
Let's load a 3D model from a .glft2 file via Assimp. The simplest code to do this will look like this:
- First, we request the library to convert any geometric primitives it might encounter into triangles:
const aiScene* scene = aiImportFile( "data/rubber_duck/scene.gltf", aiProcess_Triangulate);
- Additionally, we do some basic error checking, as follows:
if ( !scene || !scene->HasMeshes() ) { printf("Unable to load file\n"); exit( 255 ); } - Now we can convert the loaded 3D scene into a data format that we can use to upload the model into OpenGL. For this recipe, we will only use vertex positions in
vec3format without indices:std::vector<vec3> positions; const aiMesh* mesh = scene->mMeshes[0]; for (unsigned int i = 0; i != mesh->mNumFaces; i++) { const aiFace& face = mesh->mFaces[i]; const unsigned int idx[3] = { face.mIndices[0], face.mIndices[1], face.mIndices[2] }; - To keep this example as simple as possible, we can flatten all of the indices and store only the vertex positions. Swap the
yandzcoordinates to orient the model:for (int j = 0; j != 3; j++) { const aiVector3D v = mesh->mVertices[idx[j]]; positions.push_back( vec3(v.x, v.z, v.y) ); } } - Now we can deallocate the
scenepointer withaiReleaseImport(scene)and upload the content ofpositions[]into an OpenGL buffer:GLuint VAO; glCreateVertexArrays(1, &VAO); glBindVertexArray(VAO); GLuint meshData; glCreateBuffers(1, &meshData); glNamedBufferStorage(meshData, sizeof(vec3) * positions.size(), positions.data(), 0); glVertexArrayVertexBuffer( VAO, 0, meshData, 0, sizeof(vec3) ); glEnableVertexArrayAttrib(VAO, 0 ); glVertexArrayAttribFormat( VAO, 0, 3, GL_FLOAT, GL_FALSE, 0); glVertexArrayAttribBinding(VAO, 0, 0);
- Save the number of vertices to be used by
glDrawArrays()in the main loop and render the 3D model:const int numVertices = static_cast<int>(positions.size());
Here, we use the same two-pass technique from the Doing math with GLM recipe to render a wireframe 3D model on top of a solid image:
while ( !glfwWindowShouldClose(window) ) {
  ...
  glPolygonMode(GL_FRONT_AND_BACK, GL_FILL);
  glDrawArrays(GL_TRIANGLES, 0, numVertices);
  ...
  glPolygonMode(GL_FRONT_AND_BACK, GL_LINE);
  glDrawArrays(GL_TRIANGLES, 0, numVertices);
  glfwSwapBuffers(window);
  glfwPollEvents();
}
The output graphics should look similar to the following screenshot:
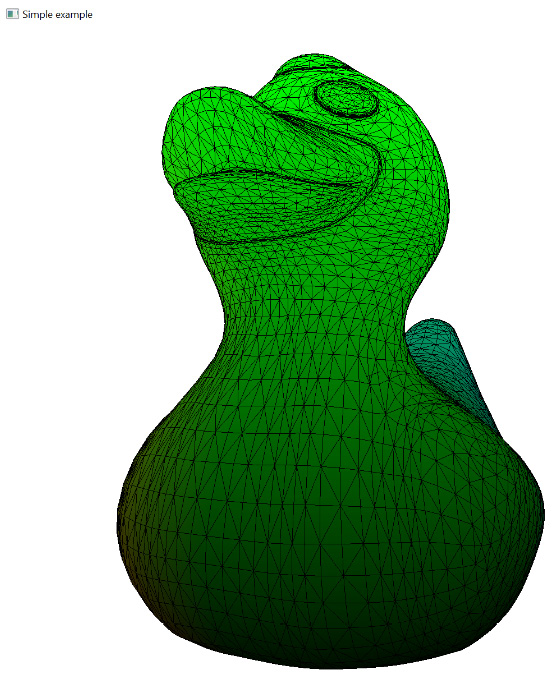
Figure 2.6 – A wireframe rubber duck