Provisioning and configuring an Azure VM with Terraform
In this recipe, we will study a typical use case of Terraform in Azure in which we will provision and configure a VM in Azure using Terraform.
Getting ready
For this recipe, we don’t need any special prerequisites. We will start the Terraform configuration from scratch. This recipe will only involve writing the Terraform configuration. We will explore the process of writing the Terraform configuration in different stages as we proceed with this recipe. As for the architecture in Azure, we have already built a network beforehand, which will contain this VM and which is made up of the following resources:
- A virtual network (VNet) called
VNET-DEMO. - Inside this VNet, a subnet named
Subnet1is registered.
In addition, the VM that will be provisioned will have a public IP address so that it can be accessed publicly.
Note that, for this recipe, we will expose the VM with a public IP, but in production, it is not recommended to use a public IP; it is recommended to use a private endpoint as documented here: https://learn.microsoft.com/azure/private-link/private-endpoint-overview.
Finally, keeping the VM’s password secret in the code, we protect it in an Azure Key Vault resource, as studied in the Using Azure Key Vault with Terraform to protect secrets recipe of this chapter.
The source code for this chapter is available here: https://github.com/PacktPublishing/Terraform-Cookbook-Second-Edition/tree/main/CHAP08/vm.
How to do it…
Write the following Terraform configuration to provision a VM with Terraform:
- The first resource to build is the resource group, with the help of the following code:
resource "azurerm_resource_group" "rg" { name = "RG-VM" location = "EAST US" } - Then, we write the following code to provision the public IP:
resource "azurerm_public_ip" "ip" { name = "vmdemo-pip" resource_group_name = azurerm_resource_group.rg.name location = azurerm_resource_group.rg.location allocation_method = "Dynamic" } - We continue by writing the code for the network interface:
data "azurerm_subnet" "subnet"{ name = "Default1" resource_group_name = "RG_NETWORK" virtual_network_name = "VNET-DEMO" } resource "azurerm_network_interface" "nic" { name = "vmdemo-nic" resource_group_name = azurerm_resource_group.rg.name location = azurerm_resource_group.rg.location ip_configuration { name = "internal" subnet_id = data.azurerm_subnet.subnet.id private_ip_address_allocation = "Dynamic" public_ip_address_id = azurerm_public_ip.ip.id } } - We get the VM password by using the
random_passwordresource:resource "random_password" "password" { length = 16 special = true override_special = "_%@" } - Finally, we write the code for the VM resource, as follows. (Here is an extract of the Terraform configuration, the complete code is available here: https://github.com/PacktPublishing/Terraform-Cookbook-Second-Edition/blob/main/CHAP08/vm/main.tf):
resource "azurerm_linux_virtual_machine" "vm" { name = "myvmdemo" ... admin_username = "adminuser" admin_password = random_password.password.result network_interface_ids = [azurerm_network_interface.nic.id] source_image_reference { publisher = "Canonical" offer = "UbuntuServer" sku = "18.04-LTS" version = "latest" } ... provisioner "remote-exec" { inline = [ "sudo apt update" "sudo apt install nginx -y", ] connection { host = self.public_ip_address user = self.admin_username password = self.admin_password } } } - Finally, we set the four environment variables for the Terraform Azure authentication and we run the Terraform workflow with the terraform
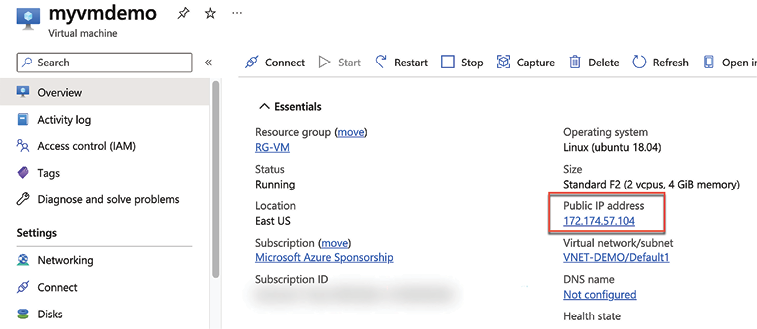
init,plan, andapplycommands. - Go to the Azure portal on the created VM properties, and get the public IP value, as shown in the following image:

Figure 8.13: Getting the VM’s public IP
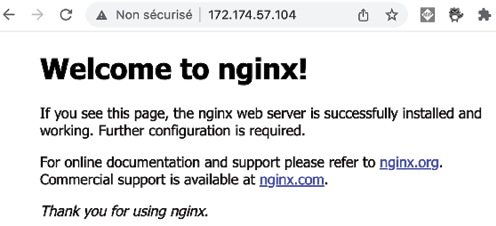
- Open a browser and navigate to
http://<PUBLIC_IP>:

Figure 8.14: nginx default website
We can see that we have access to the successfully installed nginx web server.
How it works…
In Step 1, we wrote the Terraform configuration that will create the resource group containing the VM. This step is optional because you can provision the VM in an existing resource group, and in this case, you can use the azurerm_resource_group block data, whose documentation is available here: https://www.terraform.io/docs/providers/azurerm/d/resource_group.html.
Then, in Steps 2 and 3, we wrote the Terraform configuration that provides the following:
- A public IP of the dynamic type, so that we don’t have to set the IP address (this IP address will be the first free address of the subnet).
- The network interface of the VM that uses this IP address, which will register in the subnet that has already been created. To retrieve the subnet ID, we used an
azurerm_subnetdata source.
In Step 4, we use the random_password resource to generate a random password for the VM (refer to the Generating passwords with Terraform recipe in Chapter 2, Writing Terraform Configurations, for more details).
Finally, in Step 5, we write the code that will provision the VM. In this code, we have defined the following properties of the VM:
- Its name and size (which includes its RAM and CPU)
- The basic image used, which is an Ubuntu (Linux) image
- Authentication information for the VM with a login and a password (an SSH key can also be used but is not detailed in this recipe)
In this resource, we also added a remote-exec provisioner, which allows you to remotely execute commands or scripts directly on the VM that will be provisioned. The use of this provisioner will allow you to configure the VM for administration, security, or even middleware installation tasks. Here, in this recipe, we use the provisioner to install nginx using the command apt install nginx.
At the end of the execution of the Terraform commands, we open the browser at the public IP URI address and we get a default installed nginx website.
There’s more…
The interesting and new aspect of this recipe is the addition of the remote-exec provisioner, which enables the configuration of the VM using commands or scripts. This method can be useful in performing the first steps of VM administration, such as opening firewall ports, creating users, and other basic tasks. Here, in our recipe, we used it to update the packages with the execution of the apt update command. However, this method requires that this VM is accessible from the computer running Terraform because it connects to the VM (SSH or WinRM) and executes the commands.
If you want to keep a real IaC, it is preferable to use an Code as configuration tool, such as Ansible, Puppet, Chef, or PowerShell DSC. And so, in the case of using Ansible to configure a Windows VM, the remote-exec provisioner can perfectly serve to authorize the WinRM SSL protocol on the VM because this port is the port used by Ansible to configure Windows machines.
Moreover, in Azure, you can also use a custom script VM extension, which is another alternative to configuring VMs using a script. In this case, you can provision this VM extension with Terraform using the azurerm_virtual_machine_extension resource, as explained in the following documentation: https://www.terraform.io/docs/providers/azurerm/r/virtual_machine_extension.html.
There can only be one custom script extension per VM. Therefore, you have to put all the configuration operations in a single script.
Apart from providing remote-exec and the VM extension, another solution is to use the custom_data property of the Terraform resource, azurerm_virtual_machine. Documentation pertaining to the custom_data property is available at https://www.terraform.io/docs/providers/azurerm/r/linux_virtual_machine.html#custom_data, and a complete code sample is available at https://github.com/terraform-providers/terraform-provider-azurerm/blob/master/examples/virtual-machines/linux/custom-data/main.tf.
Finally, by way of another alternative for VM configuration, we can also preconfigure the VM image with all the necessary software using Packer, which is another open source tool from HashiCorp and allows you to create your own VM image using JSON or HCL2 (as documented at https://www.packer.io/guides/hcl). Once this image is created, in the Terraform VM configuration, we will set the name of the image created by Packer instead of the image provided by the Marketplace (Azure or other cloud providers). For more information about Packer, read the following documentation: https://www.packer.io/.
The differences between these two solutions are:
- The
remote-execor custom script is useful if you want to install or configure software or components, but it doesn’t guarantee the immutability of the OS configuration and its security hardening, because anyone who writes the Terraform configuration can insert a security hole in the VM. So you need to use it with care and control what is put into the Terraform configuration. - As for Packer, it will be useful for ensuring OS immutability with its configuration and hardening. However, its use requires the construction of OS images and a frequent update pipeline.
See also
- Various tutorials and guides are available in the Azure documentation available here: https://docs.microsoft.com/azure/developer/terraform/create-linux-virtual-machine-with-infrastructure


