SELinux usage in enforcing and permissive modes
Security-Enhanced Linux (SELinux) was introduced in December 2000 via the Linux-Kernel mailing list as a product started by the National Security Agency (NSA) to improve the security of the operating system by means of mandatory access controls and role-based access control, as opposed to the traditional discretionary access controls that were available in the system.
Before SELinux was introduced in the Linux kernel, discussions took place regarding the proper way to do it, and finally, a kernel framework named Linux Security Modules (LSM) was introduced and SELinux was implemented using it so that other approaches could use LSM too, and not just SELinux.
SELinux provides security improvements to Linux as access to files made by users, processes, or even other resources can be controlled in a very granular way.
Let’s take one example to make it clearer when SELinux comes into play: when a web server is serving pages from a user’s account, it reads files from the user’s home directory inside the public_html or www folders (the most standard ones). Being able to read files from the user’s home directory can reveal the contents in the event that the web server process is hijacked by an attacker, and this precise moment is when SELinux comes into play, as it will automatically block access to files that should not be accessible for a web server.
SELinux then confines the processes and services to only perform what they are supposed to and only use the resources that are authorized. This is a really important feature that keeps things under control, even in the event of software bugs that may lead to unexpected files or resources being accessed. SELinux will block it if it has not been authorized by the active policy.
Important Tip
SELinux permissions always arise following regular discretionary access control (DAC) if a user has no access to a file because of improper file permissions. SELinux has nothing to do there.
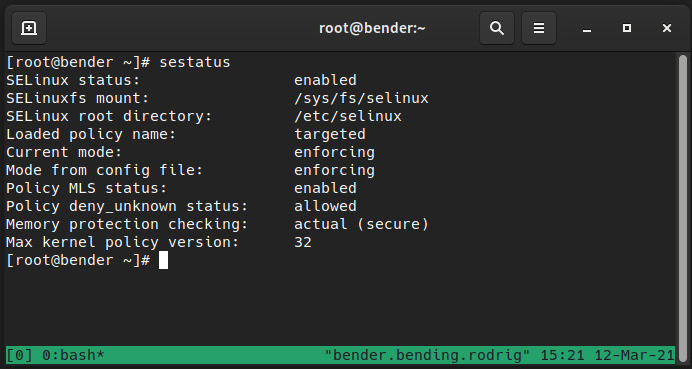
By default, the system installation should deploy it in the enforcing mode using the targeted policy. It is possible to check your current system status via the execution of sestatus, as shown in the following screenshot:

Figure 10.1 – Output of sestatus for our system
As we can see, our system has SELinux enabled using the targeted policy and is currently enforcing. Let’s learn what this means.
SELinux works by defining a policy, that is, a set of predefined rules for granting or denying access to resources. The ones available can be listed via dnf list selinux-policy-* in your system, with targeted and mls being the most common ones.
We will focus on the targeted policy, but to make an analogy regarding mls, the multi-level security (MLS) policy, it is about allowing users to interact based on their security clearance level, similar to what we can see in movies where someone has clearance to know some information, but not other people. How does this apply to a system? Well, the root user might have access to perform certain actions but not others, and if the user became root via su or sudo, they would still have the original SELinux label attached, so permissions could be reduced if the root login happened over a local terminal or a remote connection and sudo execution.
The mode, listed as enforcing, means that the policy is currently being enforced, which is the opposite of permissive. We can consider this as being active and offering protection, while permissive entails being active but only providing a warning, and not offering protection.
Why do we have permissive instead of just disabling it? This question is a bit tricky, so let’s explain a bit more about how it works to provide a better answer.
SELinux uses extended attributes in the filesystem to store the labels. Each time a file is created, a label is assigned based on the policy, but this only happens while SELinux is active, so this makes SELinux disabled different from SELinux permissive, as the first one will not create those labels for the new files created.
Additionally, SELinux in the permissive mode allows us to see the errors that will be raised if a program has not received a good policy for it or if a file has no proper labels.
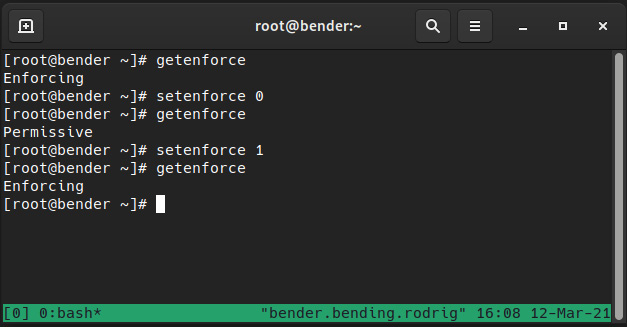
It is really easy to temporarily switch from enforcing to permissive and vice versa, and always via the setenforce command, while we can use getenforce to retrieve the current status, as we can see in the following screenshot:

Figure 10.2 – Changing SELinux enforcing status
It might look basic, but it really is as easy as that – a matter of running a command. However, if the status was disabled, it would be a completely different story.
The SELinux status is configured by editing the /etc/selinux/config file, but changes only take effect after a system reboot; that is, we can switch from enforcing to permissive in real time or from permissive to enforcing, but when changing the policy from disabling to enabling, or vice versa, SELinux will require us to reboot the system.
The general advice is to leave SELinux in the enforcing mode, but if, for whatever reason, it was disabled, the recommendation is to switch SELinux to permissive as the first step when moving from disabled. This will allow us to check that the system actually works without being locked out of it because of a kernel blocking access to files and resources.
Note
During the reboot after switching from disabled to permissive or enforcing, the system will force a relabeling of the filesystem based on the policy. This is accomplished by the creation of a file in the root folder of our filesystem named /.autorelabel, which will trigger the process and reboot again afterward.
But why opt for disabling instead of permissive? For example, some software might require to set it in the disabled mode even if later, it can be re-enabled for operations or other reasons, but bear in mind that SELinux is a security feature that protects your system and should be kept.
Keep in mind that SELinux uses Access Vector Cache (AVC) messages that are logged to the /var/log/audit/audit.log file as well as system journals, and yes, it’s a cache, so rules are not checked as frequently so as to speed up operations.
Let’s go back to the idea of the filesystem storing labels and let’s jump into the next section to see how they relate to processes, files, and the RBAC provided by SELinux.


