Search icon CANCEL
Subscription
0
Cart icon
Your Cart (0 item)
Close icon
You have no products in your basket yet
Arrow left icon
Explore Products
Best Sellers
New Releases
Books
Videos
Audiobooks
Learning Hub
Conferences
Free Learning
Arrow right icon
Arrow up icon
GO TO TOP
Mastering  QGIS

You're reading from   Mastering QGIS Go beyond the basics and unleash the full power of QGIS with practical, step-by-step examples

Arrow left icon
Product type Paperback
Published in Sep 2016
Publisher Packt
ISBN-13 9781786460370
Length 486 pages
Edition 2nd Edition
Tools
Arrow right icon
Authors (5):
Arrow left icon
John Van Hoesen, GISP John Van Hoesen, GISP
Author Profile Icon John Van Hoesen, GISP
John Van Hoesen, GISP
Kurt Menke, GISP Kurt Menke, GISP
Author Profile Icon Kurt Menke, GISP
Kurt Menke, GISP
Paolo Corti Paolo Corti
Author Profile Icon Paolo Corti
Paolo Corti
Richard Smith Jr., GISP Richard Smith Jr., GISP
Author Profile Icon Richard Smith Jr., GISP
Richard Smith Jr., GISP
Luigi Pirelli Luigi Pirelli
Author Profile Icon Luigi Pirelli
Luigi Pirelli
+1 more Show less
Arrow right icon
View More author details
Toc

Table of Contents (13) Chapters Close

Preface 1. A Refreshing Look at QGIS FREE CHAPTER 2. Creating Spatial Databases 3. Styling Raster and Vector Data 4. Preparing Vector Data for Processing 5. Preparing Raster Data for Processing 6. Advanced Data Creation and Editing 7. Advanced Data Visualization 8. The Processing Toolbox 9. Automating Workflows with the Graphical Modeler 10. Creating QGIS Plugins with PyQGIS and Problem Solving 11. PyQGIS Scripting Index

Configuring the modeler and naming a model


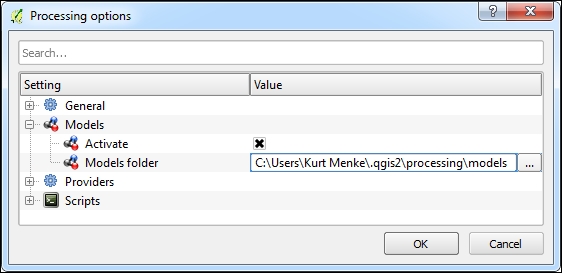
Before starting a model, it is a good practice to configure the modeler. Models are saved as JSON files with a .model extension. When you save a model, QGIS will prompt you to save the model file to the Models folder. You can set the location of the Models folder by navigating to Processing | Options in QGIS Desktop. Under the Models section of the Processing options window, you can specify the location of the Models folder. Click on the default folder path and the browse (ellipses) button will appear, allowing you to select a different location:
To demonstrate the basics of using the graphical modeler, we will use a simple example that identifies riparian tree stands in Alaska. It will have three inputs and two algorithms. First, we will give our model a name and a group name. For this example, as shown in the following screenshot, we have opened the graphical modeler and named the model as Riparian Trees and the model group as Landcover. This is...

lock icon The rest of the chapter is locked
Register for a free Packt account to unlock a world of extra content!
A free Packt account unlocks extra newsletters, articles, discounted offers, and much more. Start advancing your knowledge today.
Unlock this book and the full library FREE for 7 days
Get unlimited access to 7000+ expert-authored eBooks and videos courses covering every tech area you can think of
Renews at $19.99/month. Cancel anytime
Banner background image