Configuring a host-specific firewall
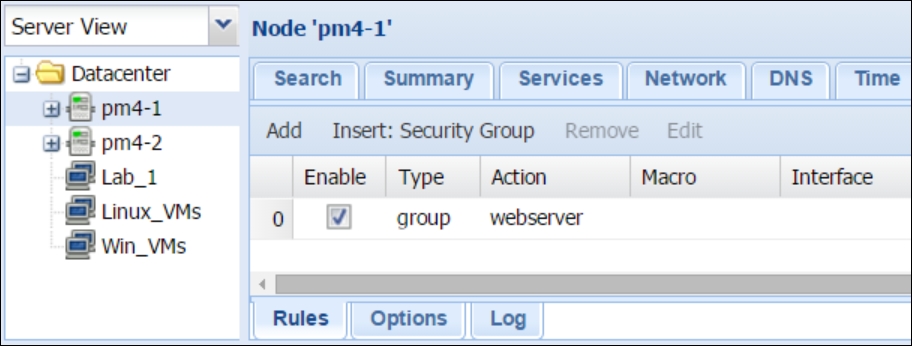
Any rules created in the host zone only apply to the node itself where the rule is created and the VMs are in that host node. Rules for one node do not get replicated to the other nodes although the rule files are stored in the Proxmox cluster filesystem. There are no options to create IPSet or Security Groups in the host zone. We can only create firewall rules. The following screenshot shows the Firewall feature for the host node pm4-1 in our example cluster:

Creating host firewall rules
The process of creating new rules for the Host zone is identical to the rule creation process that we have already discussed in the Configuring a datacenter-specific firewall section earlier in this chapter. Besides creating rules from scratch, we can also assign predefined rules in the form of a Security Group to a node. We cannot create a new Security Group under the host firewall menu, but we can assign it some predefined rules. For example, earlier in this chapter, we created a Security Group named webserver. If a Proxmox node is only going to host the VMs used for only webservers, then we can assign the Security Group webserver to that node, and all the rules will be cascaded into all the VMs in the host. Thus, we would save a lot of time from not having to create separate rules for each VM.
To open the dialog box to assign a security group, click on Insert: Security Group. The following screenshot shows the dialog box with webserver selected from the Security Group drop-down list:

We have to ensure that we enable the rule by clicking on the checkbox, and then we need to click on Add to assign the security group. The following screenshot shows the Rule added to the node pm4-1:

Options for the host zone firewall
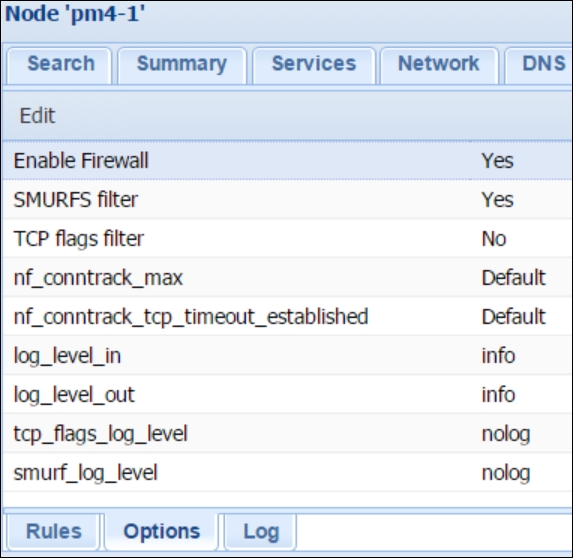
The Proxmox node firewall has several items under the Options tab. Most of the items can be left at their default values, as shown in the following screenshot. However, an understanding of this item will aid in combating security through the cluster. The following screenshot shows the Option items with default values for an unmodified Proxmox node:

To change the settings of any option item, we need to select the line item, and then click on the Edit button.
Enable a firewall
By default, all Proxmox nodes have the firewall option enabled. To disable a firewall for the node completely, select No for this option.
The SMURFS filter
By default, the SMURFS filter is enabled. By nature, SMURF is a distributed denial-of-service (DDoS) attack. In this attack, an attacker sends a very large number of ICMP data packets with the victim's spoofed IP address as the source, and it is broadcasted to a network using the broadcast address. Generally, all network devices answer an ICMP ping. During a SMURF attack, the victim's device gets flooded by ICMP responses. If there are a large number of devices in the network, then the flooding become extreme, making the victimized device unresponsive. This is why this filter should remain enabled at all times.
The TCP flags filter
In simple terms, TCP flags are control bits that indicate how TCP packets should be handled by the client. These control bits or indicators reside in the TCP header. There are a total of nine control bits with one bit for each flag. The full description of how exactly these TCP flags work is beyond the scope of this book since TCP is a vast subject of various complexities. Here, we will see what those TCP flags are and how the Proxmox firewall handles TCP flag filtering. The following table is a summary of the TCP flags and their functions:
|
TCP Flag |
Function |
|---|---|
|
URG – 1 bit |
This indicates that the TCP packet is urgent. |
|
ACK – 1 bit |
This indicates the |
|
PSD – 1 bit |
This flag asks for the buffer data to be pushed as soon as possible to the receiving side of the client application. |
|
RST – 1 bit |
This flag indicates the TCP connection reset. |
|
SYN – 1 bit |
This flag indicates a synchronized sequence number before initiating a TCP connection. Only the first packet that is sent from a source usually has this flag. |
|
FIN – 1 bit |
This flag indicates the end TCP packets. |
TCP flags are useful to detect and pinpoint oddly-behaved TCP packets and determine a possible intrusion. Arguments for TCP flags filtering are added to the firewall rules right after the –p syntax, as shown in the following code:
[RULES]
IN DROP –p tcp –tcp-flags SYN,ACK SYN –dport
Note
As of Proxmox VE 4.1, there are no options used to manually add TCP flags to filter through the GUI. We can add them through the CLI but this makes the rule disappear from the GUI.
By default, TCP flag filtering is disabled in the Proxmox VE. We can enable it to let the Proxmox firewall automatically filter odd packets with out-of-sync bits. All data packets traversing through the network have a uniformed SYN behavior. Odd packets usually indicate that they are from a bad source.
nf_conntrack_max
This value defines the maximum size of a netfilter connection tracking table. This table keeps a record of all live connections and deletes them when a connection is closed. By default, the size of this table is 65,536 bytes. While for most of the nodes, this is perfectly fine, for high-volume connection servers, such as DNS or Webserver, this table may become full quickly. For a Proxmox node, which holds lots of high-traffic VMs, this value needs to be increased. We can check the current value of nf_conntrack_max using the following command:
# sysctl –a | grep nf_conntrack_max
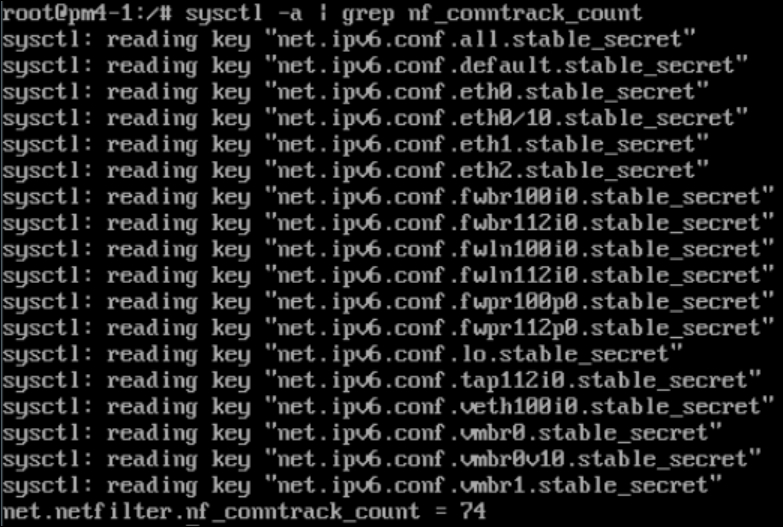
The following command will show you the number of current live connections in the node:
# sysctl –a | grep nf_conntrack_count
The following screenshot shows the connection count for our example node pm4-1:

Note
Note that if the tracking table is full, due to many live connections, then the node will drop all new connection packets.
nf_conntrack_tcp_timeout_established
This node only keeps track of the netfilter connections if they live. Dead connections are deleted automatically from the table. This deletion happens based on the set timeout period. The longer the timeout period, the longer the record of the connection will stay in the tracking table. The value of this option is in seconds. By default, the value is set to 4,32,000 seconds or 12 hours. We can check the current value using the following command:
# sysctl –a | grep nf_conntrack_tcp_timeout_established
By reducing this value, we can keep the tracking table lean-faster for a high-traffic node.
log_level_in/out
A firewall is only as good as its logging capability. It is only by going through the log that we can see what is being blocked and what is not. Proxmox comes with a custom service named pvefw-logger, which is based on the netfilter logging daemon. The sole purpose of this service is to log a connection activity based on the set firewall rules. Through the firewall Option tab, we can set logging at various levels of verbosity. There are eight levels of logging available for the iptable-based firewall. The following table shows the iptable logging levels and their availability in the Proxmox firewall:
|
Log Level |
Type | |
|---|---|---|
|
Level 0 |
Emergency |
Available in Proxmox |
|
Level 1 |
Alert |
Available in Proxmox |
|
Level 2 |
Critical |
Available in Proxmox |
|
Level 3 |
Error |
Available in Proxmox |
|
Level 4 |
Warning |
Available in Proxmox |
|
Level 5 |
Notice |
Not available in Proxmox |
|
Level 6 |
Info |
Available in Proxmox |
|
Level 7 |
Debug |
Available in Proxmox |
In addition to these levels, Proxmox also has the nolog option. This disables all logging for a resource. The log-level info is mostly used as it logs all the good and bad connections. This way, we can see exactly what is being blocked and allowed. However, Info log level also creates many log entries in a very short period of time. As a good rule of thumb, always select some form of logging when enabling a firewall.
tcp_flags_log_level
Similar to the standard log level, we can also enable different log levels for the tcp flags. If the TCP flags filter is not enabled, this will not produce any log entries. When enabled, we will see the tcp flags filter logged in the log window.
smurf_log_level
Like the tcp flags log, this also shows log entries for the smurf attacks. This also follows various log levels.
Configuring the host firewall through the CLI
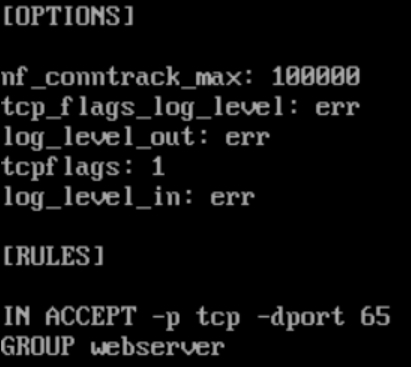
We can also configure and manage the host zone firewall through the CLI. The firewall configuration file for the host is in /etc/pve/local/host.fw. The following screenshot shows the content of the host.fw file:

As we can see, in the preceding screenshot, there are only two segments in the firewall configuration file for the host zone. They are as follows:
[OPTIONS]
. . . . . . . .

[RULES]
. . . . . . . .
The functions of these segments are exactly the same as the segments in the Configuring the Datacenter firewall through the CLI section, as discussed earlier in this chapter. Note that there are no segments for Security Group or IPSet. This is because these features are not present for the host firewall zone.


