Search icon CANCEL
Subscription
0
Cart icon
Your Cart (0 item)
Close icon
You have no products in your basket yet
Save more on your purchases now! discount-offer-chevron-icon
Savings automatically calculated. No voucher code required.
Arrow left icon
Explore Products
Best Sellers
New Releases
Books
Videos
Audiobooks
Learning Hub
Conferences
Free Learning
Arrow right icon
Arrow up icon
GO TO TOP
Mastering Adobe Photoshop 2024

You're reading from   Mastering Adobe Photoshop 2024 Discover the smart way to polish your digital imagery skills by editing professional looking photos

Arrow left icon
Product type Paperback
Published in Jan 2024
Publisher Packt
ISBN-13 9781838822019
Length 458 pages
Edition 1st Edition
Arrow right icon
Author (1):
Arrow left icon
Gary Bradley Gary Bradley
Author Profile Icon Gary Bradley
Gary Bradley
Arrow right icon
View More author details
Toc

Table of Contents (19) Chapters Close

Preface 1. Part 1:Raising Your Photoshop Game
2. Chapter 1: Making Photoshop Work Harder and Smarter FREE CHAPTER 3. Chapter 2: Non-Destructive Healing and Retouching 4. Chapter 3: Masking and Cutouts 5. Part 2:Bringing Brands Front and Center
6. Chapter 4: Building Brand Mock-Ups and Prototypes 7. Chapter 5: Creating Printed Marketing Collateral 8. Chapter 6: From Pixels to Post: Images for Social Media 9. Chapter 7: Creating Animated GIFs and Videos 10. Part 3:Building Visual Components
11. Chapter 8: Bringing Typography to Life with Effects and Styling 12. Chapter 9: Creating Textures, Patterns, and Backdrops 13. Chapter 10: Creating and Applying Brushes 14. Part 4:World Building
15. Chapter 11: Blending and Collaging Images 16. Chapter 12: Creating Surrealist Artwork 17. Index 18. Other Books You May Enjoy

Creating seamless panoramas

Photoshop has a very intuitive photo-merging feature that will detect where images should be joined and will even blend the edges of each photo seamlessly for you. Here’s how to use it:

  1. Head to Adobe Photoshop and go to FileAutomatePhotomerge to launch the Photomerge image browser.
  2. Click on the Browse button and select Coast_01.jpg to Coast_06.jpg (six files in total) from the 11-Blend folder. Click Open when done to add them to Photomerge.
  3. Set Layout mode to Auto, which is the default. Then, turn on the checkboxes for Blend Images Together, which performs the seamless stitching for us, Vignette Removal, to remove darkened edges around each image, and Content-Aware Fill Transparent Areas. Click OK when done:
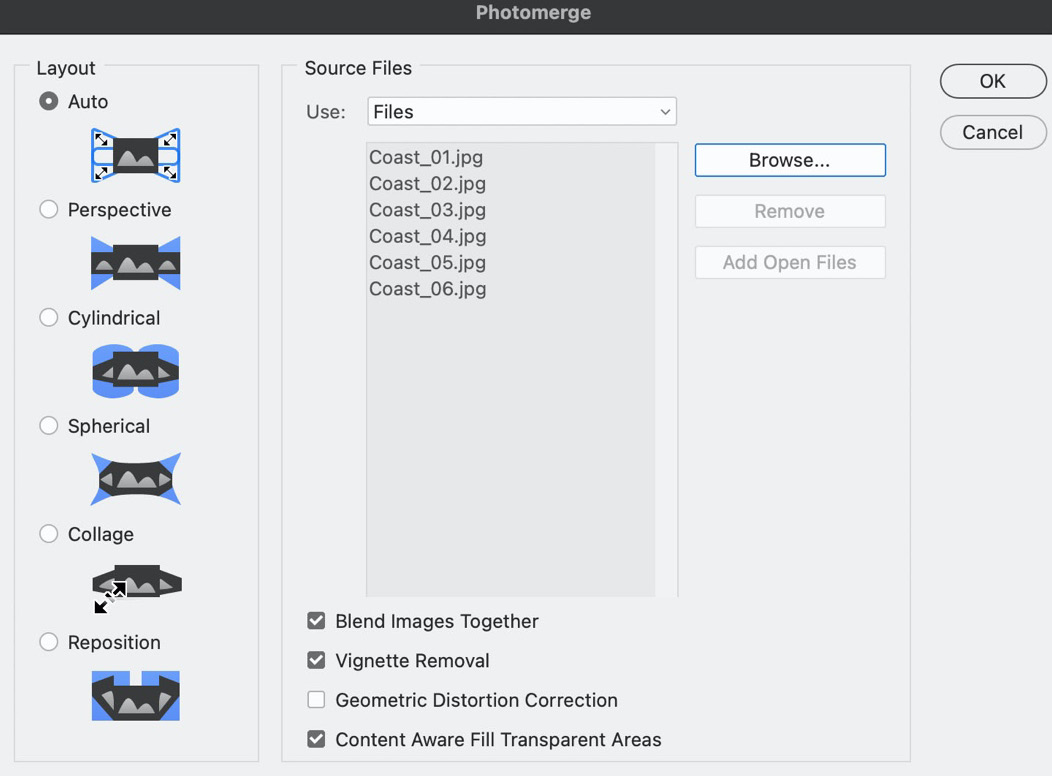
Figure 11.1: Adding images to the Photomerge dialog

Figure 11.1: Adding images to the Photomerge dialog

Photomerge source options

Geometric Distortion Correction is beneficial when stitching images that contain structures...

lock icon The rest of the chapter is locked
Register for a free Packt account to unlock a world of extra content!
A free Packt account unlocks extra newsletters, articles, discounted offers, and much more. Start advancing your knowledge today.
Unlock this book and the full library FREE for 7 days
Get unlimited access to 7000+ expert-authored eBooks and videos courses covering every tech area you can think of
Renews at $19.99/month. Cancel anytime