Search icon CANCEL
Subscription
0
Cart icon
Your Cart (0 item)
Close icon
You have no products in your basket yet
Save more on your purchases! discount-offer-chevron-icon
Savings automatically calculated. No voucher code required.
Arrow left icon
Explore Products
Best Sellers
New Releases
Books
Videos
Audiobooks
Learning Hub
Free Learning
Arrow right icon
Arrow up icon
GO TO TOP
Dynamics 365 Application Development

You're reading from   Dynamics 365 Application Development Master professional-level CRM application development for Microsoft Dynamics 365

Arrow left icon
Product type Paperback
Published in Jan 2018
Publisher
ISBN-13 9781788399784
Length 418 pages
Edition 1st Edition
Arrow right icon
Authors (2):
Arrow left icon
Deepesh Somani Deepesh Somani
Author Profile Icon Deepesh Somani
Deepesh Somani
Nishant Rana Nishant Rana
Author Profile Icon Nishant Rana
Nishant Rana
Arrow right icon
View More author details
Toc

Table of Contents (14) Chapters Close

Preface 1. Customize Application Navigation FREE CHAPTER 2. Design Apps Using App Module Designer 3. Define Processes Using Visual Process Designer 4. Define Business Rules Using Business Rule Designer 5. Creating Custom Business Apps 6. Automate Business Processes Using Microsoft Flow 7. Develop Apps using Web API 8. Leverage Azure Extensions in Dynamics 365 9. Using Editable Grids in Apps 10. Configure Microsoft Cognitive services 11. Train the Users through Learning Path 12. Other New Features in Dynamics 365 13. Other Books You May Enjoy

Editing a Business Process Flow

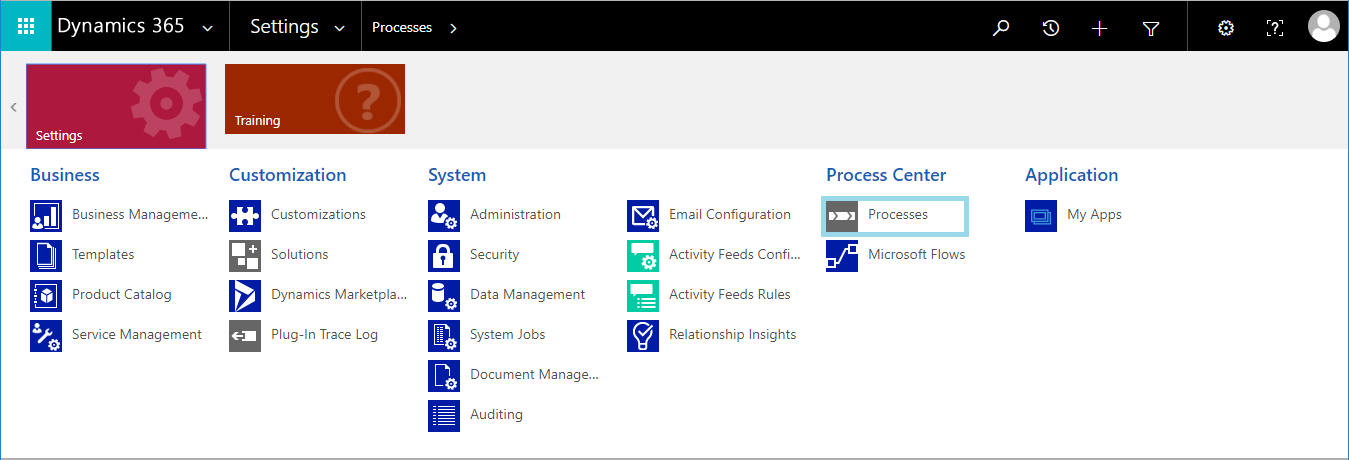
Dynamics 365 allows you to edit an existing Business Process Flow. In this section, we will edit the Business Process Flow already created before, and add an out-of-the-box workflow to the Business Process Flow to send emails:

  1. Go to Settings | Processes:
  1. Select the existing Business Process Flow that you want to edit. Next, click on the EDIT button on the action bar:
  1. The Business Process Flow designer will open. Expand the first stage of the Business Process Flow and select the Add workflow component:
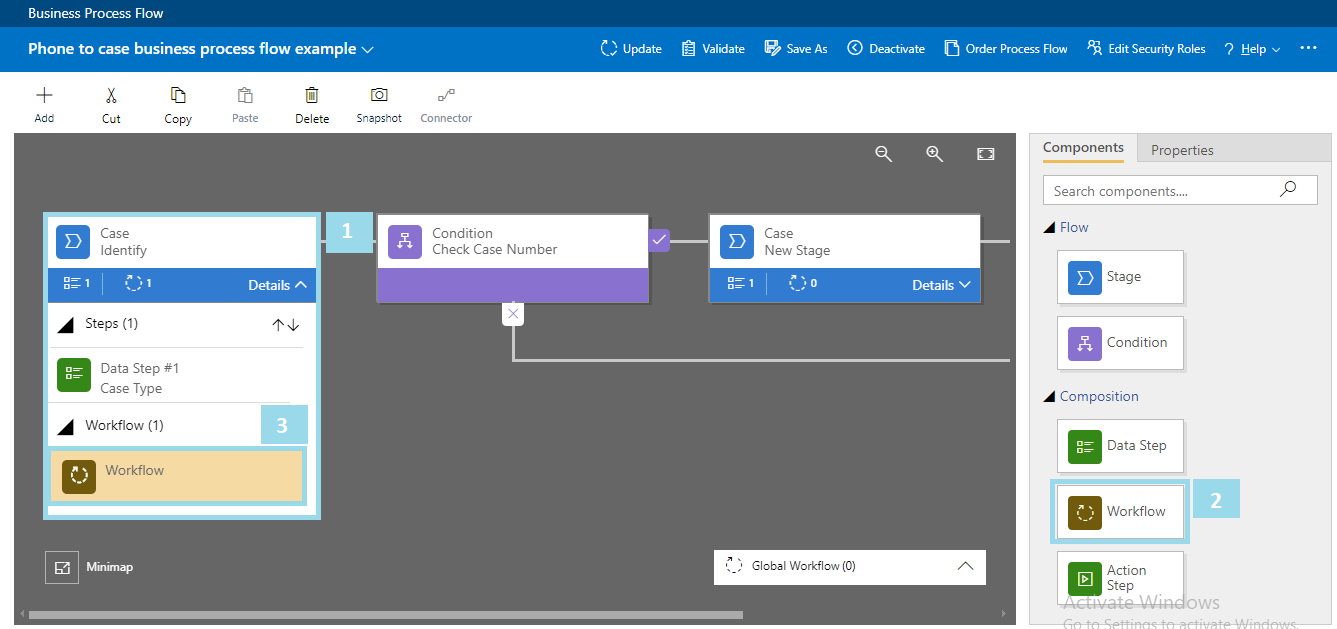
  1. Click on the Workflow component on the canvas and set its properties. Set the trigger condition to Stage Exit, select workflow, and select Send email workflow. To save and apply changes on the component, click on the Apply button, as shown next:
Note: Send Email workflow is a pre-configured out-of-the-box workflow to...
lock icon The rest of the chapter is locked
Register for a free Packt account to unlock a world of extra content!
A free Packt account unlocks extra newsletters, articles, discounted offers, and much more. Start advancing your knowledge today.
Unlock this book and the full library FREE for 7 days
Get unlimited access to 7000+ expert-authored eBooks and videos courses covering every tech area you can think of
Renews at $19.99/month. Cancel anytime
Banner background image