


Flow building blocks
Before we get into flow building blocks, let’s take a step back and define flows and a tool to build flows called Flow Builder.
Salesforce flows are a visual algorithm of your process flow. They are based on flowchart models – these are a visual representation of the process in a sequence of steps and decision points. While process flows are depicted using flowcharts and are static, Salesforce flows are dynamic and living flowcharts that we can use to implement our business processes. Flow Builder is our tool that makes these flows come to life. The best part is that they are declarative automation features that team members can implement with low code.
Flow Builder utilizes all these building blocks and helps us create these flows on a canvas. Let’s take a look and learn the flow of building blocks.
There are three building blocks that we need for any Salesforce flow. They are as follows:
- Elements: This is a step that tells the flow what to do. There are many elements that can do different things. There are three types of elements:
- Interaction element: User interaction is needed to trigger this flow element. These are screen elements where the user can interact with data on the screen, and action elements make the interaction feasible.
- Data element: Provides instruction to interact with database records or records. We use data elements to read, create, update, and delete records.
- Logic element: Enables flow to evaluate and manipulate data as per your business process flows (requirements). It helps us decide what we would like to do with the data, such as define criteria for multiple paths, pause flows, create looping paths, and so on.
From the toolbar, as shown in Figure 4.1, we will be able to create these elements by dragging and dropping them on the canvas. We will explore the canvas in detail and create multiple flow scenarios in the coming chapters:
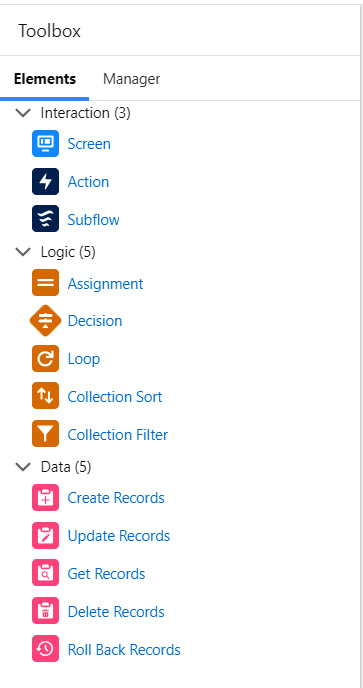
Figure 4.1 – Flow elements as represented on Salesforce Flow Builder
You can find high-level definitions of each element in Figure 4.2:
|
Elements |
|
|
Interaction (3) |
|
|
Screen |
The screen lets you capture or display information to a user. |
|
Action |
Call an Apex class and perform an action. |
|
Subflow |
Launch another active flow within the organization. Also called a referenced flow. |
|
Logic (5) |
|
|
Assignment |
Used to set values – variables, collection variables, record variables, record collection variables, and global variables. |
|
Decision |
Based on a set of conditions, and routes users through the flow based on the output of those conditions. |
|
Loop |
A loop path for iterating over items in a collection variable. The flow temporarily stores the item in the loop variable for each iteration of the loop. |
|
Collection Sort |
Reorder the items within a collection and optionally limit the number of items that remain in the collection after the sort. |
|
Collection Filter |
Apply filter criteria to a collection, and then output a new collection that contains only items that meet the filter criteria. |
|
Data (5) |
|
|
Create Records |
Create one or multiple Salesforce records by using a record variable or a record collection variable. |
|
Update Records |
Update one or more Salesforce records. |
|
Get Records |
Find Salesforce records and store values from the records in variables based on filter conditions. |
|
Delete Records |
Identify Salesforce records to delete by specifying conditions. |
|
Roll Back Records |
When a flow runs, record changes are executed and saved to the database as part of a transaction. This element rolls back the current transaction and cancels all its pending record changes. |
Figure 4.2 – Flow element high-level definitions
- Connectors: These direct the flow to which element to execute next. Basically, they determine the flow path. They define the path that the flow takes from start to finish as it runs.
Various elements of a flow are connected via lines with arrows on the canvas. This is the path our flow runs when executed. For a simplified flow with connectors, see Figure 4.3. Each element should be connected via a connector to our screen flow so that the steps are performed in this sequence to create a contact record in Salesforce.
In free-form, you create and remove connectors that determine the order of execution for the elements on the canvas, whereas in auto-layout, Flow Builder automatically creates or removes connectors.
In our next screenshot, we can clearly see how the connectors are connected between different canvas elements. The Get Records element is connected to the decision element. The Decision element is connected to the Create Records data element. The direction of the connector arrow gives us the direction in which the flow gets executed:
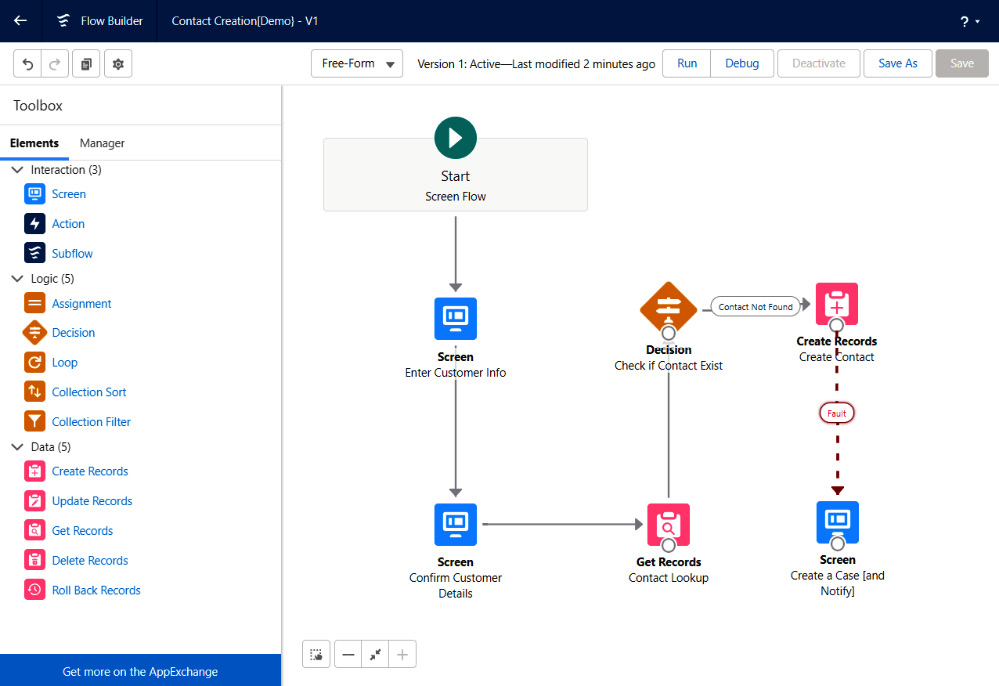
Figure 4.3 – Contact Creation Flow Builder layout; elements are connected via connectors
You can navigate to the Flow Builder page from Setup | Flow and then click on one of your flows (or one of the Managed-Installed flows provided by Salesforce; for example, Create a Case).
- Resources: Resources are individual variables that we use in Flow Builder to create flows. They can be text, numbers, records, text templates, variables, picklist values, and so on. Some resources, such as global constants and global variables, are provided by the system. You do not see them on the canvas, but they are referenced by the flow’s elements. To see all your resources, click on the Manager tab on your Flow Builder. We can access them while editing the elements. These containers store values to enable specific business functions related to the flow. They are useful only when the flow is running.
A resource can be any of the following:
- A value
- A global resource
- Fields
- Records
- Multiple records
- Elements
See Figure 4.4. The value for Field is stored in the variables, and these variables are our resources to hold values during the flow execution. You can view this screen by double-clicking on one of the data elements such as Get Records:

Figure 4.4 – Get Records element in edit mode; here, we can assign resources to our fields
- The
First_Name_Input ({!First_Name_Input})resource is a variable that holds a value for FirstName - The
Last_Name_Input {!Last_Name_Input}is a variable that holds a value for LastName
These resource values are available only during the running of our flow. Once the flow ends, these values are purged, and resources are ready for a new set of values.
Now that we have gained an understanding of the basic building blocks of flows, the next section lets us learn various flows that we have in Salesforce that trigger your business steps and hence automate your business process.


