Configuring SourceSafe for Remote Access
To be able to remotely access SourceSafe databases you must install the SourceSafe HTTP Remote Access components on the server machine. These components expose the XML web service used by the SourceSafe 2005 internet plug-in to perform source control tasks.
Note
You should make sure that the Internet Information Server (IIS) is installed on the SourceSafe server before configuring the SourceSafe web service.
When a remote user connects to the SourceSafe web service on the server, he or she authenticates using a Windows account. After authenticating successfully, the SourceSafe service impersonates that user account (performs operations in the user's context). For this reason, the Windows user account must be granted the necessary access rights in the database. A detailed description on how to configure the SourceSafe database and the necessary user accounts is provided in Appendix B.
The remote connection can use standard unsecured HTTP or secured HTTPS. These two methods require different client and server configurations.
Using HTTP
When using standard unsecured HTTP, the client requests and server responses are not encrypted, allowing data interception over the network. For this reason, using HTTP is recommended only when communicating over a trusted network connection (secured organization LAN or a secure VPN connection over the Internet). Even so, when using HTTP, the Visual SourceSafe internet plug-in doesn't send SourceSafe users and passwords to the server. Instead, because it impersonates the Windows user account used for authentication, the SourceSafe web service uses the Windows account's user name to automatically log in into the database. This brings two configuration issues:
A SourceSafe user account must have the same username as the Windows user account used for authentication on the server.
The database must be configured to allow automatic user log-ins.
For example, let's say John wants to access the SourceSafe database using the SourceSafe internet plug-in. If on the SourceSafe server he has the Windows John user account, his SourceSafe database user account must have the same username. A detailed description on how to configure the SourceSafe database and the necessary user accounts is provided in Appendix B.
On the client side, the SourceSafe internet plug-in must be configured to connect without using SSL.
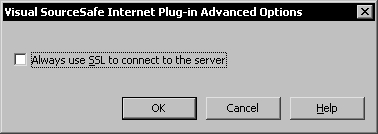
A detailed description of setting this option is provided in the additional material under the section Advanced Options in the SourceSafe Internet Plug-In provided online at http://www.packtpub.com/visual-sourcesafe-2005/book.
Using HTTPS
To secure the communication between the SourceSafe internet plug-in and the SourceSafe web service, you must use the Secure Sockets Layer (SSL) installed on IIS. SSL requires a server authentication certificate.
If you and all the teammates are part of the same Windows domain, it is likely that SSL certificates are already installed and everything should work without other configurations.
If not already installed, a local certificate can be created and installed using the SelfSSL tool provided in the IIS 6.0 Resource Kit (the easiest way available on both Server and Professional Windows editions) or the Certificate Services (available only on Windows Server editions).
On the client side, the SourceSafe internet plug-in must be configured to connect using SSL.
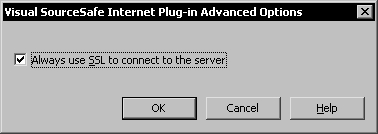
When this option is used, the SourceSafe Internet plug-in will send SourceSafe usernames and passwords to the server so the restrictions on user names as in the case of HTTP don't apply.
A detailed description of setting this option is provided in the additional material under the section Advanced Options in the SourceSafe Internet Plug-In provided online at http://www.packtpub.com/visual-sourcesafe-2005/book.
Setting up a Server Certificate using SelfSSL
To set up a server certificate using SelfSSL you must first install the IIS 6.0 Resource Kit Tools available at: http://www.microsoft.com/downloads/details.aspx?FamilyID=56fc92ee-a71a-4c73-b628-ade629c89499&displaylang=en.
During installation, make sure you select the SelfSSL 1.0 tool.
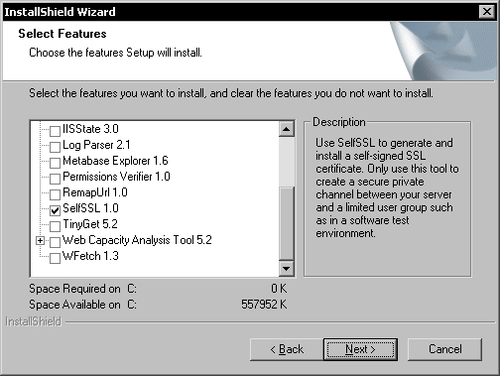
After finishing the installation, you can run selfssl.exe from the Programs | IIS Resources | SelfSSL start menu.
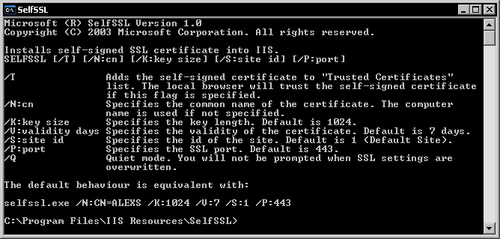
You can see all the command-line flags in the command window.
To generate a correctly configured certificate you must take into consideration the internet domain of your SourceSafe server. For example, my local computer name is ALEXS. Users on the local network can connect to it using this name. Users on the Internet, however, cannot connect to it using this name.
To be able to connect from the Internet, they must use the internet domain name address. By default SelfSSL generates a server certificate using the local name which is not correct in our case. To correctly generate the certificate you must use the internet domain address that will be used by the remote users to connect.
In my case, I have to execute the following command:
selfssl.exe /N:CN=vss.alexandruserban.com /T /V:365
The /T argument is used to automatically add the certificate to the Trusted Certificates list on the current machine (the server).
The /V argument determines for how many days the certificate will be valid. I created a certificate valid for one year.
The /S argument determines the IIS website on which to install the certificate. By default the certificate is installed on the website having the ID 1, which is the default website. On Windows Professional editions this is the only available website. On server editions you can create multiple websites. However, the SourceSafe web service is always installed on the web server having the ID 1. When configuring the certificate for the website that hosts the SourceSafe web service always use the ID 1 or use the default.
The /P argument determines the SSL port used. If you use a different port than the default 443, you can specify it using this argument.
Installing the Certificate on the Clients
After you install the certificate on the server using SelfSSL, it must also be installed on the client machines, because they need to trust it in order to use it for encrypting data.
The easiest way to install the certificate on the clients is to navigate to the SourceSafe server's website using HTTPS instead of HTTP.
For example, to install on a client machine the certificate I've created earlier, I will have to open Internet Explorer on the client and navigate to https://vss.alexandruserban.com.
Internet Explorer 6 will pop up a security alert because the certification authority (the server) is not trusted.
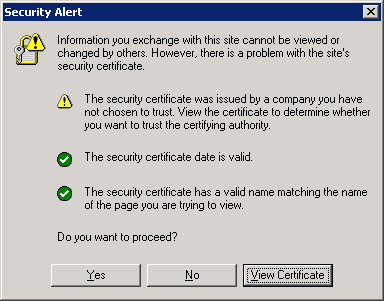
Internet Explorer 7 will show the following page instead:
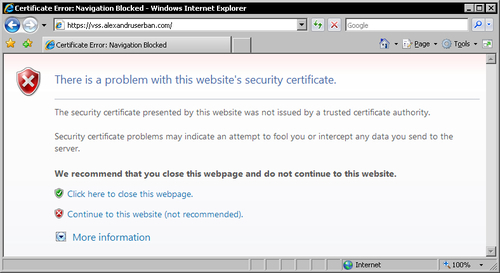
Click the Continue to this website (not recommended) link to continue and then click on the Certificate Error notification next to the address bar.
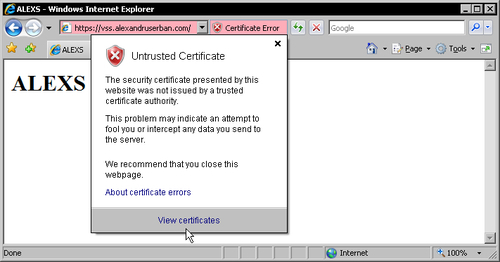
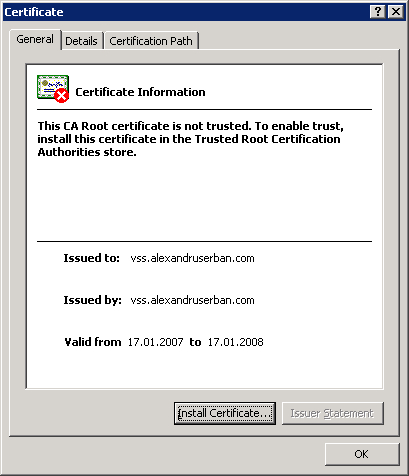
In order to trust the certificate we have to install it on the client. To do this, click View certificates either in Internet Explorer 6 or 7. This will display the following certificate:
Note
We can use this installation method because the certificate created by SelfSSL is a root certificate. You can see that the Issued by and the Issued to fields are the same. Their value must be the server's internet address.
Click Install Certificate to install the certificate on the client. This will show the Certificate Import Wizard. Click Next until you finish the wizard. This will display a security warning similar to the following:
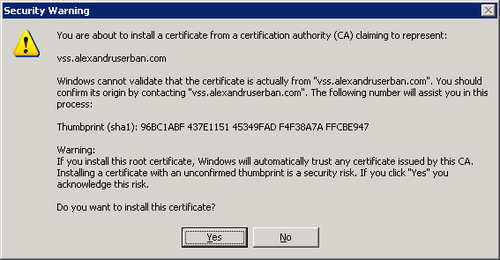
Click Yes in the security warning to install the certificate.
Restart Internet Explorer and navigate again to the same address. This time no security warnings should appear.
Repeat this procedure on all the clients.
Setting up a Server Certificate using Certificate Services
To create a server certificate you need to install the Microsoft Certificate Services on the server machine running a Windows Server operating system using the Add/Remove Windows Components section in the Add/Remove Programs Control Panel:
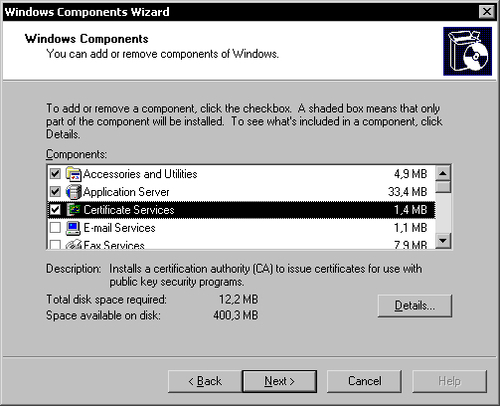
Use this wizard to install the Certificate Services if not already installed.
Requesting the Certificate
Open Internet Explorer and go to http:/[your server name]/certsrv. You will see a page similar to the following:
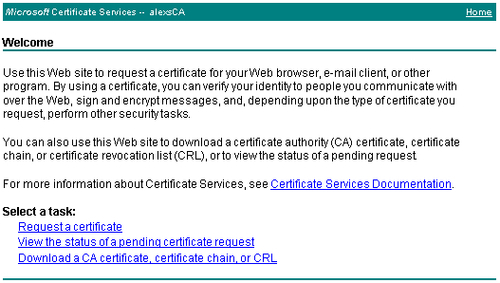
Click the Request a certificate link. In the next page you are asked for a certificate type.

Click on the advanced certificate request link. The next page shows the certificate type options.
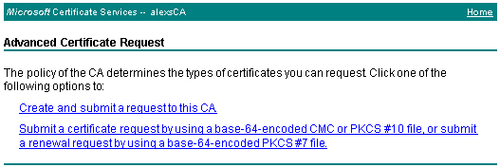
Click on the Create and submit a request to this CA link. The following page shows the Advanced Certificate Request options:

In the Identifying Information section you must enter in the Name textbox the internet domain name of the server machine where the SourceSafe XML web service is installed. The remaining fields are optional.
In this case I'm creating a certificate for the server whose domain is vss.alexandruserban.com. This is the domain that remote users will use to connect to the SourceSafe web service.
In the Type of Certificate Needed section, select the Server Authentication Certificate option.

Under the Key Options section, select as the cryptographic service provider (CSP) the Microsoft Enhanced Cryptographic Provider v1.0. Also check the Store certificate in the local computer certificate store option to store the certificate in the local certificate store.
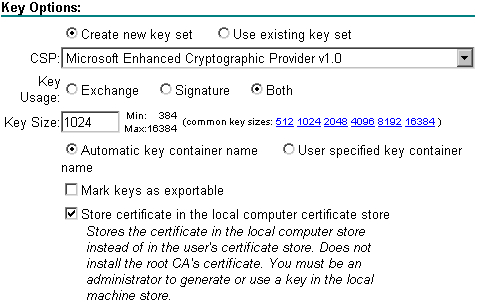
Click the Submit button to submit the certificate request and then click Yes in the warning message.

The certificate request is submitted to the certification authority, it is given a Request Id, and it is pending the approval to be issued.
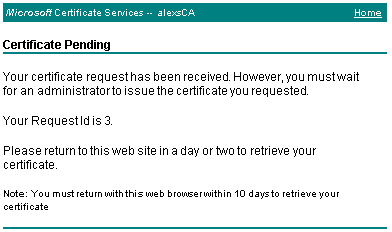
You must wait for the certificate request to be issued by the administrator, or, if you have administrator rights, you can issue it yourself.
Issuing the Server Certificate
To issue the server certificate, go to the Certification Authority section in the Control Panel under the Administrative Tools.
Expand your server name under the Certification Authority root node and click on the Pending Requests subfolder. In the right pane you can see all the pending certificate requests. To issue a certificate request right-click the request, choose All Tasks, and then click Issue.
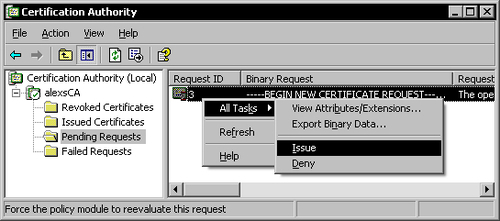
The certificate is issued and can now be installed on the server.
Installing the Certificate on the Server
To install the certificate open Internet Explorer and go to: http:/[your server name]/certsrv.
Click on the View the status of a pending certificate request link. The next page shows the statuses of pending certificate requests and issued certificates.

To view the certificate, click on the Server Authentication Certificate link. The next page allows you to install the issued certificate.

Click on the Install this certificate link and then click Yes in the warning message to install the certificate.

The certificate is successfully installed on the server.

Assigning the SSL Certificate to the Website
Once you have the server certificate, (either created by you or issued by a third party) you must assign it to the IIS website that hosts the SourceSafe web service. To assign the certificate to the website, open the Internet Information Services Manager, and expand the Web Sites subfolder.

Right-click the Default Web Site (or the site having the ID of 1), and click Properties. Go to the Directory Security tab page. In this tab page, you can see the Secure communications section.
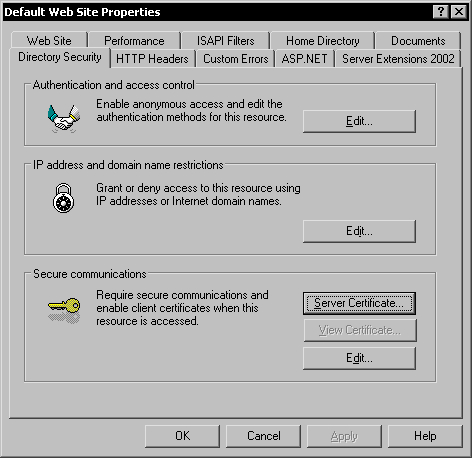
Click on the Server Certificate button to activate the IIS Certificate Wizard.
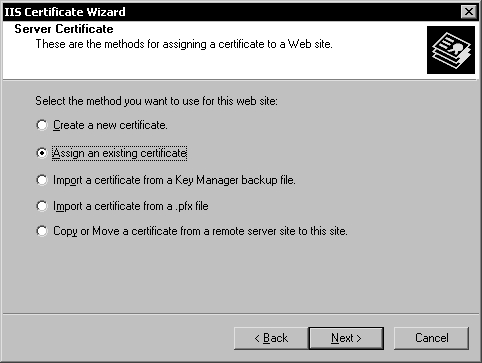
Select the Assign an existing certificate option and click Next. In the following page, select the server certificate.
In my case, I will select the certificate I created earlier:
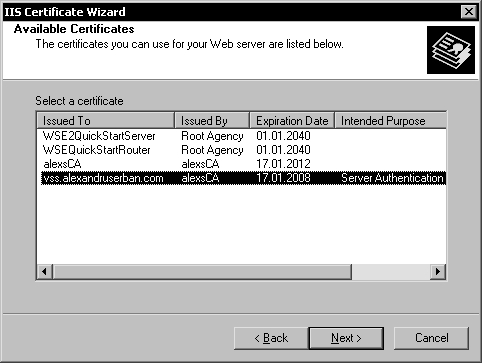
Click Next to select the certificate and advance to the SSL Port page.
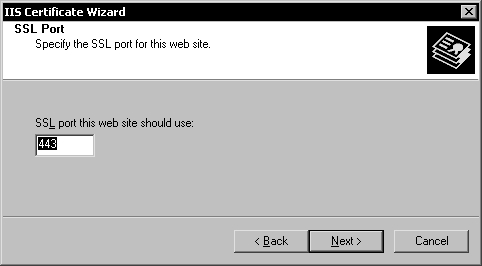
If you use another SSL port than the default 443 you can enter it here.
Click Next and then click Finish to assign the server certificate to the website.
Now the secure communications between the server and the clients will use the selected certificate.
Distributing the Server's Certificate to Users
If you choose to issue your own certificates, unless you are a globally recognized certification authority such as VeriSign, your certificates are not trusted by other machines. Trying to connect to the SourceSafe server from other clients will result in an error message.

To successfully establish a secure connection to the SourceSafe web service, the remote clients must trust the Certification Authority (the server) that issued the SSL certificate.
To be able to trust the server, remote clients must have the Certification Authority Root (CA Root) certificate installed into their local Trusted Root Certification Authorities store.
Note
Using the browser to install certificates generated with Certificate Services will not work unless the SSL certificate is a root certificate.
In the following screenshot, you can see that if you install a non-root SSL certificate on the clients using the browser, it will still not be fully trusted because the Certification Authority (displayed in the Issued by field) is not trusted.
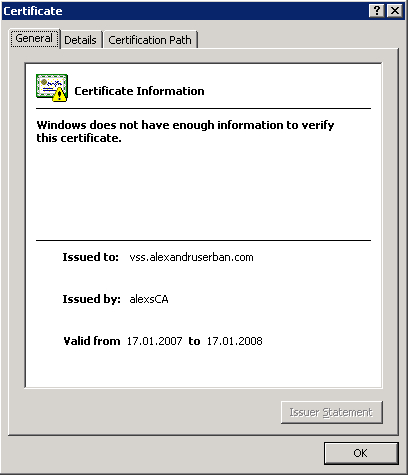
In this case you must export and distribute your server's CA Root certificate to users who will connect to the SourceSafe web service so the generated SSL certificates will be trusted.
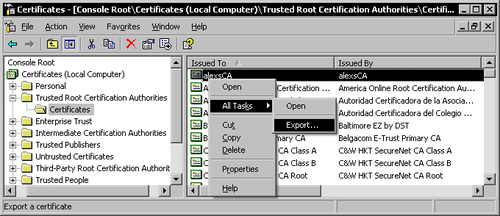
To export the CA Root certificate, open the Microsoft Management Console (mmc.exe), and add the Certificates for the local computer snap-in to it. Go to the Trusted Root Certification Authorities store, right-click your server's root certificate and use the All Tasks menu to Export the certificate.
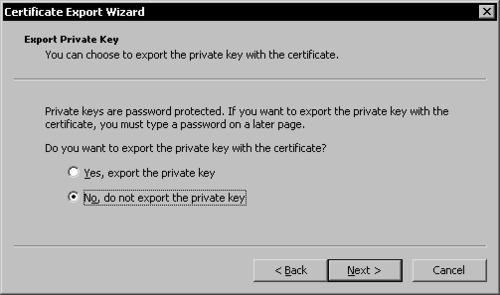
The Certificate Export Wizard will open. In the second page, choose not to export the private key and click Next.
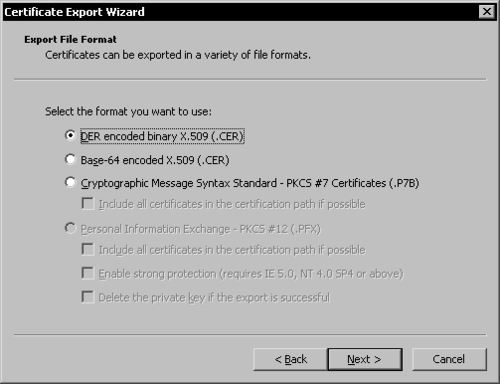
Choose the format you want to use to export the certificate and click Next.
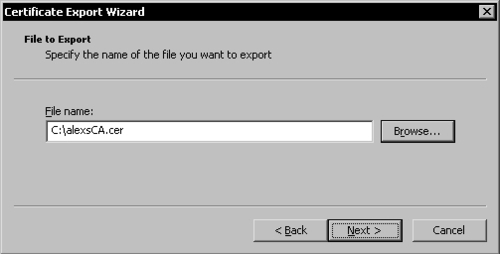
Enter the path for the certificate file to be created and click Next.
Click Next, and then Finish in the last page to export your CA Root certificate to the selected file.
Now you can distribute your CA Root certificate file to users who will connect to the SourceSafe web service. All they have to do is to double-click the file and click the Install Certificate button.
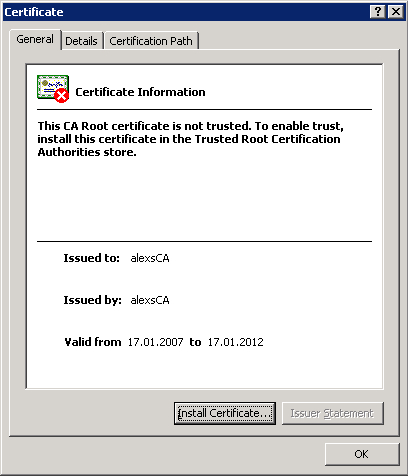
After installing the CA Root certificate, remote SourceSafe users will be able to successfully establish a secure connection to the server.


