Getting started with PowerShell
Before we can jump directly into scripting for cybersecurity and crazy red or blue team tasks, it is important to know some of the basics of PowerShell. Here are some refreshers that will help you to get started.
Introduction to OOP
PowerShell is an object-oriented language. OOP allows developers to think of software development as if they were working with real-life objects or entities. Some of the main advantages of OOP are that it's scalable, flexible, and overall, it lets you efficiently reuse your code.
Some of the base terminologies in OOP are classes, objects, properties, and methods. And if we look at the four main principles of OOP – encapsulation, abstraction, inheritance, and polymorphism – you quickly feel overwhelmed if you have no experience with OOP yet.
But don't worry, it is not as hard as it sounds, and OOP will make your life easier!
To better understand those concepts and principles, let's look at Alice and Bob as an example. They are both human beings; therefore, they share the same class: human. Both are our working entities in our example and, therefore, are our objects.
A class is a collection of properties and methods, similar to a blueprint for objects. Alice and Bob are both humans and share many properties and methods. Both have a certain amount of energy they can spend per day, can feel more or less relaxed, and need to work to gain money.
Both need to work and like to drink coffee. During the night, both need to sleep to restore their energy:
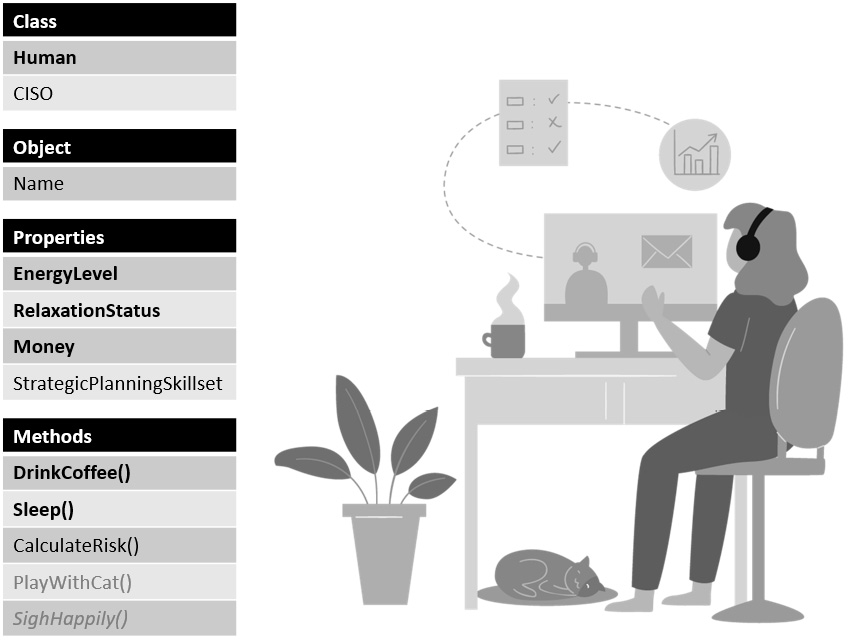
Figure 1.1 – Alice, the CISO
Alice works as a Chief Information Security Officer (CISO) and, often, plays between meetings and in the evening with her cat Mr. Meow, which helps her to relax.

Figure 1.2 – Bob, the security consultant
In comparison, Bob works as a security consultant. Although he is also a human, he has different methods than Alice: Bob does not have a cat, but he enjoys painting in his spare time, which makes him feel relaxed and restores his batteries.
Let's explore the four main principles of OOP, looking at Alice and Bob.
Encapsulation
Encapsulation is achieved if each object keeps its state private inside a class. Other objects cannot access it directly, they need to call a method to change its state.
For example, Alice's state includes the private EnergyLevel, RelaxationStatus, and Money properties. She also has a private SighHappily() method. She can call this method whenever she wants; the other classes can't influence whenever Alice sighs happily. When Alice plays with her cat Mr. Meow, the SighHappily() method is called by default – Alice really enjoys this activity.
What other classes can do is call the public Work(), DrinkCoffee(), Sleep(), and PlayWithCat() functions. Those functions can change the internal state and even call the private SighHappily() method when Alice plays with her cat Mr. Meow:
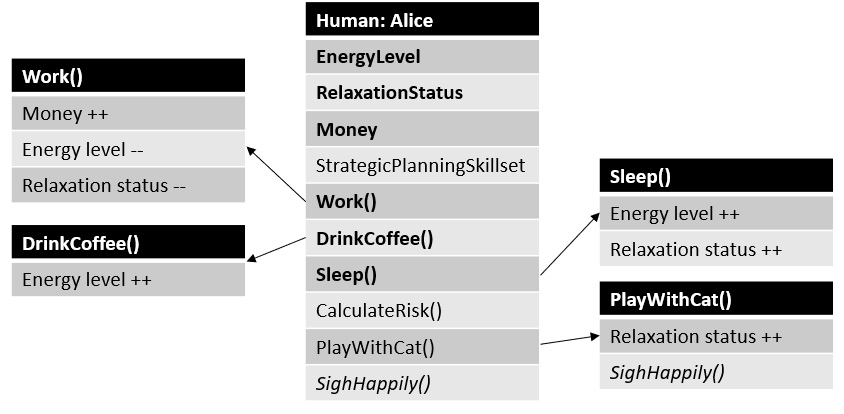
Figure 1.3 – A closer look at public and private methods
To summarize, if you want to change a private property's value, you always need to call a public method that is linked to the private state. Like in real life, there is no magic cure – besides coffee – to immediately remove your tiredness. And even with coffee, you still need to perform an action to drink it. The binding that exists between the private state and the public methods is called encapsulation.
Abstraction
Abstraction can be thought of as a natural extension of encapsulation. Often, a code base becomes super extensive, and you can lose the overview. Applying abstraction means that each object should expose its methods at only a high level and should hide details that are not necessary to other objects.
So, for example, we have the Work() method defined in the human class.
Depending on how technical your parents are, they might understand what you do in your daily job. Mine, however, do not understand a word that I say. They just know that I work with computers. So, if I talk with my parents on the phone, instead of telling them every detail and boring them to death, I just tell them that I have finished work.
A similar principle should also apply when writing object-oriented code. Although there are many different operations behind the Work()method, it is abstracted and only the relevant data is shown.
Another example could be an elevator in the office. When you push a button to get to a different floor, something happens below the surface. But only the buttons and the display, indicating the floor level, are shown to the user of the elevator. This principle is called abstraction and helps to keep an overview of the task that should be achieved.
Inheritance
If you require very similar classes or objects, you won't want to duplicate existing code. This would make things more complicated, work-intensive, and there would be a higher chance of implementing bugs – for example, if you have to change the code for all different instances and forget one.
So, our Alice and Bob objects are quite similar and share a common logic, but they are not entirely the same. They are both humans, but they have different professions that require different skillsets and tasks performed.
All CISOs and all security consultants are humans, so both roles inherit all properties and methods from the human class.
Similar to the SecurityConsultant class, the CISO class inherits all properties and methods of the human class. However, while the CISO class also introduces the StrategicPlanningSkillset property and the CalculateRisk() method, they are not necessary for the SecurityConsultant class.
The SecurityConsultant class defines their own TechnicalAuditingSkillset property and AnalyzeSystem() and TalkToCustomer() methods.
Alice inherits all the skills that were defined in the human class, and in the CISO class, which builds a hierarchy: human is now the parent class of the CISO class, while the CISO class is Alice's parent class – in this case, Alice is the child object.
Additionally, Bob inherits all the properties and methods defined in the human class, but in comparison to Alice, he inherits everything from the SecurityConsultant class:
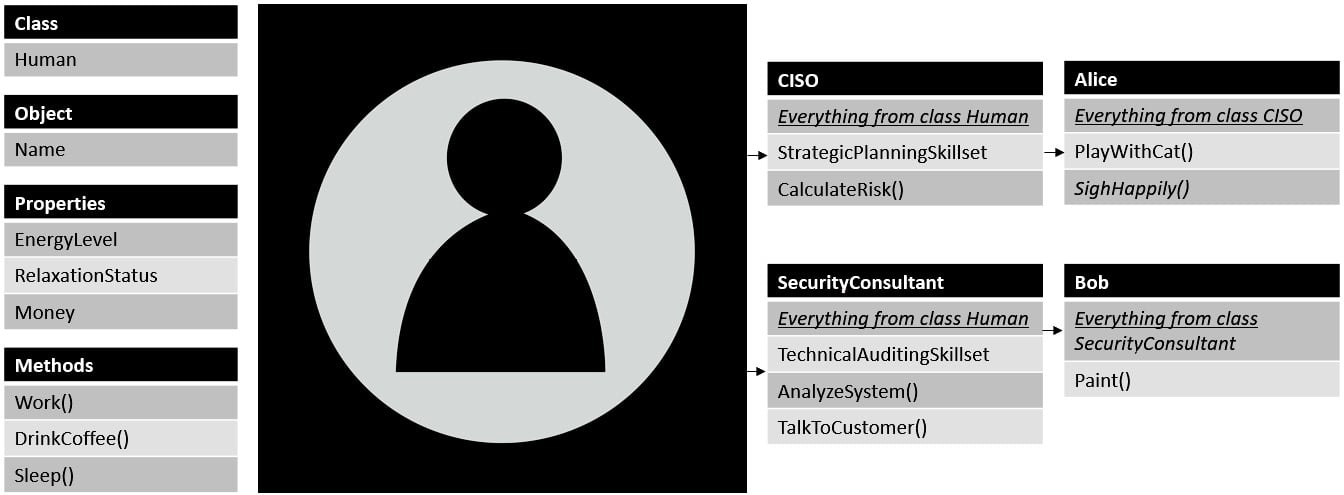
Figure 1.4 – Inheritance: parent and child classes and objects
And yes, dear security consultants and CISOs, I know that your profession requires far more skills and that your role is far more challenging than is shown in this example. I tried to make it abstract to keep it simple.
Looking at Alice and Bob, Alice enjoys spending time with her cat, Mr. Meow, so she brings her unique PlayWithCat() and SighHappily() methods. Bob does not have a cat, but he enjoys painting and, therefore, has the unique Paint() method.
Using inheritance, we only need to add what is necessary to implement the required changes while using the existing logic with the parent classes.
Polymorphism
Now that we have looked into the concept of inheritance, polymorphism is not far off. Polymorphism means that although you can create different objects out of different classes, all classes and objects can be used just like their parents.
If we look at Alice and Bob, both are humans. That means we can rely on the fact that both support the EnergyLevel, RelaxationStatus, and Money properties along with the Work(), DrinkCoffee(), and Sleep() methods.
Additionally, they can support other unique properties and methods, but they always support the same ones as their parents to avoid confusion.
Please note that this overview should only serve as a high-level overview; if you want to dive deeper into the concepts of OOP, you might want to look into other literature solely on OOP, such as Learning Object-Oriented Programming, which is written by Gaston C. Hillar and also published by Packt.
Now that you understand the base concepts of OOP, let's get back to working with PowerShell.
Windows PowerShell
By default, Windows PowerShell 5.1 is installed on all newer systems, starting with Windows 10. You can either open it by searching in your Start menu for PowerShell, or you can also start it via Windows key + R and typing in powershell or powershell.exe.
In this console, you can run commands, scripts, or cmdlets:

Figure 1.5 – The Windows PowerShell version 5.1 CLI
On Windows 10 devices, the default location of Windows PowerShell v5.1 is under the following:
- Windows PowerShell:
%SystemRoot%\system32\WindowsPowerShell\v1.0\powershell.exe - Windows PowerShell (x86):
%SystemRoot%\syswow64\WindowsPowerShell\v1.0\powershell.exe
Why Is There a v1.0 in the Path? Does That Mean I'm Running an Old Version?
As we will also take a more detailed look at PowerShell versions in this book, you might think Omg, I heard that old versions do not provide all necessary security features, such as logging and many more! Am I at risk?
No, you aren't. Although the path contains v1, newer versions are being installed in this exact path. Originally it was planned to create a new folder with the correct version name, but later Microsoft decided against it so that no breaking changes are caused.
You might have also noticed the .ps1 script extension. We have the same reason here: originally it was also planned that each version will be differentiated by the script extension. But out of backward compatibility reasons, this idea was not implemented for PowerShell v2 logic.
But since Windows PowerShell will not be developed further, it makes sense to install and use the latest PowerShell Core binaries.
PowerShell Core
On newer systems, Windows PowerShell version 5.1 is still installed by default. To use the latest PowerShell Core version, you need to manually download and install it. While this book was written, the latest stable PowerShell Core version was PowerShell 7.3.6.
To learn more about how to download and install the latest PowerShell Core version, you can leverage the official documentation: https://docs.microsoft.com/en-us/powershell/scripting/install/installing-powershell-core-on-windows.
You will find the latest stable PowerShell Core version here: https://aka.ms/powershell-release?tag=stable.
Download it and start the installation. The installation wizard opens and guides you through the installation. Depending on your requirements, you can specify what should be configured by default:
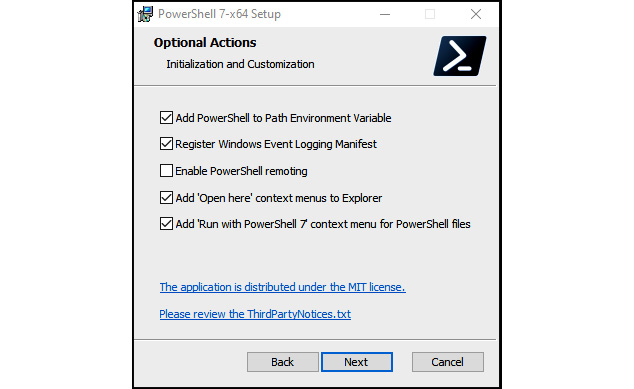
Figure 1.6 – Installing PowerShell 7
Don't worry if you haven't enabled PowerShell remoting yet. You can configure this option later. The wizard runs through and installs PowerShell Core in the separate $env:ProgramFiles\PowerShell\7 location. PowerShell 7 is designed to run parallel to PowerShell 5.1.
After the setup is complete, you can launch the new PowerShell console and pin it to your taskbar or the Start menu:
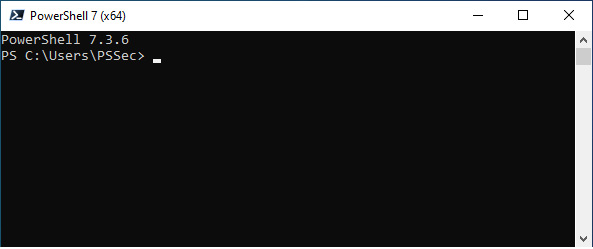
Figure 1.7 – The PowerShell version 7 CLI
Now you can use the latest PowerShell Core version instead of the old Windows PowerShell version 5.1.
Installing PowerShell Core Group Policy definitions
To define consistent options for your servers in your environment, Group Policy helps with the configuration.
When installing PowerShell 7, Group Policy templates, along with an installation script, will be populated under $PSHOME.
Group Policy requires two kinds of templates (.admx, .adml) to allow the configuration of registry-based settings.
You can find the templates as well as the installation script using the Get-ChildItem -Path $PSHOME -Filter *Core*Policy* command:

Figure 1.8 – Locating the PowerShell Core Group Policy templates and installation script
Type $PSHOME\InstallPSCorePolicyDefinitions.ps1 into your domain controller, press Tab, and confirm with Enter.
The Group Policy templates for PowerShell Core will be installed, and you can access them by navigating to the following:
- Computer Configuration | Administrative Templates | PowerShell Core
- User Configuration |Administrative Templates | PowerShell Core
You can now use them to configure PowerShell Core in your environment, in parallel to Windows PowerShell.
You can configure both policies differently, but to avoid confusion and misconfiguration, I recommend configuring the setting in Windows PowerShell and checking the Use Windows PowerShell Policy setting box, which is available in all PowerShell Core Group Policy settings.
Autocompletion
Autocompleting commands can be very useful and can save a lot of time. You can either use Tab or Ctrl + spacebar for autocompletion:
- With Tab, the command that comes nearest to the command that you already typed in is shown. With every other Tab you can switch through the commands and have the next one – sorted alphabetically – entered.
- If there are multiple commands that fit the string you entered, you can type Ctrl + spacebar to see all possible commands. You can use the arrow keys to select a command. Confirm with Enter:

Figure 1.9 – Using Ctrl + spacebar to choose the right command
Working with the PowerShell history
Sometimes, it can be useful to find out which commands you have used recently in your PowerShell session:

Figure 1.10 – Using Get-History
All recently used commands are shown. Use the arrow keys to browse the last-used commands, change them, and run them again.
In this example, one of the last commands that was run was the Enter-PSSession command, which initiates a PowerShell remoting session to the specified host – in this case, to PSSEC-PC01.
If you want to initiate another PowerShell remoting session to PSSEC-PC02 instead of PSSEC-PC01, you don't have to type in the whole command again: just use the arrow up key once, then change -ComputerName to PSSEC-PC02 and hit Enter to execute it.
If your configuration allows you to connect to PSSEC-PC02 from this PC using the same credentials, the connection is established, and you can work remotely on PSSEC-PC02.
We will have a closer look at PowerShell remoting in Chapter 3, Exploring PowerShell Remote Management Technologies and PowerShell Remoting.
Searching the PowerShell history
To search the history, pipe the Get-History command to Select-String and define the string that you are searching for:
Get-History | Select-String <string to search>
If you are a person who likes to keep your commands terse, aliases might speak to you. We will take a look at them later, but for now, here's an example of how you'd search the history, using the same commands but abbreviated as an alias:
h | sts <string to search>
If you want to see all the PowerShell remoting sessions that were established in this session, you can search for the Enter-PSSession string:

Figure 1.11 – Searching the session history
However, if you only search for a substring such as PSSession, you can find all occurrences of the PSSession string, including the last execution of Get-History:

Figure 1.12 – Searching the session history
When you are looking for a command that was run recently, you don't have to query the entire history. To only get the last X history entries, you can specify the -Count parameter.
In this example, to get the last five entries, specify -Count 5:

Figure 1.13 – Getting the last five history entries
When you close a PowerShell session, the session history is deleted. That means you will get no results if you use the session-bound Get-History command upon starting a new session.
But there's also a persistent history that you can query, as provided by the PSReadline module.
The history is stored in a file, which is stored under the path configured in (Get-PSReadlineOption).HistorySavePath:

Figure 1.14 – Displaying the location of the persistent history
You can either open the file or inspect the content using Get-Content:
> Get-Content (Get-PSReadlineOption).HistorySavePath
If you just want to search for a command to execute it once more, the interactive search might be helpful. Press Ctrl + R to search backward, and type in characters or words that were part of the command that you executed earlier.
As you are searching backward, the most recent command that you executed will appear in your command line. To find the next match, press Ctrl + R again:

Figure 1.15 – Using the interactive search to search backward
Ctrl + S works just like Ctrl + R but searches forward. You can use both shortcuts to move back and forth in the search results.
Ctrl + R and Ctrl + S allow you to search the permanent history, so you are not restricted to search for the commands run during this session.
Clearing the screen
Sometimes, after running multiple commands, you might want to start with an empty shell without reopening it – to keep your current session, history, and variables:
> Clear
After typing in the Clear command and confirming with Enter, your current PowerShell console will be cleared, and you can start with a fresh and clean console. All variables set in this session are still accessible, and your history is still available.
Instead of Clear, you can also use the cls alias or the Ctrl + L shortcut.
Canceling a command
If you are running a command, sometimes, you might want to cancel it out for different reasons. It could be that you executed the command by accident, perhaps a command takes too long, or you want to try a different approach – it doesn't matter, Ctrl + C is your friend. Press Ctrl + C to cancel a running command.
Execution Policy
Before we get started writing PowerShell scripts, let's take a closer look at a mechanism called Execution Policy. If you have tried to run a script on a system that was not configured to run scripts, you might have already stumbled upon this feature:

Figure 1.16 – Trying to execute a script on a system with Execution Policy configured as Restricted
Execution Policy is a feature that restricts the execution of PowerShell scripts on the system. Use Get-ExecutionPolicy to find out how the Execution Policy setting is configured:

Figure 1.17 – Finding out the current Execution Policy setting
While the default setting on all Windows clients is Restricted, the default setting on Windows servers is RemoteSigned. Having the Restricted setting configured, the system does not run scripts at all, while RemoteSigned allows the execution of local scripts and remote scripts that were signed.
Configuring Execution Policy
To start working with PowerShell and create your own scripts, first, you need to configure the Execution Policy setting.
Execution Policy is a feature that allows you to avoid running PowerShell code by accident. It does not protect against attackers who are trying to run code on your system on purpose.
Rather, it is a feature that protects you from your own mistakes – for example, if you have downloaded a script from the internet that you want to inspect before running, and you double-click on it by mistake, Execution Policy helps you to prevent this.
Execution Policy options
The following are the Execution Policy options that determine whether it is allowed to run scripts on the current system or whether they need to be signed to run:
AllSigned: Only scripts that are signed by a trusted publisher can be executed, including local scripts.
In 1, AppLocker, Application Control, and Code Signing, you can find out more about script signing, or you can refer to the online documentation at https://docs.microsoft.com/en-us/powershell/module/microsoft.powershell.core/about/about_signing.
Bypass: Nothing is blocked, and scripts run without generating a warning or a prompt.RemoteSigned: Only locally created scripts can run if they are unsigned. All scripts that were downloaded from the internet, or are stored on a remote network location, need to be signed by a trusted publisher.Restricted: This is the default configuration. It is not possible to run PowerShell scripts or load configuration files. It is still possible to run interactive code.Unrestricted: All scripts can be run, regardless of whether they were downloaded from the internet or were created locally. If scripts were downloaded from the internet, you will still get prompted if you want to run the file.
The Execution Policy scope
To specify who or what will be affected by the Execution Policy feature, you can define scopes. The -scope parameter allows you to set the scope that is affected by the Execution Policy feature:
CurrentUser: This means that the current user on this computer is affected.LocalMachine: This is the default scope. All users on this computer are affected.MachinePolicy: This affects all users on this computer.Process: This only affects the current PowerShell session.
One good way is to sign all scripts that are being run in your organization. Through this, you can not only identify which scripts are allowed, but it also allows you to use further mitigations such as AppLocker in a better way (you can read more about AppLocker in "11" on page 435, AppLocker, Application Control, and Code Signing) – and you can configure Execution Policy to AllSigned.
Of course, if you develop your own PowerShell scripts, they are not signed while you are still working on them.
To maintain protection from running scripts unintentionally, but to have the ability to run locally developed scripts nevertheless, the RemoteSigned setting is a good approach. In this case, only local scripts (that is, scripts that weren't downloaded from the internet and signed) can be run; unsigned scripts from the internet will be blocked from running.
Use the Set-ExecutionPolicy cmdlet as an administrator to configure the Execution Policy setting:

Figure 1.18 – Configuring the Execution Policy setting
The Execution Policy setting is being configured. Now you can run your own scripts and imported modules on your system.
Windows PowerShell – configuring Execution Policy via Group Policy
If you don't want to set the Execution Policy setting for every machine in your organization manually, you can also configure it globally via Group Policy.
To configure Group Policy for Windows PowerShell, create a new Group Policy Object (GPO) that is linked to the root folder in which all your devices are located and that you want to configure Execution Policy for.
Then, navigate to Computer Configuration | Policies | Administrative Templates | Windows Components | Windows PowerShell:
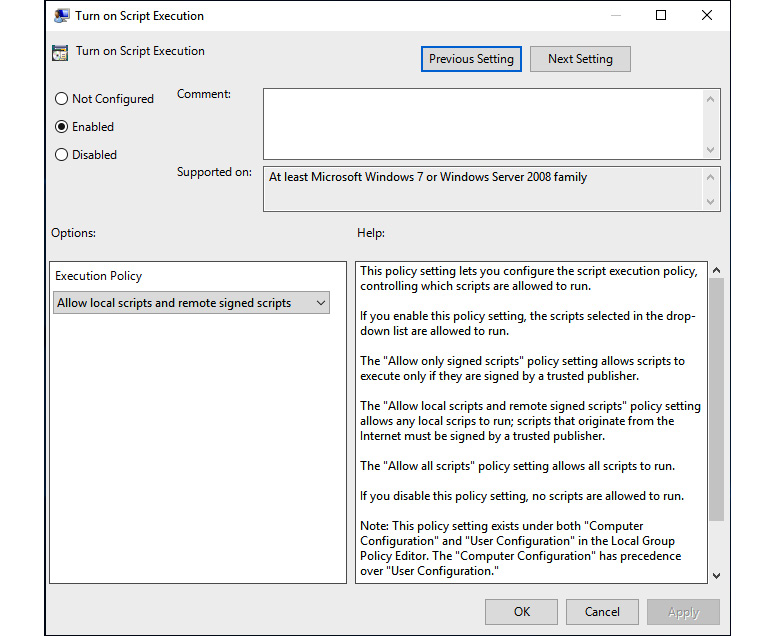
Figure 1.19 – Configuring the Execution Policy feature using GPO for Windows PowerShell
Configure the Turn on Script Execution setting, and choose the Allow local scripts and remote signed scripts option, which configures Execution Policy to RemoteSigned.
PowerShell Core – configuring Execution Policy via Group Policy
Since Windows PowerShell and PowerShell Core are designed to run in parallel, you also need to configure the Execution Policy settings for PowerShell Core.
The Group Policy settings for PowerShell Core are located in the following paths:
- Computer Configuration | Administrative Templates | PowerShell Core
- User Configuration | Administrative Templates | PowerShell Core:
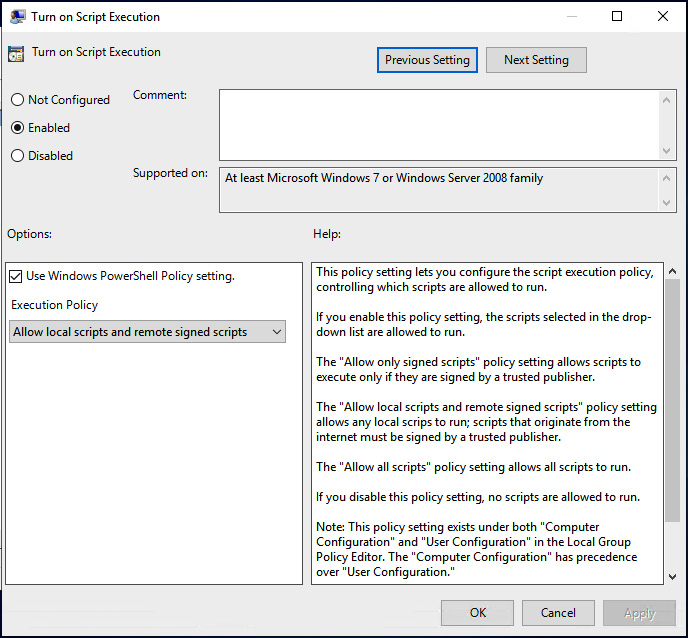
Figure 1.20 – Configuring the Execution Policy setting using GPO for PowerShell Core
Configure the settings of your choice, and apply the changes. In this case, the settings configured in the Windows PowerShell Group Policy will be applied.
Execution Policy is not a security control – avoiding Execution Policy
As mentioned earlier, Execution Policy is a feature that keeps you from running scripts unintentionally. It is not a feature designed to protect you from malicious users or from code run directly on the machine.
Even if Execution Policy is configured as strictly as possible, you can still type in any code into a PowerShell prompt.
Essentially, when we speak of bypassing Execution Policy, we are simply avoiding Execution Policy, as you will see in this section. Although it's not a real hack, some people in the security community still like to call avoiding Execution Policy a bypass.
Avoiding Execution Policy is quite easy – the easiest way is by using its own -Bypass parameter.
This parameter was introduced when people started to think of Execution Policy as a security control. The PowerShell team wanted to avoid this misconception so that organizations were not lulled into a false sense of security.
I created a simple script that just writes Hello World! into the console, which you can find on GitHub at https://github.com/PacktPublishing/PowerShell-Automation-and-Scripting-for-Cybersecurity/blob/master/Chapter01/HelloWorld.ps1.
With Execution Policy set to restricted, I get an error message when I try to run the script without any additional parameters.
However, if I run the script using powershell.exe as an administrator with the -ExecutionPolicy parameter set to Bypass, the script runs without any issues:
> powershell.exe -ExecutionPolicy Bypass -File .\HelloWorld.ps1
Hello World!
If Execution Policy is configured via Group Policy, it can't be avoided just by using the -Bypass parameter.
As Execution Policy only restricts the execution of scripts, another way is to simply pass the content of the script to Invoke-Expression. Again, the content of the script is run without any issues – even if Execution Policy was configured using Group Policy:
Get-Content .\HelloWorld.ps1 | Invoke-Expression
Hello World!
Piping the content of the script into Invoke-Expression causes the content of the script to be handled as if the commands were executed locally using the command line; this bypasses Execution Policy and Execution Policy only applies to executing scripts and not local commands.
Those are only some examples out of many ways to avoid ExecutionPolicy, there are some examples of avoiding ExecutionPolicy in "8" on page 337, Red Team Tasks and Cookbook. Therefore, don't be under the false impression that ExecutionPolicy protects you from attackers.
If you are interested in what mitigations can help you to improve the security of your environment, you can read more about it in Section 3, Securing PowerShell – Effective Mitigations in Detail.
Help system
To be successful in PowerShell, understanding and using the help system is key. To get started, you will find some useful advice in this book. As I will cover only the basics and mostly concentrate on scripting for cybersecurity, I advise you to also review the documentation on the PowerShell help system. This can be found at https://docs.microsoft.com/en-us/powershell/scripting/learn/ps101/02-help-system.
There are three functions that make your life easier when you are working with PowerShell:
Get-HelpGet-CommandGet-Member
Let's take a deeper look at how to use them and how they can help you.
Get-Help
If you are familiar with working on Linux systems, Get-Help is similar to what the man pages in Linux are, that is, a collection of how-to pages and tutorials on how to use certain commands in the best way possible.
If you don't know how to use a command, just use Get-Help <command> and you will know which options it provides and how to use it.
When you are running Get-Help for the first time on your computer, you might only see a very restricted version of the help pages, along with a remark that states that the help files are missing for this cmdlet on this computer:
Get-Help -Name Get-Help
As mentioned, the output only displays partial help:

Figure 1.21 – Output of Get-Help when the help files are missing for a cmdlet
Therefore, first, you need to update your help files. An internet connection is required. Open PowerShell as an administrator and run the following command:
Update-Help
You should see an overlay that shows you the status of the update:

Figure 1.22 – Updating help
As soon as the update is finished, you can use all the help files as intended. As help files get quickly outdated, it makes sense to update them regularly or even create a scheduled task to update the help files on your system.
Did You Know?
PowerShell help files are not deployed by default because the files get outdated so quickly. As it makes no sense to ship outdated help files, they are not installed by default.
You can use the following Get-Help parameters:
Detailed: This displays the basic help page and adds parameter descriptions along with examples.Examples: This only displays the example section.Full: This displays the complete help page.Online: This displays the online version of the specified help page. It does not work in a remote session.Parameter: This parameter only displays help for the specified parameter.ShowWindow: This displays the help page in a separate window. It not only provides better reading comfort but also allows you to search and configure the settings.
The easiest way to get all the information that the help file provides is by using the -Full parameter:
Get-Help -Name Get-Content -Full
Running this command gets you the full help pages for the Get-Content function:
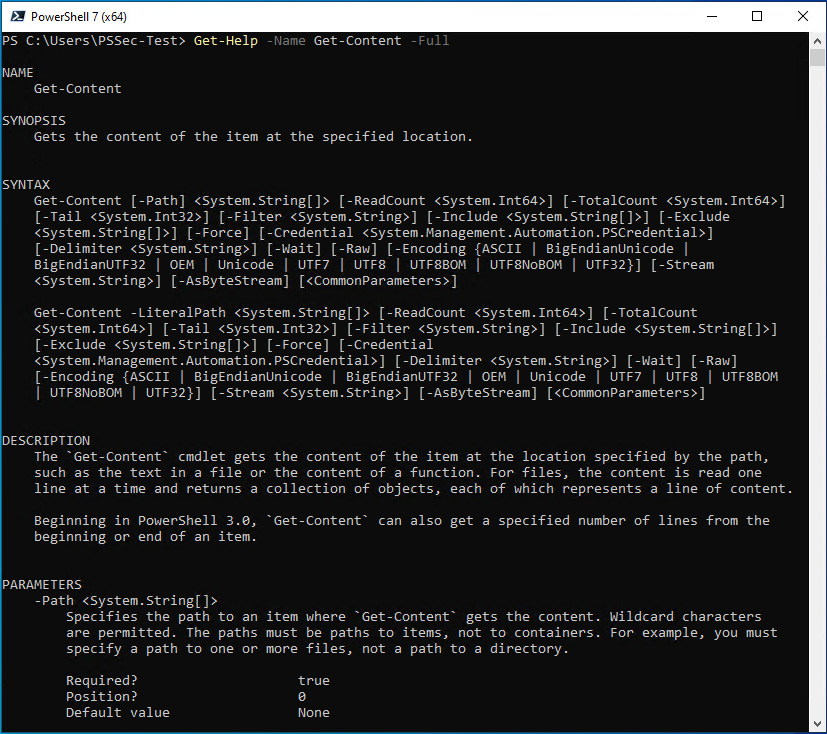
Figure 1.23 – The full Help pages for the Get-Content function
Please also review the official PowerShell documentation for more advanced ways of Get-Help: https://docs.microsoft.com/en-us/powershell/module/microsoft.powershell.core/get-help.
Get-Command
Get-Command gets you all commands that are currently installed on the computer, including aliases, applications, cmdlets, filters, functions, and scripts:
Get-Command
Additionally, it can show you which commands are available for a certain module. In this case, we investigate the EventList module that we have installed from the PowerShell Gallery, which is a central repository for the modules, scripts, and other PowerShell-related resources:
> Get-Command -Module EventList
CommandType Name                                Version    Source
----------- ----                                -------    ------
Function    Add-EventListConfiguration          2.0.0      EventList
Function    Get-AgentConfigString               2.0.0      EventList
Function    Get-BaselineEventList               2.0.0      EventList
Function    Get-BaselineNameFromDB              2.0.0      EventList
Function    Get-GroupPolicyFromMitreTechniques  2.0.0      EventList
Function    Get-MitreEventList                  2.0.0      EventList
Function    Get-SigmaPath                       2.0.0      EventList
Function    Get-SigmaQueries                    2.0.0      EventList
Function    Get-SigmaSupportedSiemFromDb        2.0.0      EventList
Function    Import-BaselineFromFolder           2.0.0      EventList
Function    Import-YamlCofigurationFromFolder   2.0.0      EventList
Function    Open-EventListGUI                   2.0.0      EventList
Function    Remove-AllBaselines                 2.0.0      EventList
Function    Remove-AllYamlConfigurations        2.0.0      EventList
Function    Remove-EventListConfiguration       2.0.0      EventList
Function    Remove-OneBaseline                  2.0.0      EventList
Get-Command can be also very helpful if you are looking for a specific cmdlet, but you can't remember its name. For example, if you want to find out all the cmdlets that are available on your computer that have Alias in their name, Get-Command can be very helpful:
> Get-Command -Name "*Alias*" -CommandType Cmdlet
CommandType  Name           Version    Source
-----------  ----           -------    ------
Cmdlet       Export-Alias   3.1.0.0    Microsoft.PowerShell.Utility
Cmdlet       Get-Alias      3.1.0.0    Microsoft.PowerShell.Utility
Cmdlet       Import-Alias   3.1.0.0    Microsoft.PowerShell.Utility
Cmdlet       New-Alias      3.1.0.0    Microsoft.PowerShell.Utility
Cmdlet       Set-Alias      3.1.0.0    Microsoft.PowerShell.Utility
If you don't remember a certain command exactly, use the -UseFuzzyMatching parameter. This shows you all of the related commands:
Get-Command get-commnd -UseFuzzyMatching
CommandType   Name         Version   Source
-----------   ----         -------   ------
Cmdlet        Get-Command  7.1.3.0   Microsoft.PowerShell.Core
Application   getconf      0.0.0.0   /usr/bin/getconf
Application   command      0.0.0.0   /usr/bin/command
Additionally, please review the documentation to get more advanced examples on how Get-Command can help you: https://docs.microsoft.com/en-us/powershell/module/microsoft.powershell.core/get-command.
Get-Member
Get-Member helps you to display the members within an object.
In PowerShell, everything is an object, even a simple string. Get-Member is very useful for seeing which operations are possible.
So, if you want to see what operations are possible when using your "Hello World!" string, just type in the following:
"Hello World!" | Get-Member
All available methods and properties will be displayed, and you can choose from the list the one that best fits your use case:
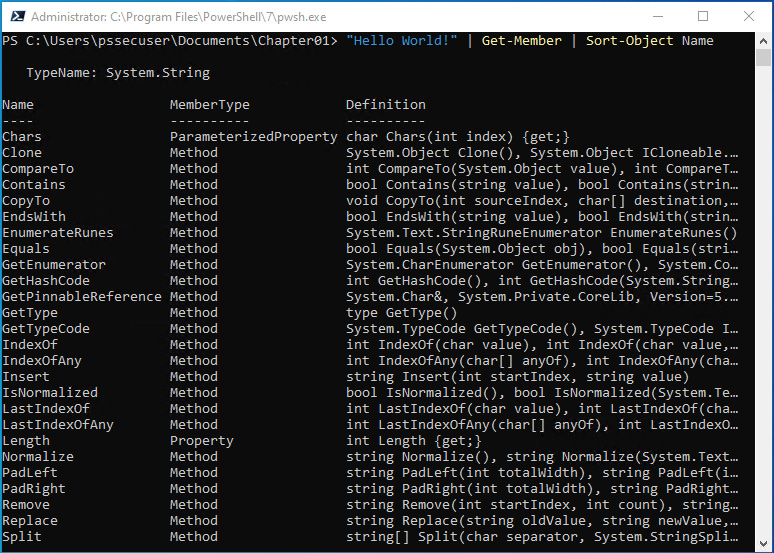
Figure 1.24 – Displaying all the available members of a string
In the preceding example, I also inserted the | Sort-Object Name string. It sorts the output alphabetically and helps you to quickly find a method or property by name.
If Sort-Object was not specified, Get-Member would have sorted the output alphabetically by MemberType (that is, Method, ParameterizedProperty, and Property).
After you have chosen the operation that you want to run, you can use it by adding.(a dot), followed by the operation. So, if you want to find out the length of your string, add the Length operation:
> ("Hello World!").Length
12
Of course, you can also work with variables, numbers, and all other objects.
To display the data type of a variable, you can use GetType(). In this example, we use GetType() to find out that the data type of the $x variable is integer:
> $x = 4
> $x.GetType()
IsPublic IsSerial Name  BaseType
-------- -------- ----  --------
True     True     Int32 System.ValueType
To get more advanced examples regarding how to use Get-Member, please also make sure that you review the official documentation at https://docs.microsoft.com/en-us/powershell/module/microsoft.powershell.utility/get-member.
PowerShell versions
As PowerShell functionalities are often tied to a certain version, it might be useful to check the PowerShell version that is installed on your system.
You can use the $PSVersionTable.PSVersion environment variable:
> $PSVersionTable.PSVersion
Major  Minor  Build  Revision
-----  -----  -----  --------
5      1      19041  610
In this example, PowerShell 5.1 has been installed.
Exploring security features added with each version
PowerShell is backward compatible with earlier versions. Therefore, it makes sense to always upgrade to the latest version.
But let's have a look at which security-related features were made available with which version. This overview should serve only as a reference, so I won't dive into every feature in detail.
PowerShell v1
The first PowerShell version, PowerShell v1, was released in 2006 as a standalone version. It introduced the following list of security-related features:
- Signed scripts and PowerShell Subject Interface Package (SIP).
Get-AuthenticodeSignature,*-Acl, andGet-PfxCertificate cmdlets.- Execution Policy.
- Requiring intent to run scripts from the current directory (
./foo.ps1). - Scripts are not run if they are double-clicked.
- PowerShell Engine logging: Some commands could be logged via
LogPipelineExecutionDetails, although this is difficult to configure. - Built-in protection from scripts that are sent directly via email: This intentionally adds PowerShell extensions to Windows' Unsafe to email list.
- Software Restriction Policies (SRPs) and AppLocker support.
PowerShell v2
In 2009, the second version of PowerShell (PowerShell v2) was released. This version was included in the Windows 7 OS by default. It offered the following list of features:
- Eventing
- Transactions
- Changes within Execution Policy
- Scopes to Execution Policy (the process, user, and machine)
- The ExecutionPolicy Bypass implementation to make people stop treating it like a security control
- PowerShell remoting security
- Modules and module security
- IIS-hosted remoting endpoints
- This was very difficult to configure and required DIY constrained endpoints.
Add-Type- Data language
PowerShell v3
PowerShell v3, released in 2012, was included by default in the Windows 8 OS. It offered the following list of features:
- Unblock-File and alternate data stream management in core cmdlets.
- The initial implementation of constrained language (for Windows RT).
- Registry settings for module logging (via
LogPipelineExecutionDetails). - Constrained endpoints: These were still hard to configure, but a more admin-friendly version of IIS-hosted remoting endpoints.
PowerShell v4
Following PowerShell version v3, PowerShell v4 was just released in 2013 – 1 year after the former version – and was included, by default, in the Windows 8.1 OS. Its features are listed as follows:
- Workflows.
- DSC security, especially for signed policy documents.
- PowerShell web services security.
- With KB3000850, many significant security features could be ported into PowerShell version 4, such as module logging, script block logging, transcription, and more. However, those features were included, by default, in PowerShell version 5.
PowerShell v5
PowerShell v5 was released in 2015 and was included, by default, in the Windows 10 OS. A lot of security features that are available nowadays in PowerShell were provided with this release. They are listed as follows:
- Security transparency
- AMSI
- Transcription
- Script block logging
- Module logging
- Protected event logging
- JEA
- Local JEA (for interactive constrained/kiosk modes)
- Secure code generation APIs
- Constrained language
- Cryptographic Message Syntax (CMS) cmdlets,
*-FileCatalogcmdlets,ConvertFrom-SddlString,Format-Hex, andGet-FileHash - PowerShell Gallery security
Revoke-Obfuscation- The Injection Hunter module
- PowerShell classes security
PowerShell v6
With PowerShell v6, which was released as a standalone in 2018, the PowerShell team was mostly focused on the effort to make PowerShell available cross-platform as open source software. PowerShell v6 introduced the first macOS and Unix shell to offer full security transparency. Its features include the following:
- OpenSSH on Windows
- Cross-platform parity: full security transparency via Syslog
PowerShell editors
Before we get started, you might want to choose an editor. Before you start typing your scripts into notepad.exe or want to use PowerShell ISE for PowerShell 7, let's take a look at what PowerShell editors you can use for free and what the potential downsides are.
Windows PowerShell ISE
The Windows PowerShell Integrated Scripting Environment (ISE) is a host application that is integrated within Microsoft Windows systems. As this application is pre-installed, this makes it very easy for beginners to simply open the Windows PowerShell ISE and type in their very first script.
The downside of the Windows PowerShell ISE is that, currently, it does not support PowerShell Core – and currently, there's no intention by the PowerShell team to add support.
To open it, you can either open the Windows Start menu and search for PowerShell ISE, or you can run it by opening the command line, using the Windows key + R shortcut, and typing in powershell_ise or powershell_ise.exe.
When you start the Windows PowerShell ISE, you will only see a PowerShell command line, the menu, and the available commands. Before you can use the editor, you either need to open a file or create a new blank file.
You can also click on the little drop-down arrow on the right-hand side to expand the scripting pane or enable the scripting pane from the View menu:
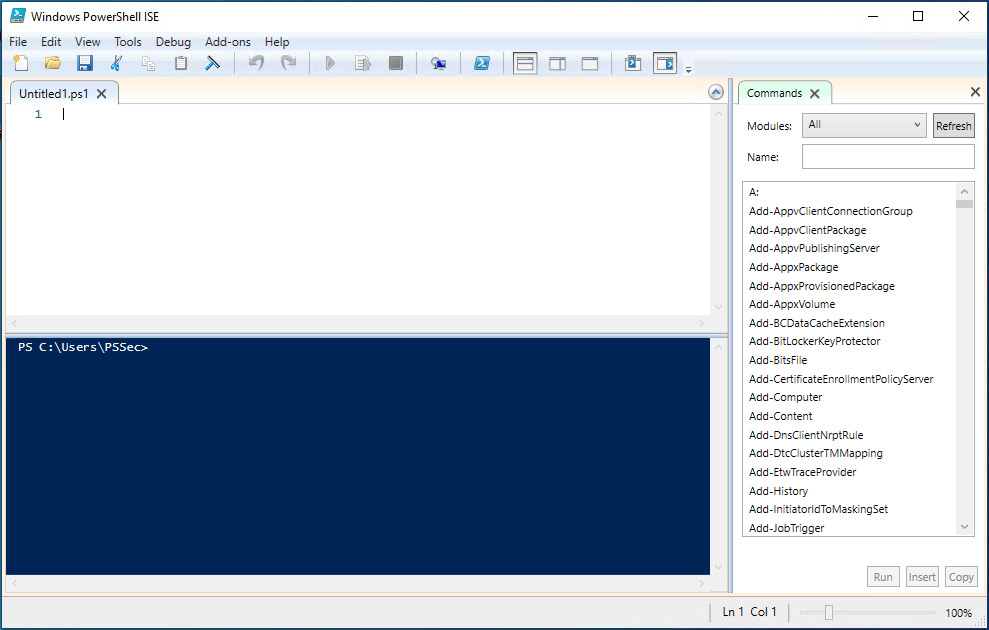
Figure 1.25 – Windows PowerShell ISE after opening a new file
On Windows 10 devices, the default location of the PowerShell ISE is under the following:
- Windows PowerShell ISE:
%windir%\system32\WindowsPowerShell\v1.0\PowerShell_ISE.exe
- Windows PowerShell ISE (x86):
%windir%\syswow64\WindowsPowerShell\v1.0\PowerShell_ISE.exe
Where Do Those Nasty Errors Come From?
When working with PowerShell or the PowerShell ISE, sometimes, errors can appear that are caused by the fact that you had insufficient permissions. To overcome that issue, start PowerShell (ISE) as an administrator if your use case requires it.
Windows PowerShell ISE commands
On the right-hand pane, you can browse through all commands and modules that are available in this session. Especially if you are not that familiar with existing cmdlets, this can help you a lot.
Visual Studio Code
Yes, you could just use Windows PowerShell or Windows PowerShell ISE to work with PowerShell 5.1. But honestly, you should use PowerShell Core 7 instead.
You want to write complex scripts, functions, and modules, and, therefore, you want to use a good editor that supports you while scripting.
Visual Studio Code is not the only recommended editor to use to edit PowerShell, but it comes for free as an open source and cross-platform version.
It was developed by Microsoft and can be downloaded from the official Visual Studio Code web page at https://code.visualstudio.com/.
Visual Studio versus Visual Studio Code
When you search for Visual Studio Code, it often happens that you stumble onto Visual Studio, which is – despite the name – a completely different product.
Visual Studio is a full-featured integrated development environment (IDE), which consists of multiple tools that help a developer to develop, debug, compile, and deploy their code. Visual Studio even contains a tool to easily design GUI components.
Visual Studio Code is an editor that provides a lot of features, but in the end, it is very useful for code developers. Additionally, it provides Git integration, which makes it very easy to connect with your versioning system to track changes and eventually revert them.
To summarize, Visual Studio is a big suite that was designed to develop apps for Android, iOS, Mac, Windows, the web, and the cloud, as Microsoft states. In comparison, Visual Studio Code is a code editor that supports thousands of extensions and provides many features. Visual Studio does not run on Linux systems, while Visual Studio Code works on cross-platform systems.
As Visual Studio is a full-featured IDE with many features, it might take longer to load when starting the program. So, for working with PowerShell, I recommend using Visual Studio Code, which is not only my preferred editor but also the recommended editor for PowerShell.
Working with Visual Studio Code
Visual Studio Code offers some great benefits when working with PowerShell. The PowerShell team has even released a guide on how to leverage Visual Studio Code for your PowerShell development. You can find it at https://docs.microsoft.com/en-us/powershell/scripting/dev-cross-plat/vscode/using-vscode.
Once you have installed Visual Studio Code onto your OS, this is what the UI should look like when you open it:
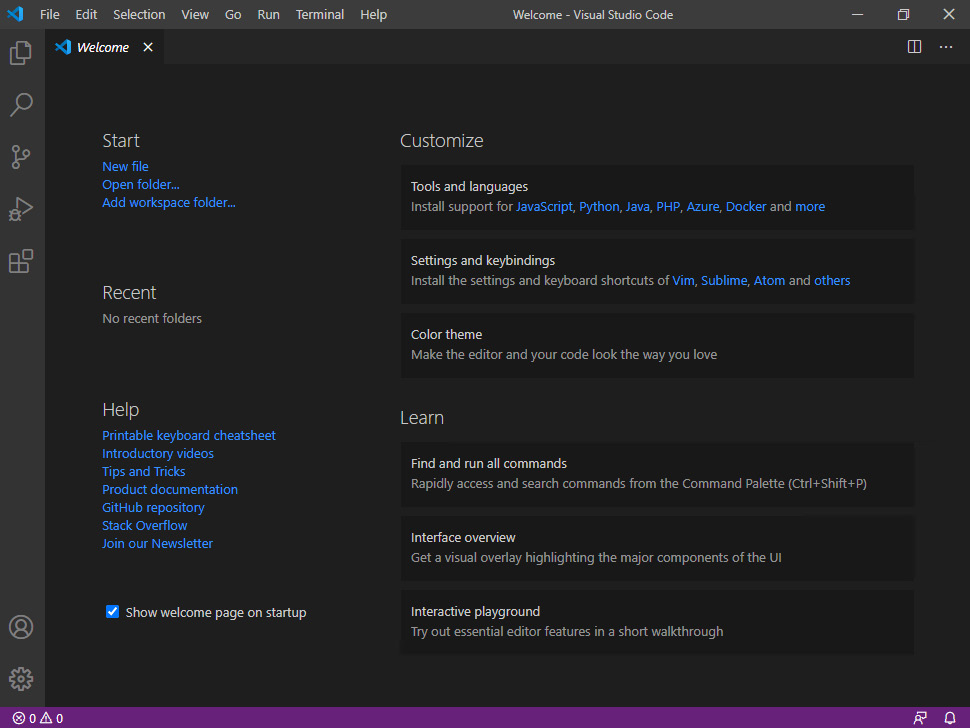
Figure 1.26 – The Visual Studio Code editor
If you want to get the most out of Visual Studio Code, make sure that you follow the documentation. Nevertheless, here are my must-haves when working on my PowerShell projects in Virtual Studio Code.
Installing the PowerShell extension
To properly work with PowerShell using Visual Studio Code, the PowerShell extension should be installed and activated.
If you start a new project or file and use PowerShell code before installing the PowerShell extension, Visual Studio Code suggests installing the PowerShell extension. Confirm with Yes to the prompt on the installation of the PowerShell extension.
If you want to download the extension manually, you can download the Visual Studio PowerShell extension via the following link: https://marketplace.visualstudio.com/items?itemName=ms-vscode.PowerShell.
Launch the quick opening option by pressing Ctrl + P and type in ext install powershell. Then, press Enter.
The extensions pane opens. Search for PowerShell and click on the Install button. Follow the instructions.
After the installation, the PowerShell extension is automatically displayed. If you want to access it later again, you can either open the Extensions pane directly from the menu or by using the Ctrl + Shift + X shortcut:
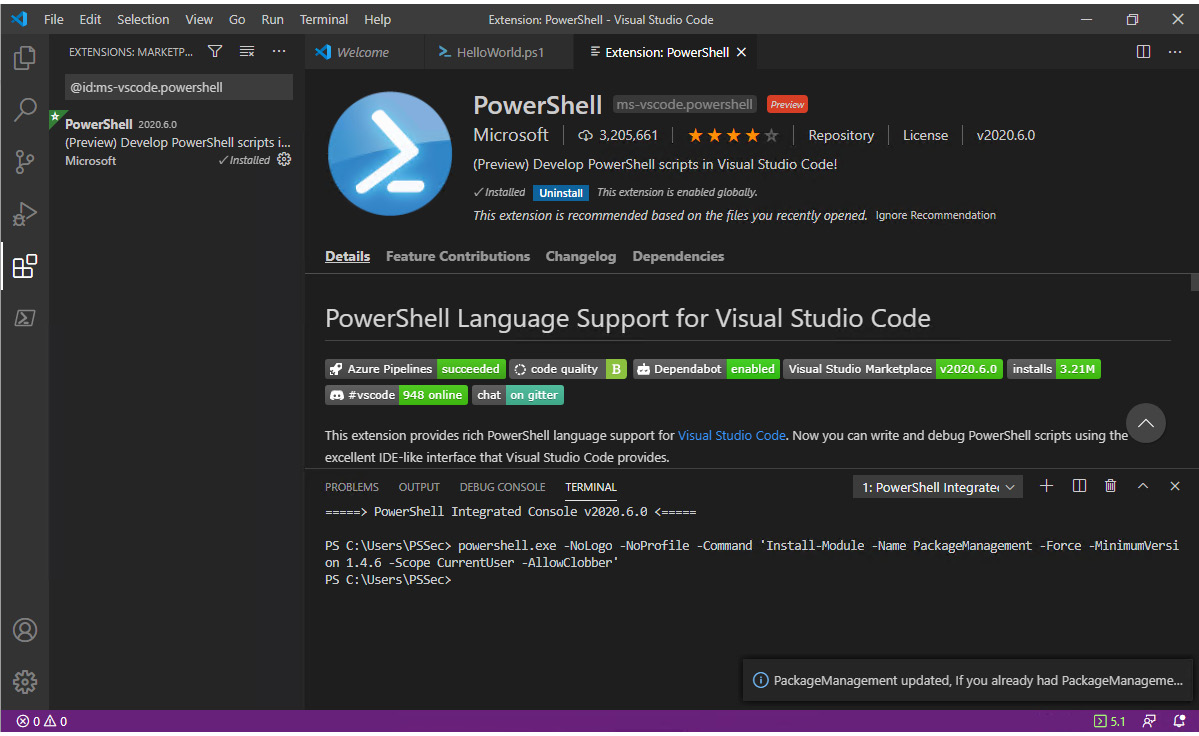
Figure 1.27 – Visual Studio Code: Installing the PowerShell extension
Automated Formatting in Visual Studio Code
By pressing Alt + Shift + F, Visual Studio Code automatically formats your current code. You can specify your formatting preferences by adjusting your workspace configuration.


