Naming the session
Each session has a name that you can set or change.
Notice the [0] at the very left of the status bar? This is the name of the session in brackets. Here, since you just started tmux without any arguments, it was given the name 0. However, this is not a very useful name, so let's change it.
In the prompt, just run the following command:
$ tmux rename-session tutorial
This tells tmux that you want to rename the current session and tutorial is the name you'd like it to have. Of course, you can name it anything you'd like. You should see that your status bar has now been updated, so now instead of [0] on the left-hand side, it should now say [tutorial]. Here's a screenshot of my screen:

Of course, it's nice that the status bar now has a pretty name we defined rather than 0, but it provides many more utilities than this, as we'll see in a bit!
It's worth noting that here we were giving a session a name, but this same command can also be used to rename an existing session.
The window string
The status bar has a string that represents each window to inform us about the things that are currently running. The following steps will help us to explore this a bit more:
- Let's fire up a text editor to pretend we're doing some coding:
$ nano test
- Now type some stuff in there to simulate working very hard on some code:
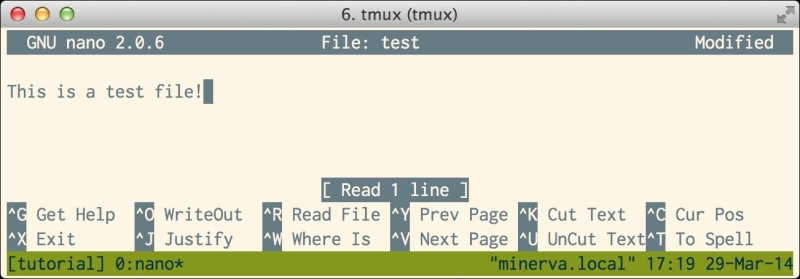
First notice how the text blob in our status bar just to the right of our session name ([tutorial]) has changed. It used to be 0:~* and now it's 0:nano*. Depending on the version of tmux and your chosen shell, yours may be slightly different (for example, 0:bash*). Let's decode this string a bit.
This little string encodes a lot of information, some of which is provided in the following bullet points:
- The zero in the front represents the number of the window. As we'll shortly see, each window is given a number that we can use to identify and switch to it.
- The colon separates the window number from the name of the program running in that window.
- The symbols ~ or nano in the previous screenshot are loosely names of the running program. We say "loosely" because you'll notice that ~ is not the name of a program, but was the directory we were visiting. tmux is pretty slick about this; it knows some state of the program you're using and changes the default name of the window accordingly. Note that the name given is the default; it's possible to explicitly set one for the window, as we'll see later.
- The symbol * indicates that this is the currently viewed window. We only have one at the moment, so it's not too exciting; however, once we get more than one, it'll be very helpful.
Creating another window
OK! Now that we know a bit about a part of the status line, let's create a second window so we can run a terminal command. Just press Ctrl + b, then c, and you will be presented with a new window!
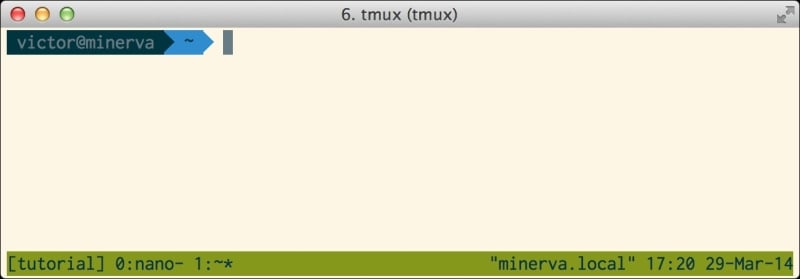
A few things to note are as follows:
- Now there is a new window with the label 1:~*. It is given the number 1 because the last one was 0. The next will be 2, then 3, 4, and so on.
- The asterisk that denoted the currently active window has been moved to 1 since it is now the active one.
- The
nanoapplication is still running in window 0. - The asterisk on window 0 has been replaced by a hyphen (-). The - symbol denotes the previously opened window. This is very helpful when you have a bunch of windows.
Let's run a command here just to illustrate how it works. Run the following commands:
$ echo "test" > test
$ cat test
The output of these commands can be seen in the following screenshot:
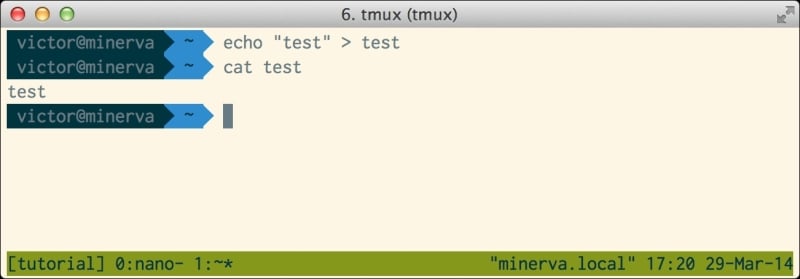
This is just some stuff so we can help identify this window. Imagine in the real world though you are moving a file, performing operations with Git, viewing log files, running top, or anything else.
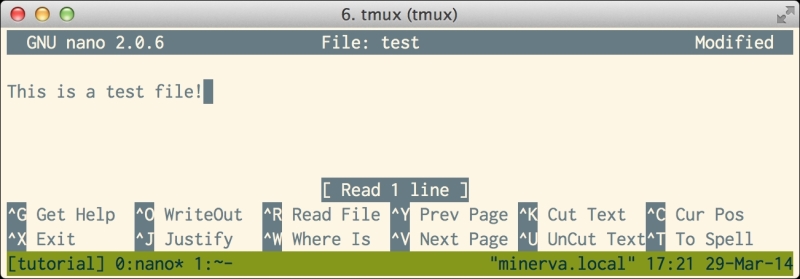
Let's jump back to window 0 so we can see nano still running. Simply press Ctrl + b and l to switch back to the previously opened window (the one with the hyphen; l stands for the last). As shown in the following screenshot, you'll see that nano is alive, and well, it looks exactly as we left it:
The prefix key
There is a special key in tmux called the prefix key that is used to perform most of the keyboard shortcuts. We have even used it already quite a bit! In this section, we will learn more about it and run through some examples of its usage.
You will notice that in the preceding exercise, we pressed Ctrl + b before creating a window, then Ctrl + b again before switching back, and Ctrl + b before a number to jump to that window.
When using tmux, we'll be pressing this key a lot. It's even got a name! We call it the prefix key. Its default binding in tmux is Ctrl + b, but you can change that if you prefer something else or if it conflicts with a key in a program you often use within tmux. You can send the Ctrl + b key combination through to the program by pressing Ctrl + b twice in a row; however, if it's a keyboard command you use often, you'll most likely want to change it. This key is used before almost every command we'll use in tmux, so we'll be seeing it a lot.
From here on, if we need to reference the prefix key, we'll do it like <Prefix>. This way if you rebind it, the text will still make sense. If you don't rebound it or see <Prefix>, just type Ctrl + b.
Let's create another window for another task. Just run <Prefix>, c again. Now we've got three windows: 0, 1, and 2. We've got one running nano and two running shells, as shown in the following screenshot:
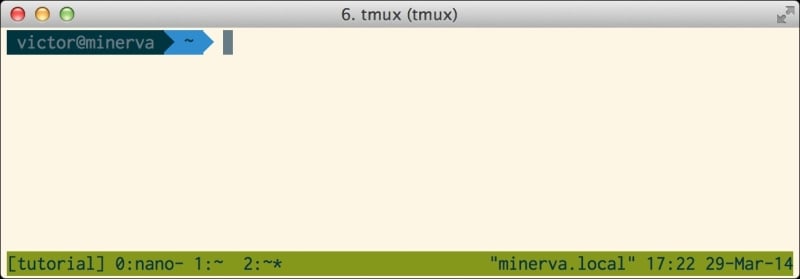
Some more things to note are as follows:
- Now we have window 2, which is active. See the asterisk?
- Window 0 now has a hyphen because it was the last window we viewed.
- This is a clear, blank shell because the one we typed stuff into is over in Window 1.
Let's switch back to window 1 to see our test commands above still active. The last time we switched windows, we used <Prefix>, l to jump to the last window, but that will not work to get us to window 1 at this point because the hyphen is on window 0. So, going to the last selected window will not get us to 1.
Thankfully, it is very easy to switch to a window directly by its number. Just press <Prefix>, then the window number to jump to that window. So <Prefix>, 1 will jump to window 1 even though it wasn't the last one we opened, as shown in the following screenshot:

Sure enough, now window 1 is active and everything is present, just as we left it. Now we typed some silly commands here, but it could just as well have been an active running process here, such as unit tests, code linting, or top. Any such process would run in the background in tmux without an issue.
Tip
This is one of the most powerful features of tmux.
In the traditional world, to have a long-running process in a terminal window and get some stuff done in a terminal, you would need two different terminal windows open; if you accidentally close one, the work done in that window will be gone.
tmux allows you to keep just one terminal window open, and this window can have a multitude of different windows within it, closing all the different running processes. Closing this terminal window won't terminate the running processes; tmux will continue humming along in the background with all of the programs running behind the scenes.
Help on key bindings
Now a keen observer may notice that the trick of entering the window number will only work for the first 10 windows. This is because once you get into double digits, tmux won't be able to tell when you're done entering the number. If this trick of using the prefix key plus the number only works for the first 10 windows (windows 0 to 9), how will we select a window beyond 10?
Thankfully, tmux gives us many powerful ways to move between windows. One of my favorites is the choose window interface.
However, oh gee! This is embarrassing. Your author seems to have entirely forgotten the key combination to access the choose window interface. Don't fear though; tmux has a nice built-in way to access all of the key bindings. So let's use it!
Press <Prefix>, ? to see your screen change to show a list with bind-key to the left, the key binding in the middle, and the command it runs to the right. You can use your arrow keys to scroll up and down, but there are a lot of entries there!
Thankfully, there is a quicker way to get to the item you want without scrolling forever.
Press Ctrl + s and you'll see a prompt appear that says Search Down:, where you can type a string and it will search the help document for that string.
Note
Emacs or vi mode
tmux tries hard to play nicely with developer defaults, so it actually includes two different modes for many key combinations tailored for the two most popular terminal editors: Emacs and vi. These are referred to in tmux parlance as status-keys and mode-keys that can be either Emacs or vi.
The tmux default mode is Emacs for all the key combinations, but it can be changed to vi via configuration, something we'll cover in Chapter 2, Configuring tmux. It may also be set to vi automatically based on the global $EDITOR setting in your shell.
If you are used to Emacs, Ctrl + s should feel very natural since it's the command Emacs uses to search.
So, if you try Ctrl + s and it has no effect, your keys are probably in the vi mode. We'll try to provide guidance when there is a mode-specific key like this by including the vi mode's counterpart in parentheses after the default key.
For example, in this case, the command would look like Ctrl + s (/) since the default is Ctrl + s and / is the command in the vi mode.
Type in choose-window and hit Enter to search down and find the choose-window key binding. Oh look! There it is; it's w:

However, what exactly does that mean?
Well, all that means is that we can type our prefix key (<Prefix>), followed by the key in that help document to run the mentioned command. First, let's get out of these help docs. To get out of these or any screens like them, generated by tmux, simply press q for quit and you should be back in the shell prompt for window 2.
If you ever forget any key bindings, this should be your first step.
Tip
A nice feature of this key binding help page is that it is dynamically updated as you change your key bindings.
Later, when we get to Configuration, you may want to change bindings or bind new shortcuts. They'll all show up in this interface with the configuration you provide them with.
Can't do that with manpages!
Now, to open the choose window interface, simply type <Prefix>, w since w was the key shown in the help bound to choose-window and voilà:

Notice how it nicely lays out all of the currently open windows in a task-manager-like interface.
It's interactive too. You can use the arrow keys to move up and down to highlight whichever window you like and then just hit Enter to open it. Let's open the window with nano running. Move up to highlight window 0 and hit Enter.
You may notice a few more convenient and intuitive ways to switch between the currently active windows when browsing through the key bindings help. For example, <Prefix>, p will switch to the previous window and <Prefix>, n will switch to the next window. Whether refreshing your recollection on a key binding you've already learnt or seeking to discover a new one, the key bindings help is an excellent resource.
Searching for text
Now we only have three windows so it's pretty easy to remember what's where, but what if we had 30 or 300? With tmux, that's totally possible. (Though, this is not terribly likely or useful! What would you do with 300 active windows?)
One other convenient way to switch between windows is to use the find-window feature. This will prompt us for some text, and it will search all the active windows and open the window that has the text in it.
If you've been following along, you should have the window with nano currently open (window 0). Remember we had a shell in window 1 where we had typed some silly commands? Let's try to switch to that one using the find-window feature.
Type <Prefix>, f and you'll see a find-window prompt as shown in the following screenshot:

Here, type in cat test and hit Enter.
You'll see you've switched to window 1 because it had the cat test command in it.
However, what if you search for some text that is ambiguous? For example, if you've followed along, you will see the word test appear multiple times on both windows 0 and 1. So, if you try find-window with just the word test, it couldn't magically switch right away because it wouldn't know which window you mean.
Thankfully, tmux is smart enough to handle this. It will give you a prompt, similar to the choose-window interface shown earlier, but with only the windows that match the query (in our case, windows 0 and 1; window 2 did not have the word test in it). It also includes the first line in each window (for context) that had the text.

Pick window 0 to open it.
Detaching and attaching
Now press <Prefix>, d.
Uh oh! Looks like tmux is gone! The familiar status bar is no more available. The <Prefix> key set does nothing anymore.

You may think we the authors have led you astray, causing you to lose your work. What will you do without that detailed document you were writing in nano?
Fear not explorer, we are simply demonstrating another very powerful feature of tmux. <Prefix>, d will simply detach the currently active session, but it will keep running happily in the background!
Yes, although it looks like it's gone, our session is alive and well.
How can we get back to it? First, let's view the active sessions. In your terminal, run the following command:
$ tmux list-sessions
You should see a nice list that has your session name, number of windows, and date of creation and dimensions. If you had more than one session, you'd see them here too.

To re attach the detached session to your session, simply run the following command:
$ tmux attach-session –t tutorial
This tells tmux to attach a session and the session to attach it to as the target (hence -t). In this case, we want to attach the session named tutorial. Sure enough, you should be back in your tmux session, with the now familiar status bar along the bottom and your nano masterpiece back in view.
Note that this is the most verbose version of this command. You can actually omit the target if there is only one running session, as is in our scenario. This shortens the command to tmux attach-session. It can be further shortened because attach-session has a shorter alias, attach. So, we could accomplish the same thing with just tmux attach.
Throughout this text, we will generally use the more verbose version, as they tend to be more descriptive, and leave shorter analogues as exercises for the reader.


