


Configuring Docker for MongoDB
MongoDB is a Not Only SQL (NoSQL) document-oriented database, widely used to store Internet of Things (IoT) data, application logs, and so on. A NoSQL database is a non-relational database that stores unstructured data differently from relational databases such as MySQL or PostgreSQL. Don’t worry too much about this now; we will cover it in more detail in Chapter 5.
Your cluster production environment can handle huge amounts of data and create resilient data storage.
Getting ready
Following the good practice of code organization, let’s start creating a folder inside our project to store the Docker image:
Create a folder inside our project directory to store the MongoDB Docker image and data as follows:
my-project$ mkdir mongo-local
my-project$ cd mongo-local
How to do it…
Here are the steps to try out this recipe:
- First, we pull the Docker image from Docker Hub as follows:
my-project/mongo-local$ docker pull mongo
You should see the following message in your command line:
Using default tag: latest
latest: Pulling from library/mongo
(...)
bc8341d9c8d5: Pull complete
(...)
Status: Downloaded newer image for mongo:latest
docker.io/library/mongo:latest
Note
If you are a WSL user, an error might occur if you use the WSL 1 version instead of version 2. You can easily fix this by following the steps here: https://learn.microsoft.com/en-us/windows/wsl/install.
- Then, we run the MongoDB server as follows:
my-project/mongo-local$ docker run \
--name mongodb-local \
-p 27017:27017 \
-e MONGO_INITDB_ROOT_USERNAME="your_username" \
-e MONGO_INITDB_ROOT_PASSWORD="your_password"\
-d mongo:latest
We then check our server. To do this, we can use the command line to see which Docker images are running:
my-project/mongo-local$ docker ps
We then see this on the screen:

Figure 1.5 – MongoDB and Docker running container
We can even check on the Docker Desktop application to see whether our container is running:

Figure 1.6 – The Docker Desktop vision of the MongoDB container running
- Finally, we need to stop our container. We need to use
Container IDto stop the container, which we previously saw when checking the Docker running images. We will rerun it in Chapter 5:my-project/mongo-local$ docker stop 427cc2e5d40e
How it works…
MongoDB’s architecture uses the concept of distributed processing, where the main node interacts with clients’ requests, such as queries and document manipulation. It distributes the requests automatically among its shards, which are a subset of a larger data collection here.
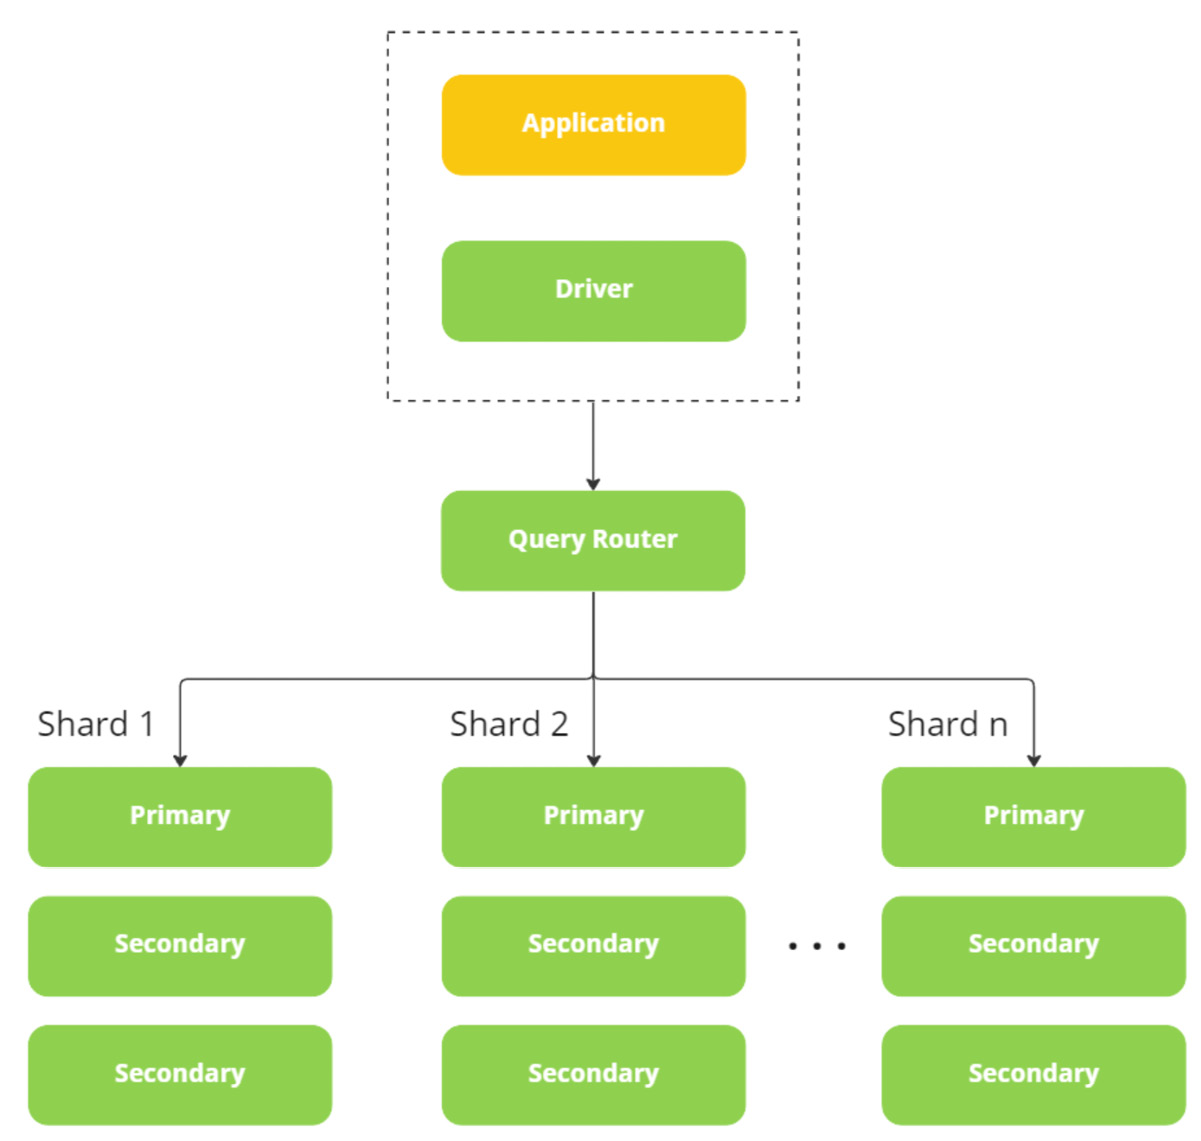
Figure 1.7 – MongoDB architecture
Since we may also have other running projects or software applications inside our machine, isolating any database or application server used in development is a good practice. In this way, we ensure nothing interferes with our local servers, and the debug process can be more manageable.
This Docker image setting creates a MongoDB server locally and even allows us to make additional changes if we want to simulate any other scenario for testing or development.
The commands we used are as follows:
- The
--namecommand defines the name we give to our container. - The
-pcommand specifies the port our container will open so that we can access it vialocalhost:27017. -ecommand defines the environment variables. In this case, we set therootusername and password for our MongoDB container.-dis detached mode – that is, the Docker process will run in the background, and we will not see input or output. However, we can still usedocker psto check the container status.mongo:latestindicates Docker pulling this image’s latest version.
There’s more…
For frequent users, manually configuring other parameters for the MongoDB container, such as the version, image port, database name, and database credentials, is also possible.
A version of this image with example values is also available as a docker-compose file in the official documentation here: https://hub.docker.com/_/mongo.
The docker-compose file for MongoDB looks similar to this:
# Use your own values for username and password
version: '3.1'
services:
  mongo:
    image: mongo
    restart: always
    environment:
      MONGO_INITDB_ROOT_USERNAME: root
      MONGO_INITDB_ROOT_PASSWORD: example
  mongo-express:
    image: mongo-express
    restart: always
    ports:
      - 8081:8081
    environment:
      ME_CONFIG_MONGODB_ADMINUSERNAME: root
      ME_CONFIG_MONGODB_ADMINPASSWORD: example
      ME_CONFIG_MONGODB_URL: mongodb://root:example@mongo:27017/
See also
You can check out MongoDB at the complete Docker Hub documentation here: https://hub.docker.com/_/mongo.


