In this article, written by Jayant Varma, the author of Xcode 6 Essentials, we shall look at Xcode closely as this is going to be the tool you would use quite a lot for all aspects of your app development for Apple devices. It is a good idea to know and be familiar with the interface, the sections, shortcut keys, and so on.
(For more resources related to this topic, see here.)
Starting Xcode
Xcode, like many other Mac applications, is found in the Applications folder or the Launchpad. On starting Xcode, you will be greeted with the launch screen that offers some entry points for working with Xcode. Mostly, you will select Create a new Xcode project or Check out an existing project , if you have an existing project to continue work on.
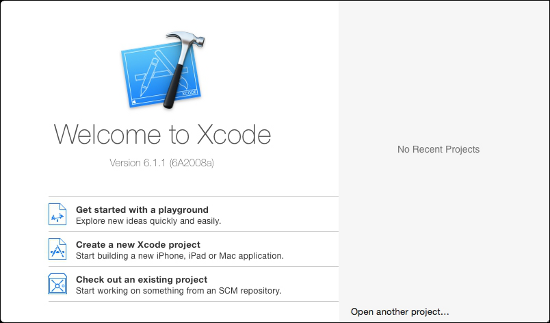
Xcode remembers what it was doing last, so if you had a project or file open, it will open up those windows again.
Creating a new project
After selecting the Create a new project option, we are guided via a wizard that helps us get started.
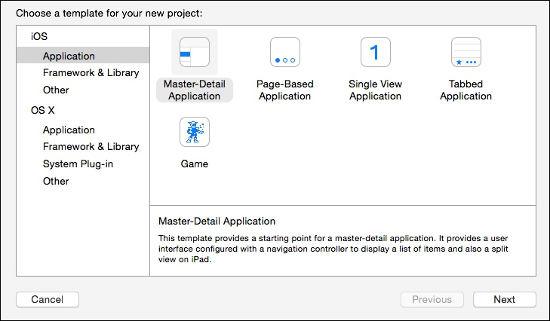
Selecting the project type
The first step is to select what type of project you want to create. At the moment, there are two distinct types of projects, mobile (iOS) or desktop (OS X) that you can create. Within each of those types, you can select the type of project you want. The screenshot displays a standard configuration for iOS application projects. The templates used when the selected type of project is created are self sufficient, that is, when the Run button is pressed, the app compiles and runs. It might do nothing, as this is a minimalistic template. On selecting the type of project, we can select the next step:
Setting the project options
This step allows selecting the options, namely setting the application name, the organization name, identifier, language, and devices to support. In the past, the language was always set to Objective-C, however with Xcode 6, there are two options: objective-C and Swift
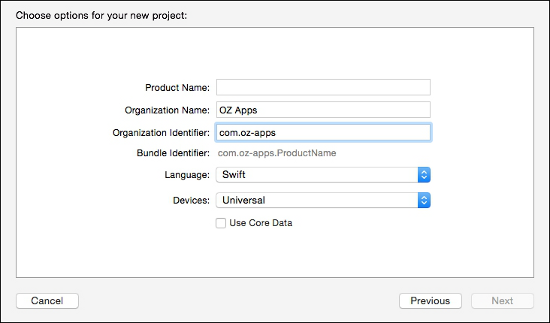
Setting the project properties
On creation, the main screen is displayed. Here it offers the option to change other details related to the application such as the version number and build. It also allows you to configure the team ID and certificates used for signing the application to test on a mobile device or for distribution to the App Store. It also allows you to set the compatibility for earlier versions. The orientation and app icons, splash screens, and so on are also set from this screen. If you want to set these up later on in the project, it is fine, this can be accessed at any time and does not stop you from development. It needs to be set prior to deploying it on a device or creating an App Store ready application.
Xcode overview
Let us have a look at the Xcode interface to familiarize ourselves with the same as it would help improve productivity when building your application.
The top section immediately following the traffic light (window chrome) displays a Play and Stop button. This allows the project to run and stop. The breadcrumb toolbar displays the project-specific settings with respect to the product and the target. With an iOS project, it could be a particular simulator for iPhone, iPad, and so on, or a physical device (number 5 in the following screenshot).
Just under this are vertical areas that are the main content area with all the files, editors, UI, and so on. These can be displayed or hidden as required and can be stacked vertically or horizontally.
The distinct areas in Xcode are as follows:
- Project navigation (number1)
- Editor and assistant editor (number 2 ) and (number 3 )
- Utility/inspector (number 4 )
- The toolbar (number 5 ) and (number 6 )
These sections can be switched on and off (shown or hidden) as required to make space for other sections or more screen space to work with:
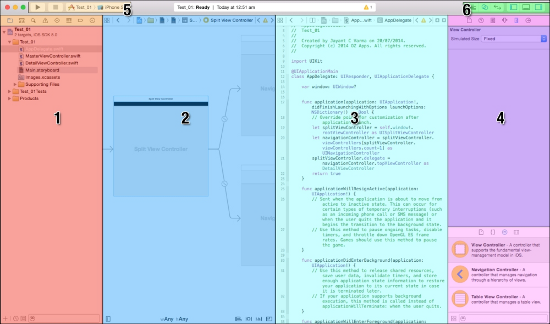
Sections in Xcode
The project section
The project navigation section has three sub sections, the topmost being the project toolbar that has eight icons. These can be seen as in the following screenshot. The next sub section contains the project files and all the assets required for this project. The bottom most section consists of recently edited files and filters:
Unlock access to the largest independent learning library in Tech for FREE!
Get unlimited access to 7500+ expert-authored eBooks and video courses covering every tech area you can think of.
Renews at $19.99/month. Cancel anytime

You can use the keyboard shortcuts to access these areas quickly with the CMD + 1...8 keys.
The eight areas available under project navigation are key and for the beginner to Xcode, this could be a bit daunting. When you run the project, the current section might change and display another where you might wonder how to get back to the project (file) navigator. Getting familiar with these is always helpful and the easiest way to navigate between these is the CMD + 1..8 keys.
- Project navigator ( CMD + 1 ): This displays all of the files, folders, assets, frameworks, and so on that are part of this project. This is displayed as a hierarchical view and is the way that a majority of developers access their files, folders, and so on.
- Symbol navigator ( CMD + 2 ): This displays all of the classes, members, and methods that are available in them. This is the easiest way to navigate quickly to a method/function, attribute/property.
- Search navigator ( CMD + 3 ): This allows you to search the project for a particular match. This is quite useful to find and replace text.
- Issues navigator ( CMD + 4 ): This displays the warning and errors that occur while typing your code or on building and running it. This also displays the results of the static analyzer.
- Tests navigator ( CMD + 5 ); This displays the tests that you have present in your code either added by yourself or the default ones created with the project.
- Debug navigator ( CMD + 6 ): This displays the information about the application when you choose to run it. It has some amazing detailed information on CPU usage, memory usage, disk usage, threads, and so on.
- Breakpoint navigator ( CMD + 7 ): This displays all the breakpoints in your project from all files. This also allows you to create exception and symbolic breakpoints.
- Log navigator ( CMD + 8 ): This displays a log of all actions carried out, namely compiling, building, and running. This is more useful when used to determine the results of automated builds
The editor and assistant editor sections
The second area contains the editor and assistant editor sections. These display the code, the XIB (as appropriate), storyboard files, device previews, and so on. Each of the sub sections have a jump bar on the top that relates to files and allow for navigating back and forth in the files and display the location of the file in the workspace. To the right from this is a mini issues navigator that displays all warnings and errors. In the case of the assistant editors, it also displays two buttons: one to add a new assistant editor area and another to close it.

Source code editors
While we are looking at the interface, it is worth noting that the Xcode code editor is a very advanced editor with a lot of features, which is now seen as standard with a lot of text editors. Some of the features that make working with Xcode easier are as follows:
- Code folding : This feature helps to hide code at points such as the function declaration, loops, matching brace brackets, and so on. When a function or portion of code is folded, it hides it from view, thereby allowing you to view other areas of the code that would not be visible unless you scrolled.
- Syntax highlighting : This is one of the most useful features as it helps you, the developer, to visually, at a glance, differentiate your source code from variables, constants, and strings. Xcode has syntax highlighting for a couple of languages as mentioned earlier.
- Context help : This is one of the best features whereby when you hover over a word in the source code with OPT pressed, it shows a dotted underline and the cursor changes to a question mark. When you click on a word with the dotted underline and the question mark cursor, it displays a popup with details about that word. It also highlights all instances of that word in the file. The popup details as much information as available. If it is a variable or a function that you have added to the code, then it will display the name of the file where it was declared. If it is a word that is contained in the Apple libraries, then it displays the description and other additional details.
- Context jump : This is another cool feature that allows jumping to the point of declaration of that word. This is achieved by clicking on a word while keeping the CMD button pressed. In many cases, this is mainly helpful to know how the function is declared and what parameters it expects. It can also be useful to get information on other enumerators and constants used with that function. The jump could be in the same file as where you are editing the code or it could be to the header files where they are declared.
- Edit all in scope : This is a cool feature where you can edit all of the instances of the word together rather than using search and replace. A case scenario is if you want to change the name of a variable and ensure that all instances you are using in the file are changed but not the ones that are text, then you can use this option to quickly change it.
- Catching mistakes with fix-it : This is another cool feature in Xcode that will save you a lot of time and hassle. As you type text, Xcode keeps analyzing the code and looking for errors. If you have declared a variable and not used it in your code, Xcode immediately draws attention to it suggesting that the variable is an unused variable. However, if it was supposed to be a pointer and you have declared it without *; Xcode immediately flags it as an error that the interface type cannot be statically allocated. It offers a fix-it solution of inserting * and the code has a greyed * character showing where it will be added. This helps the developer fix commonly overlooked issues such as missing semicolons, missing declarations, or misspelled variable names.
- Code completion : This is the bit that makes writing code so much easier, type in a few letters of the function name and Xcode pops up a list of functions, constants, methods, and so on that start with those letters and displays all of the required parameters (as applicable) including the return type. When selected, it adds the token placeholders that can be replaced with the actual parameter values. The results might vary from person to person depending on the settings and the speed of the system you run Xcode on.
The assistant editor
The assistant editor is mainly used to display the counterparts and related files to the file open in the primary editor (generally used when working with Objective-C where the .h or.m files are the related files). The assistant editors track the contents of the editor. Xcode is quite intelligent and knows the corresponding sections and counterparts.
When you click on a file, it opens up in the editor. However, pressing the OPT + Shift while clicking on the file, you would be provided with an interactive dialog to select where to open the file. The options include the primary editor or the assistant editor. You can also add assistant editors as required.
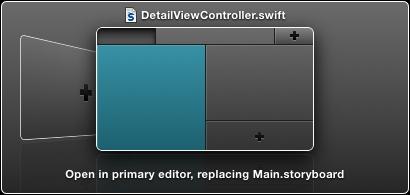
Another way to open a file quickly is to use the Open Quickly option, which has a shortcut key of CMD + Shift + O . This displays a textbox that allows accessing a file from the project.
The utility/inspector section
The last section contains the inspector and library. This section changes based on the type of file selected in the current editor. The inspector has 6 tabs/sections and they are as follows:
- The file inspector ( CMD + OPT + 1 ): This displays the physical file information for the file selected. For code files, it is the text encoding, the targets that it belongs to, and the physical file path. While for the storyboard, it is the physical file path and allows setting attributes such as auto layout and size classes (new in Xcode 6).
- The quick help inspector ( CMD + OPT + 2 ): This displays information about the class or object selected.
- The identity inspector ( CMD + OPT + 3 ): This displays the class name, ID, and others that identify the object selected.
- The attributes inspector ( CMD + OPT + 4 ): This displays the attributes for the object selected as if it is the initial root view controller, does it extend under the top bars or not, if it has a navigation bar or not, and others. This also displays the user-defined attributes (a new feature with Xcode 6).
- The size inspector ( CMD + OPT + 5 ): This displays the size of the control selected and the associated constraints that help position it on the container.
- The connections inspector ( CMD + OPT + 6 ): This displays the connections created in the Interface Builder between the UI and the code.

The lower half of this inspector contains four options that help you work efficiently, they are as follows:
- The file template library : This contains the options to create a new class, protocol. The options that are available when selecting the File | New option from the menu.
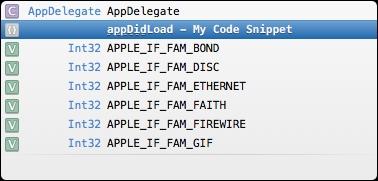
- The code snippets library : This is a wonderful but not widely used option. This can hold code snippets that can help you avoid writing repetitive blocks of code in your app. You can drag and drop the snippet to your code in the editor. This also offers features such as shortcuts, scopes, platforms, and languages. So you can have a shortcut such as appDidLoad (for example) that inserts the code to create and populate a button. This is achieved simply by setting the platform as appropriate to iOS or OS X.

After creating a code snippet, as soon as you type the first few characters, the code snippet shows up in the list of autocomplete options;
- The object library : This is the toolbox that contains all of the controls that you need for creating your UI, be it a button, a label, a Table View, view, View Controller, or anything else.

Adding a code snippet is as easy as dragging the selected code from the editor onto the snippet area. It is a little tricky because the moment you start dragging, it could break your selection highlight. You need to select the text, click (hold) and then drag it.
- The media library : This contains the list of all images and other media types that are available to this project/workspace.
Summary
In this article, you have seen a quick tour of Xcode, keeping the shortcuts and tips handy as they really do help get things done faster. The code snippets are a wonderful feature that allow for quickly setting up commonly used code with shortcut keywords.
Resources for Article:
Further resources on this subject:
 United States
 Great Britain
 India
India
 Germany
 France
 Canada
 Russia
 Spain
Spain
 Brazil
 Australia
 Singapore
 Hungary
 Philippines
 Mexico
 Thailand
 Ukraine
 Luxembourg
 Estonia
 Lithuania
 Norway
 Chile
Chile
 South Korea
 Ecuador
 Colombia
 Taiwan
 Switzerland
 Indonesia
 Cyprus
 Denmark
 Finland
 Poland
 Malta
Malta
 Czechia
 New Zealand
 Austria
 Turkey
 Sweden
 Italy
Italy
 Egypt
Egypt
 Belgium
 Portugal
 Slovenia
 Ireland
 Romania
 Greece
 Argentina
 Malaysia
 South Africa
 Netherlands
 Bulgaria
 Latvia
 Japan
Japan
 Slovakia


