Understanding the MVC pattern
ASP.NET Core MVC is a rich framework for building web applications with the Model-View-Controller (MVC) design pattern. The MVC pattern enables web applications to separate the presentation from the business logic. An ASP.NET Core web API project follows the basic MVC pattern, but it does not have views, so it only has a Model layer and a Controller layer. Let’s look at this in a bit more detail:
- Models: Models are classes that represent the data that is used in the application. Normally, the data is stored in a database.
- Controllers: Controllers are classes that handle the business logic of the application. Based on the convention of ASP.NET Core, controllers are stored in the
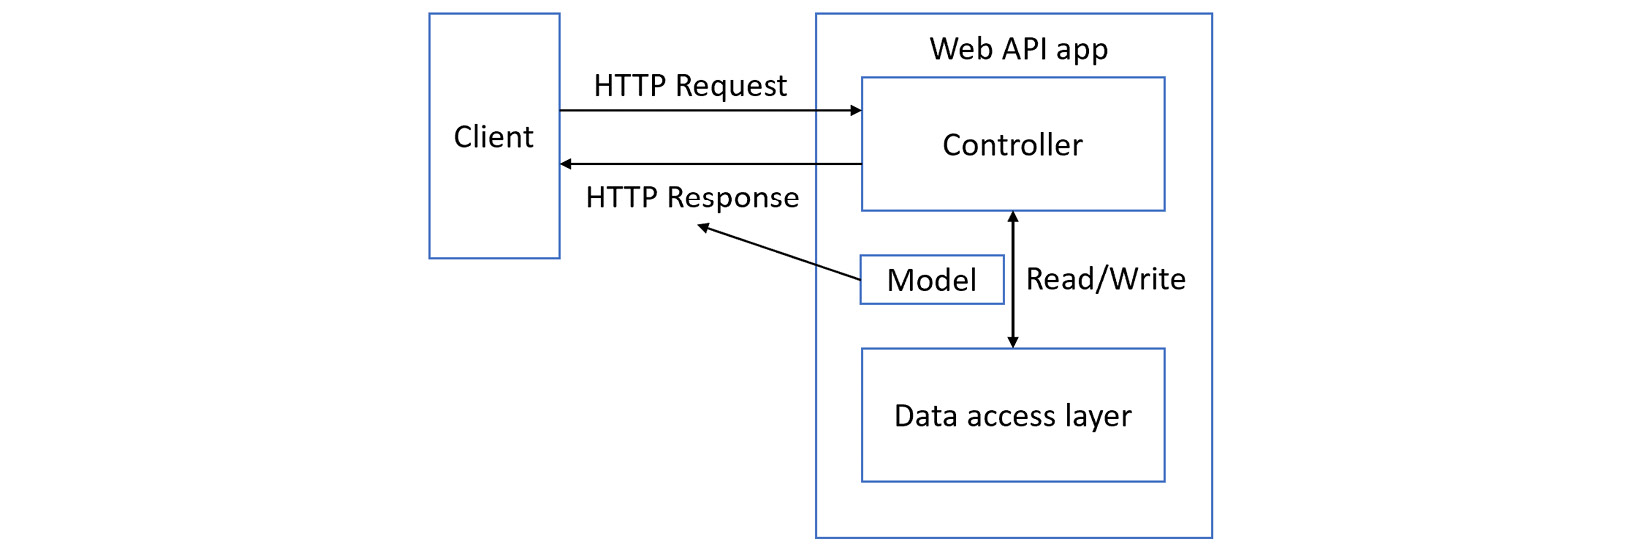
Controllersfolder. Figure 2.18 shows an example of the MVC pattern in an web API project. However, the view layer is not included in the web API project. The request from the client will be mapped to the controller, and the controller will execute the business logic and return the response to the client.

Figure 2.18 – The MVC pattern
Next, we will look at the code of the model and the controller in an ASP.NET Core web API project.
The model and the controller
In the ASP.NET Core template project, you can find a file named WeatherForecast.cs. This file is a model. It is a pure C# class that represents a data model.
The controller is the WeatherForecastController.cs file located in the Controllers folder. It contains the business logic.
It looks like this:
[ApiController]
[Route("[controller]")]
public class WeatherForecastController : ControllerBase
{
    // Some code is ignored
    private readonly ILogger<WeatherForecastController> _logger;
    public WeatherForecastController(ILogger<WeatherForecastController> logger)
    {
        _logger = logger;
    }
    [HttpGet(Name = "GetWeatherForecast")]
    public IEnumerable<WeatherForecast> Get()
    {
        return Enumerable.Range(1, 5).Select(index => new WeatherForecast
        {
            Date = DateOnly.FromDateTime(DateTime.Now.AddDays(index)),
            TemperatureC = Random.Shared.Next(-20, 55),
            Summary = Summaries[Random.Shared.Next(Summaries.Length)]
        })
        .ToArray();
    }
}
The constructor of the controller class has a parameter named ILogger<WeatherForecastController> logger. This parameter is used to log messages. It is injected with DI by the ASP.NET Core framework. We will talk about DI in the next section.
This class has an [ApiController] attribute that indicates that it is a web API controller. It also has a [Route("[controller]")] attribute that indicates the URL of the controller.
The Get() method has a [HttpGet(Name = "GetWeatherForecast")] attribute that indicates the name of the endpoint, and the Get() method is a GET operation. This method returns a list of weather forecasts as the response.
Note that the [Route("[controller]")] attribute is marked on the controller class. It means the path of the controller is /WeatherForecast. Currently, there is no [Route] attribute on the Get() method. We will learn more about routing in future sections.
We should now have a basic understanding of how ASP.NET Core web API works. The client sends the request to the web API, and the request will be mapped to the controller and the method. The controller will execute the business logic and return the response. We can use some methods to get, save, update, and delete data from the database in the controllers.
Next, let us create a new API endpoint by adding a new model and controller.
Creating a new model and controller
In Chapter 1, we showed an example REST API on https://jsonplaceholder.typicode.com/posts. It returns a list of posts, as shown next:
[
  {
    "userId": 1,
    "id": 1,
    "title": "sunt aut facere repellat provident occaecati excepturi optio reprehenderit",
    "body": "quia et suscipit\nsuscipit recusandae consequuntur expedita et cum\nreprehenderit molestiae ut ut quas totam\nnostrum rerum est autem sunt rem eveniet architecto"
  },
  {
    "userId": 1,
    "id": 2,
    "title": "qui est esse",
    "body": "est rerum tempore vitae\nsequi sint nihil reprehenderit dolor beatae ea dolores neque\nfugiat blanditiis voluptate porro vel nihil molestiae ut reiciendis\nqui aperiam non debitis possimus qui neque nisi nulla"
  },
  ...
]
Let us implement a similar API. First, we need to create a new model. Create a new folder named Models in the project. Then, create a new file named Post.cs in the Models folder:
namespace MyFirstApi.Models;
public class Post
{
    public int UserId { get; set; }
    public int Id { get; set; }
    public string Title { get; set; } = string.Empty;
    public string Body { get; set; } = string.Empty;
}
File-scoped namespace declaration
From C# 10, you can use a new form of namespace declaration, as shown in the previous code snippet, which is called a file-scoped namespace declaration. All the members in this file are in the same namespace. It saves space and reduces indentation.
Nullable reference types
You may be wondering why we assign an empty string to the Title and Body properties. This is because the properties are of type string. If we do not initialize the property, the compiler will complain:
Non-nullable property 'Title' must contain a non-null value when exiting constructor. Consider declaring the property as nullable.
By default, the ASP.NET Core web API project template enabled the nullable reference types annotation in the project properties. If you check the project file, you will find <Nullable>enable</Nullable> in the <PropertyGroup> section.
Nullable reference types were introduced in C# 8.0. They can minimize the likelihood of errors that cause the runtime to throw a System.NullReferenceException error. For example, if we forget to initialize the Title property, we may get a System.NullReferenceException error when we try to access a property of it, such as Title.Length.
With this feature enabled, any variable of a reference type is considered to be non-nullable. If you want to allow a variable to be nullable, you must append the type name with the ? operator to declare the variable as a nullable reference type; for example, public string Title? { get; set; }, which explicitly marks the property as nullable.
To learn more about this feature, see https://docs.microsoft.com/en-us/dotnet/csharp/nullable-references.
Next, create a new file named PostController.cs in the Controllers folder. You can manually add it, or install the dotnet-aspnet-codegenerator tool to create it. To install the tool, run the following commands from the project folder:
dotnet add package Microsoft.VisualStudio.Web.CodeGeneration.Design
dotnet tool install -g dotnet-aspnet-codegenerator
The preceding commands install a NuGet package required for scaffolding. The dotnet-aspnet-codegenerator tool is a scaffolding engine that is used to generate code.
Then, run the following command to generate a controller:
dotnet-aspnet-codegenerator controller -name PostsController -api -outDir Controllers
The preceding command generates an empty controller. The -name option specifies the name of the controller. The -api option indicates that the controller is an API controller. The -outDir option specifies the output directory. Update the content of the controller as follows:
using Microsoft.AspNetCore.Mvc;
using MyFirstApi.Models;
namespace MyFirstApi.Controllers;
[Route("api/[controller]")]
[ApiController]
public class PostsController : ControllerBase
{
    [HttpGet]
    public ActionResult<List<Post>> GetPosts()
    {
        return new List<Post>
        {
            new() { Id = 1, UserId = 1, Title = "Post1", Body = "The first post." },
            new() { Id = 2, UserId = 1, Title = "Post2", Body = "The second post." },
            new() { Id = 3, UserId = 1, Title = "Post3", Body = "The third post." }
        };
    }
}
Target-typed new expressions
When we create a new List instance of a specific type, we will normally use code like this:
var list = new List<Post>
{
new Post() { Id = 1, UserId = 1, Title = "Post1", Body = "The first post." },
};
When the list is declared as List<Post>, the type is known, so it is not necessary to use new Post() here when adding new elements. The type specification can be omitted for constructors, such as new(). This feature was introduced in C# 9.0.
The controller is named PostsController. The convention is the resource name with the Controller suffix. It is marked with the ApiController attribute, which indicates that the controller is a web API controller. It also has a [Route("api/[controller]")] attribute that indicates the URL of the controller. [controller] is like a placeholder, which will be replaced with the name of the controller in the routing. So, the route of this controller is /api/posts.
In this controller, we have a method named GetPosts(). This method returns a list of posts as the response. The method is marked with the [HttpGet] attribute, which indicates that this method is a GET operation. It does not have any route template, because it will match /api/posts. For other methods, we can use the [Route("[action]")] attribute to specify the route template.
The return type of the GetPosts() method is ActionResult<IEnumerable<Post>>. ASP.NET Core can automatically convert the object to JSON and return it to the client in the response message. Also, it can return other HTTP status codes, such as NotFound, BadRequest, InternalServerError, and so on. We will see more examples later.
If you run dotnet run or dotnet watch, then navigate to Swagger UI, such as https://localhost:7291/swagger/index.html, you will see the new API listed. The API is accessible at /api/posts.
Currently, the /api/posts endpoint returns a hardcoded list of posts. Let us update the controller to return a list of posts from a service.
Creating a service
Create a Services folder in the project. Then, create a new file named PostService.cs in the Services folder, as shown next:
using MyFirstApi.Models;
namespace MyFirstApi.Services;
public class PostsService
{
    private static readonly List<Post> AllPosts = new();
    public Task CreatePost(Post item)
    {
        AllPosts.Add(item);
        return Task.CompletedTask;
    }
    public Task<Post?> UpdatePost(int id, Post item)
    {
        var post = AllPosts.FirstOrDefault(x => x.Id == id);
        if (post != null)
        {
            post.Title = item.Title;
            post.Body = item.Body;
            post.UserId = item.UserId;
        }
        return Task.FromResult(post);
    }
    public Task<Post?> GetPost(int id)
    {
        return Task.FromResult(AllPosts.FirstOrDefault(x => x.Id == id));
    }
    public Task<List<Post>> GetAllPosts()
    {
        return Task.FromResult(AllPosts);
    }
    public Task DeletePost(int id)
    {
        var post = AllPosts.FirstOrDefault(x => x.Id == id);
        if (post != null)
        {
            AllPosts.Remove(post);
        }
        return Task.CompletedTask;
    }
}
The PostsService class is a simple demo service that manages the list of posts. It has methods to create, update, and delete posts. To simplify the implementation, it uses a static field to store the list of posts. This is just for demonstration purposes; please do not use this in production.
Next, we will follow the API design to implement CRUD operations. You can review the REST-based API design section of the previous chapter.
Implementing a GET operation
The design for the viewPost() operation is as follows:
|
Operation name |
URL |
HTTP method |
Input |
Response |
Description |
|
|
|
|
PostId |
Post, 200 |
View a post detail |
Table 2.1 – The design for the viewPost() operation
Update the PostController class as follows:
using Microsoft.AspNetCore.Mvc;
using MyFirstApi.Models;
using MyFirstApi.Services;
namespace MyFirstApi.Controllers;
[Route("api/[controller]")]
[ApiController]
public class PostsController : ControllerBase
{
    private readonly PostsService _postsService;
    public PostsController()
    {
        _postsService = new PostsService();
    }
    [HttpGet("{id}")]
    public async Task<ActionResult<Post>> GetPost(int id)
    {
        var post = await _postsService.GetPost(id);
        if (post == null)
        {
            return NotFound();
        }
        return Ok(post);
    }
    // Omitted for brevity
}
In the constructor method of the controller, we initialize the _postsService field. Note that we use the new() constructor to create an instance of the service. That means the controller is coupled with the PostsService class. We will see how to decouple the controller and the service in the next chapter.
Then, create a GetPost() method that returns a post with the specified ID. It has a [HttpGet("{id}")] attribute to indicate the URL of the operation. The URL will be mapped to /api/posts/{id}. id is a placeholder, which will be replaced with the ID of the post. Then, id will be passed to the GetPost() method as a parameter.
If the post is not found, the method will return a NotFound response. ASP.NET Core provides a set of built-in response messages, such as NotFound, BadRequest, InternalServerError, and so on.
If you call the API now, it will return NotFound because we have not created a post.
Implementing a CREATE operation
The design for the createPost() operation is as follows:
|
Operation name |
URL |
HTTP method |
Input |
Response |
Description |
|
|
|
|
Post |
Post, 201 |
Create a new post |
Table 2.2 – The design for the createPost() operation
Create a new method named CreatePost() in the controller. As the controller has been mapped to api/posts, we do not need to specify the route of this method. The content of the method is as follows:
[HttpPost]
public async Task<ActionResult<Post>> CreatePost(Post post)
{
    await _postsService.CreatePost(post);
    return CreatedAtAction(nameof(GetPost), new { id = post.Id }, post);
}
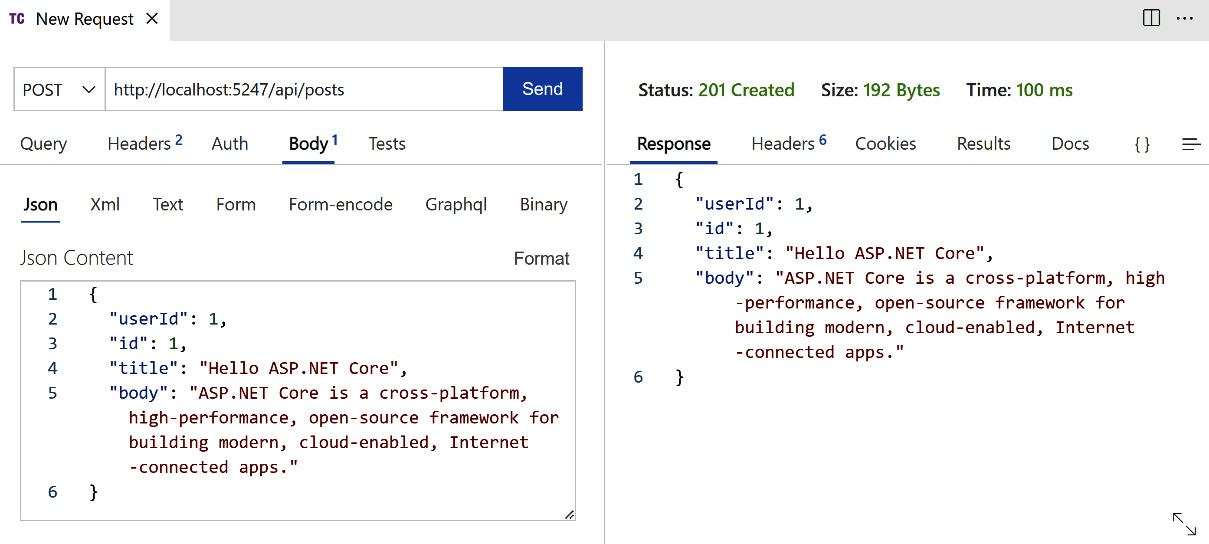
When we call this endpoint, the post object will be serialized in the JSON format that is attached to the POST request body. In this method, we can get the post from the request and then call the CreatePost() method in the service to create a new post. Then, we will return the built-in CreatedAtAction, which returns a response message with the specified action name, route values, and post. For this case, it will call the GetPost() action to return the newly created post.
Now, we can test the API. For example, we can send a POST request in Thunder Client.
Change the method to POST. Use the following JSON data as the body:
{
  "userId": 1,
  "id": 1,
  "title": "Hello ASP.NET Core",
  "body": "ASP.NET Core is a cross-platform, high-performance, open-source framework for building modern, cloud-enabled, Internet-connected apps."
}
Click the Send button. Note that the status of the response is 201 Created:

Figure 2.19 – Sending a POST request
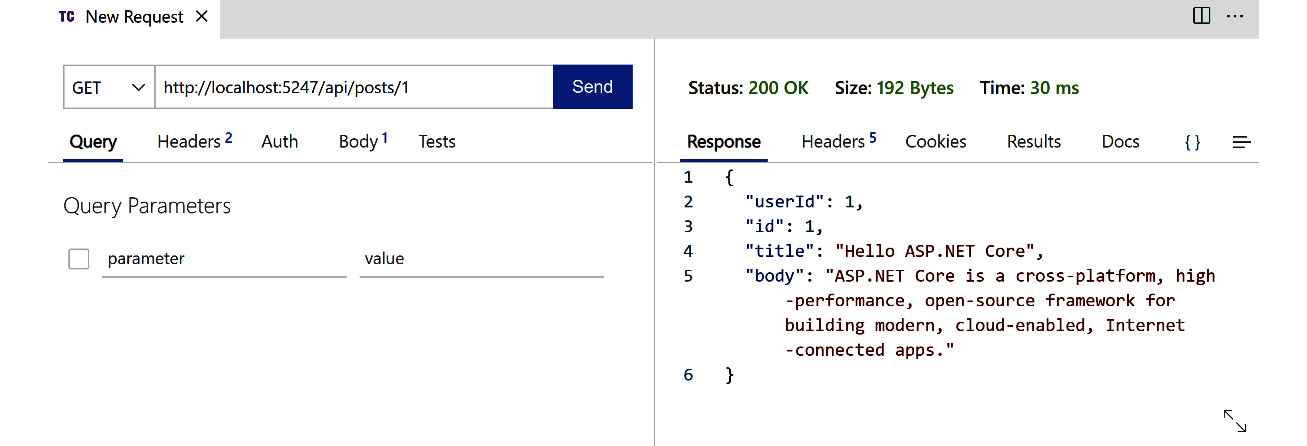
Then, send a GET request to the api/posts/1 endpoint. We can get a response like this:

Figure 2.20 – Sending a GET request
Please note that the post we created is stored in the memory of the service. Because we have not provided a database to store the data, if we restart the application, the post will be lost.
Next, let us see how to implement an update operation.
Implementing an UPDATE operation
The design for the updatePost() operation is as follows:
|
Operation name |
URL |
HTTP method |
Input |
Response |
Description |
|
|
|
|
Post |
Post, 200 |
Update a new post |
Table 2.3 – The design for the updatePost() operation
Create a new UpdatePost() method in the controller, as shown next:
[HttpPut("{id}")]
public async Task<ActionResult> UpdatePost(int id, Post post)
{
    if (id != post.Id)
    {
        return BadRequest();
    }
    var updatedPost = await _postsService.UpdatePost(id, post);
    if (updatedPost == null)
    {
        return NotFound();
    }
    return Ok(post);
}
This method has a [HttpPut("{id}")] attribute to indicate that it is a PUT operation. Similarly, id is a placeholder, which will be replaced with the ID of the post. In the PUT request, we should attach the serialized content of the post to the request body.
This time, let us test the API with HttpRepl. Run the following command to connect to the server:
httprepl https://localhost:7291/api/posts
connect https://localhost:7291/api/posts/1
put -h Content-Type=application/json -c "{"userId": 1,"id": 1,"title": "Hello ASP.NET Core 8","body": "ASP.NET Core is a cross-platform, high-performance, open-source framework for building modern, cloud-enabled, Internet-connected apps."}"
You will see this output:
HTTP/1.1 200 OK
Content-Type: application/json; charset=utf-8
Date: Thu, 18 Aug 2022 11:25:26 GMT
Server: Kestrel
Transfer-Encoding: chunked
{
  "userId": 1,
  "id": 1,
  "title": "Hello ASP.NET Core 8",
  "body": "ASP.NET Core is a cross-platform, high-performance, open-source framework for building modern, cloud-enabled, Internet-connected apps."
}
Then, we can update the GetPosts() method as follows:
[HttpGet]
public async Task<ActionResult<List<Post>>> GetPosts()
{
    var posts = await _postService.GetAllPosts();
    return Ok(posts);
}
We have implemented GET, POST, and PUT operations. Next, you can try to implement the DeletePost() method using the DELETE operation by yourself.


