Creating images (textures)
Images are used for storing 1D, 2D, or 3D data, although they are mostly used for 2D data. Different than buffers, images have the advantage of being optimized for locality in memory layout. This is because most GPUs have a fixed-function texture unit or sampler that reads texel data from an image and applies filtering and other operations to produce a final color value. Images can have different formats, such as RGB, RGBA, BGRA, and so on.
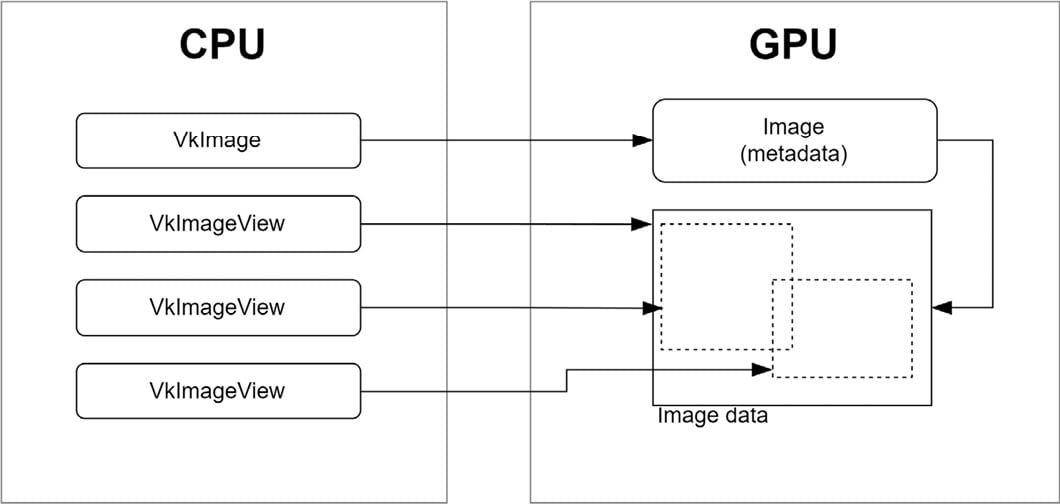
An image object is only metadata in Vulkan. Its data is stored separately and is created in a similar manner to buffers (Figure 2.10):

Figure 2.10 – Images
Images in Vulkan cannot be accessed directly and need to be accessed only by means of an image view. An image view is a way to access a subset of the image data by specifying the subresource range, which includes the aspect (such as color or depth), the mip level, and the array layer range.
Another very important aspect of images is their layout. It is used to specify the intended usage of an image resource in Vulkan, such as whether it should be used as a source or destination for a transfer operation, a color or depth attachment for rendering, or as a shader read or write resource. The correct image layout is important because it ensures that the GPU can efficiently access and manipulate the image data in accordance with the intended usage. Using the wrong image layout can lead to performance issues or rendering artifacts and can result in undefined behavior. Therefore, it’s essential to correctly specify the image layout for each usage of an image in a Vulkan application. Common image layouts are undefined (VK_IMAGE_LAYOUT_UNDEFINED) color attachment (VK_IMAGE_LAYOUT_COLOR_ATTACHMENT_OPTIMAL), depth/stencil attachment (VK_IMAGE_LAYOUT_DEPTH_STENCIL_ATTACHMENT_OPTIMAL), and shader read(VK_IMAGE_LAYOUT_SHADER_READ_ONLY_OPTIMAL). Image layout transitions are done as part of the vkCmdPipelineBarrier command.
In this recipe, you will learn how to create images on a device.
Getting ready
In the VulkanCore::Texture class within our repository, we’ve encapsulated the intricate management of images and image views, offering a comprehensive solution for handling Vulkan textures. From facilitating efficient data uploads to handling transitions between image layouts and generating mipmaps, the Texture class equips us with the means to seamlessly integrate textures in the Vulkan examples.
How to do it…
Creating an image requires some basic information about it, such as type (1D, 2D, 3D), size, format (RGBA, BGRA, and so on), number of mip levels, number of layers (faces for cubemaps), and a few others:
VkFormat format;     // Image format
VkExtents extents;   // Image size
uint32_t mipLevels;  // Number of mip levels
uint32_t layerCount; // Number of layers (sides of cubemap)
const VkImageCreateInfo imageInfo = {
    .sType = VK_STRUCTURE_TYPE_IMAGE_CREATE_INFO,
    .flags = 0, // optional
    .imageType = VK_IMAGE_TYPE_2D,  // 1D, 2D, 3D
    .format = format,
    .extent = extents,
    .mipLevels = mipLevels,
    .arrayLayers = layerCount,
    .samples = VK_SAMPLE_COUNT_1_BIT,
    .tiling = VK_IMAGE_TILING_OPTIMAL,
    .usage = VK_IMAGE_USAGE_COLOR_ATTACHMENT_BIT,
    .sharingMode = VK_SHARING_MODE_EXCLUSIVE,
    .initialLayout = VK_IMAGE_LAYOUT_UNDEFINED,
};
The following structure tells VMA that the image will be a device-only image:
const VmaAllocationCreateInfo allocCreateInfo = {
    .flags = VMA_ALLOCATION_CREATE_DEDICATED_MEMORY_BIT,
    .usage = VMA_MEMORY_USAGE_AUTO_PREFER_DEVICE,
    .priority = 1.0f,
};
The resulting image’s handle will be stored in image:
VkImage image = VK_NULL_HANDLE;
VK_CHECK(vmaCreateImage(vmaAllocator_, &imageInfo,
                        &allocCreateInfo, &image,
                        &vmaAllocation_, nullptr));
The next step is optional but useful for debugging or optimizing the code:
VmaAllocationInfo allocationInfo;
vmaGetAllocationInfo(vmaAllocator_, vmaAllocation_,
                     &allocationInfo);
This recipe only showed you how to create an image in Vulkan, not how to upload data to it. Uploading data to an image is just like uploading data to a buffer.


