Search icon CANCEL
Arrow left icon
Explore Products
Best Sellers
New Releases
Books
Videos
Audiobooks
Learning Hub
Conferences
Free Learning
Arrow right icon
Arrow up icon
GO TO TOP
Sculpting in ZBrush Made Simple

You're reading from   Sculpting in ZBrush Made Simple Explore powerful modeling and character creation techniques used for VFX, games, and 3D printing

Arrow left icon
Product type Paperback
Published in Mar 2024
Publisher Packt
ISBN-13 9781803235769
Length 508 pages
Edition 1st Edition
Languages
Tools
Concepts
Arrow right icon
Author (1):
Arrow left icon
Lukas Kutschera Lukas Kutschera
Author Profile Icon Lukas Kutschera
Lukas Kutschera
Arrow right icon
View More author details
Toc

Table of Contents (19) Chapters Close

Preface 1. Part 1: The Adventure Begins: Sculpting in ZBrush FREE CHAPTER
2. Chapter 1: Getting Started with ZBrush 3. Chapter 2: Sculpting a Demon Bust with DynaMesh 4. Chapter 3: Exploring the Gizmo, PolyGroups, and Masking 5. Chapter 4: Exploring Brushes and Alphas 6. Chapter 5: Creating an Optimized Mesh Using ZRemesher and ZProject 7. Chapter 6: Texturing Your Sculpture with Materials, Polypaint, and UVs 8. Chapter 7: Lighting and Rendering Your Model 9. Part 2: Creating Characters from Scratch: A Comprehensive Guide
10. Chapter 8: Sculpting Human Anatomy 11. Chapter 9: Creating Costumes, Armor, and Accessories with Classic Modeling Techniques 12. Chapter 10: Preparing and Exporting Our Model for 3D Printing 13. Part 3: Sculpting a Female Head: Tips and Techniques
14. Chapter 11: Sculpting a Female Head 15. Chapter 12: Adding Skin Detail, Sculpting Hair, and Using FiberMesh 16. Chapter 13: Building a Portfolio and Leveraging Social Media 17. Index 18. Other Books You May Enjoy

Adding keys, scaling, and exporting your model

In this section, you will add keys that let you combine individual pieces to assemble the full character. Then, you will learn how to scale and export your model so that it can be properly interpreted and processed by the printing software. Let’s get started.

Creating a key model

There are many options for the shape of the key, but a simple tapered cube is a popular choice that gets the job done well:
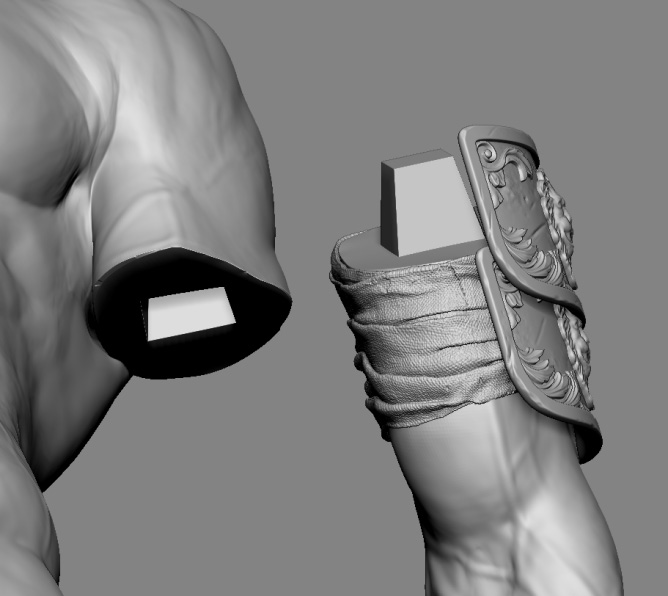
Figure 10.24 – Male key as a tapered cube (on arm) and matching female key (on torso)

Figure 10.24 – Male key as a tapered cube (on arm) and matching female key (on torso)

To create this shape, follow these steps:

  1. Go to Tool | Subtool | Append and pick any shape (for example, Sphere3D).
  2. Navigate to Tool | Initialize. Set X Res, Y Res, and Z Res to 6, and select QCube:
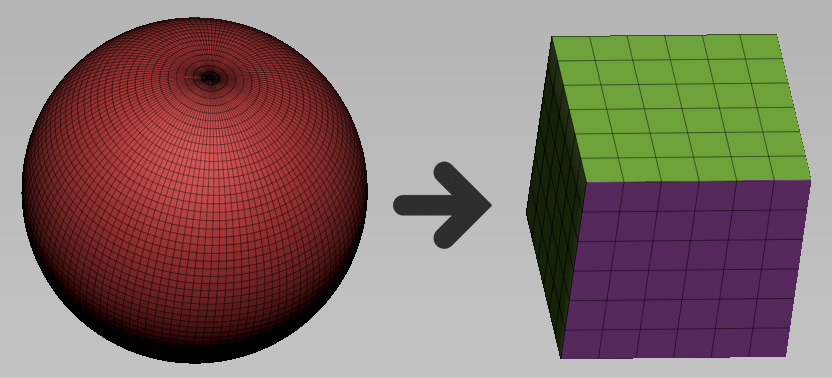
Figure 10.25 – Turning a mesh into a primitive shape with the Initialize function

Figure 10.25 – Turning a mesh into a primitive shape with the Initialize function

  1. Now, open the Gizmo menu, click on the gear icon, and select Taper. Taper...
lock icon The rest of the chapter is locked
Register for a free Packt account to unlock a world of extra content!
A free Packt account unlocks extra newsletters, articles, discounted offers, and much more. Start advancing your knowledge today.
Unlock this book and the full library FREE for 7 days
Get unlimited access to 7000+ expert-authored eBooks and videos courses covering every tech area you can think of
Renews at €18.99/month. Cancel anytime