Search icon CANCEL
Subscription
0
Cart icon
Your Cart (0 item)
Close icon
You have no products in your basket yet
Save more on your purchases now! discount-offer-chevron-icon
Savings automatically calculated. No voucher code required.
Arrow left icon
Explore Products
Best Sellers
New Releases
Books
Videos
Audiobooks
Learning Hub
Conferences
Free Learning
Arrow right icon
Arrow up icon
GO TO TOP
Mastering Windows Server 2022

You're reading from   Mastering Windows Server 2022 Comprehensive administration of your Windows Server environment

Arrow left icon
Product type Paperback
Published in May 2023
Publisher Packt
ISBN-13 9781837634507
Length 720 pages
Edition 4th Edition
Languages
Arrow right icon
Author (1):
Arrow left icon
Jordan Krause Jordan Krause
Author Profile Icon Jordan Krause
Jordan Krause
Arrow right icon
View More author details
Toc

Table of Contents (20) Chapters Close

Preface 1. Getting Started with Windows Server 2022 2. Installing and Managing Windows Server 2022 FREE CHAPTER 3. Active Directory 4. DNS and DHCP 5. Group Policy 6. Certificates 7. Networking with Windows Server 2022 8. Remote Access 9. Hardening and Security 10. Server Core 11. PowerShell 12. Redundancy in Windows Server 2022 13. Containers 14. Hyper-V 15. Remote Desktop Services 16. Troubleshooting 17. Other Books You May Enjoy
18. Index
Appendix: Answers to the End-of-Chapter Questions

Implementing a new virtual server

Now we are ready to spin up our first virtual server! Similar to creating new virtual switches, the process for creating a new VM is fairly straightforward, but there are some steps along the way that might need some explanation if you haven’t been through this process before. We start with the same management interface from which we do everything in the Hyper-V world. Open up Hyper-V Manager and right-click on the name of your Hyper-V Server. Navigate to New | Virtual Machine... to launch the wizard:
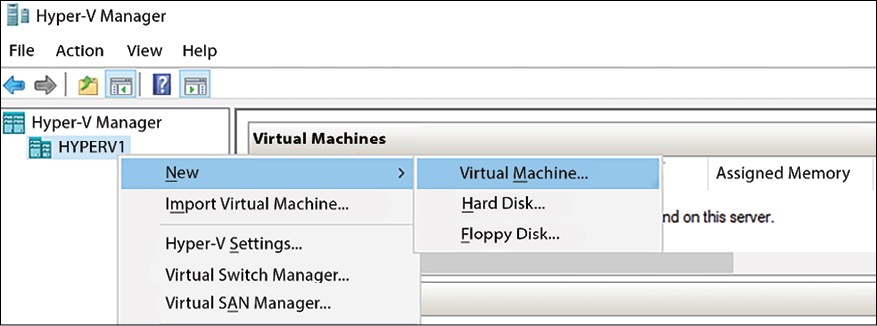
Figure 14.10: Creating a new VM

The first screen where we need to make some decisions is Specify Name and Location. Create a name for your new VM, which is easy enough. Then you also have the chance to store your VM in a new location. If you set a good default location for your virtual machines during Hyper-V role installation, chances are that you won’t have to modify this field. But in my case, I chose the default options...

lock icon The rest of the chapter is locked
Register for a free Packt account to unlock a world of extra content!
A free Packt account unlocks extra newsletters, articles, discounted offers, and much more. Start advancing your knowledge today.
Unlock this book and the full library FREE for 7 days
Get unlimited access to 7000+ expert-authored eBooks and videos courses covering every tech area you can think of
Renews at €18.99/month. Cancel anytime