Search icon CANCEL
Subscription
0
Cart icon
Your Cart (0 item)
Close icon
You have no products in your basket yet
Save more on your purchases! discount-offer-chevron-icon
Savings automatically calculated. No voucher code required.
Arrow left icon
Explore Products
Best Sellers
New Releases
Books
Videos
Audiobooks
Learning Hub
Free Learning
Arrow right icon
Arrow up icon
GO TO TOP
Mastering Manga Studio 5

You're reading from   Mastering Manga Studio 5 An extensive, fun, and practical guide to streamlining your comic-making workflow using Manga Studio 5

Arrow left icon
Product type Paperback
Published in Sep 2013
Publisher Packt
ISBN-13 9781849697682
Length 298 pages
Edition 1st Edition
Concepts
Arrow right icon
Author (1):
Arrow left icon
Liz Staley Liz Staley
Author Profile Icon Liz Staley
Liz Staley
Arrow right icon
View More author details
Toc

Table of Contents (13) Chapters Close

Preface 1. Getting Familiar with the Story Features 2. The Right Tools for the Job FREE CHAPTER 3. Palettes of a Different Color 4. Setting up Your Space 5. Living in a Material World 6. It's Only a (3D) Model 7. Ready! Set! Action! 8. Rulers and Speech Balloons 9. Putting It All Together! Drawing and Inking 10. Finishing Touches A. Recommended Reading Index

Rulers


A ruler is a great thing to have. And in digital art it's really great, especially if you have a traditional tablet where you aren't looking at the screen in order to draw. Manga Studio comes with lots of ruler options, one of which we've already explored back in the section about word balloons.
The second page of the little script that we're working on here has a few shots that require drawing backgrounds. For this purpose, using a perspective ruler will make our job infinitely easier.

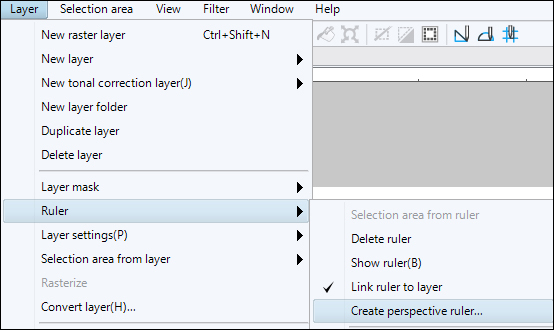
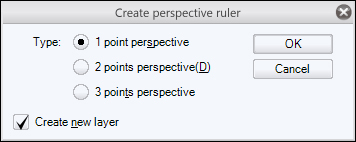
For the first panel of page two, where Steven Strange is coming into the police station, we'll add a one point perspective ruler to assist us in getting the lines just right. Go to Layer | Ruler | Create perspective ruler. Then, in the dialog box that comes up, select the 1 point perspective and click on the OK button. Leave the Create new layer checkbox selected and the ruler will be created on its own layer instead of on our sketch layer. Refer to the following screenshot:
Alright, now we have three...

lock icon The rest of the chapter is locked
Register for a free Packt account to unlock a world of extra content!
A free Packt account unlocks extra newsletters, articles, discounted offers, and much more. Start advancing your knowledge today.
Unlock this book and the full library FREE for 7 days
Get unlimited access to 7000+ expert-authored eBooks and videos courses covering every tech area you can think of
Renews at $19.99/month. Cancel anytime
Banner background image