A quick overview
After launching Lumion for the first time, it will run a benchmark to check our system or workstation and see if there is any hardware component that we can upgrade in order to run Lumion more smoothly. The next screenshot shows an example of the final result and the components we might want to upgrade:

Although CPU Memory and CPU Score are essential, the most important piece of hardware is the graphics card. Which graphics card we use makes all the difference, and Lumion's official website has some useful information that can help us evaluate the vital role of this piece of hardware.
Note
To find out what hardware will be best suited to work with Lumion 3D, check out the following link:
When the benchmark finishes execution, the next interface that appears is what we can call the main menu, although there isn't any official name. We call this area the main menu because here we find the most important settings to start working with Lumion. As you can see in the following screenshot, there are several tabs, and if we click on each one, we would find different areas that help us work with Lumion:

For now, we will stick with the New tab, because all the other tabs are sort of useless if we don't have any project of our own. We will look at a new project that is exactly what we can start in the New tab. For this, we can use one of the nine scenes shown in the preceding screenshot. However, which one should we select? All the nine scenes can be accomplished by tweaking the menus we find inside the Build mode (the Build mode is where we can build the project), and therefore, we can say that these nine scenes work as a shortcut or a preset to get a specific look and mood, although later, we can entirely change the look of the environment. Unfortunately, for now, we cannot save an environment created as a template, but nothing stops you from saving a scene and using it as a template. The only difference is that it will not appear in the New tab.
A good starting point is to use the Grass scene. The Grass scene is highlighted in the previous screenshot and is a good starting point because it is a simple scene with a flat terrain and good light. After selecting this scene, Lumion loads the scene and opens the Build mode.
Camera navigation in Lumion
Now that we are inside the Build mode, how can we control the camera? The Build mode has a very simple interface. Initially, we might feel lost with the lack of information in the interface. On the right-hand side, there is a set of buttons, and if we hover the mouse over the one with a question mark, some information appears that will help us. For now, the information we need is the one located in the top-right corner; this tells us how to navigate or control the camera in Lumion, as you can see in the following screenshot:

Here is a list of the keys and combinations to fully master the Lumion navigation system:
- WSAD / arrow keys: These are used to move the camera forward, backward, to the left, or to the right, respectively
- Q and E: These are used to move the camera up and down, respectively
- Spacebar + WSAD/arrow keys: These are used to slow down the camera
- Shift + WSAD/arrow keys: These are used to move the camera fast
- Shift + Spacebar + WSAD / arrow keys: These are used to move the camera very fast
- Use the right mouse button and move the mouse to look around
- Use the middle mouse button and move the mouse to pan the camera
- Mouse wheel up/down: This is used to zoom in and out the camera
- Ctrl + H: This is used to reset the camera pitch to horizontal viewpoint
- O + the right mouse button: This is used to orbit the camera
Now that we know what to use to control the camera, another question arises: how do we control the 3D models inside Lumion?
Controlling 3D models
Every time we place a 3D model inside Lumion, it is normal to accept some controls to tweak and adjust some basic parameters such as move, scale, and rotation. Now, it is a good time to introduce a concept that Lumion uses to control the 3D models in the scene.
Handling the 3D models using Lumion
Lumion makes a distinction between the 3D models we import and the native 3D models. This means we need to use two different Lumion menus to control each 3D model, as explained in the following screenshot:

The Import menu is where we can find the tools to import external 3D models, and the Objects menu is where we can find all the built-in 3D models of Lumion. There are two different menus, two different types of 3D models, and two different ways to select and control. This means that to control an imported 3D model, we need to have the Import menu selected; otherwise, we cannot find any tools to adjust the model. The same principle applies, for example, when we need to move a tree, and for this, we need to have the Objects menu selected. So, how can we import a 3D model?
Importing an external 3D model
Importing a 3D model is really easy and straightforward. What we need to do is click on the Import menu, which can be found on the left-hand side, and then click on the Add a new model button, as shown on the following screenshot:

This opens a Windows Explorer window where you can locate the folder that contains the 3D model and select it. After doing this, we need to give a name to the new 3D model and click on the Add to library button.
Now, we are back to the Build mode, and we are controlling a yellow boundary box that represents the 3D model we just imported. With the left mouse button, we can click to place the 3D model. This is how we import an external 3D model. If you have problems at this stage, have a look at the Common problems and solutions section at the end of this chapter.
Using Lumion's 3D models
Lumion has an extra distinction inside the Objects menu, and now, we are talking exclusively about Lumion's native 3D models. If you open the Objects menu, this is what you will find:

The buttons highlighted show the eight categories of 3D models and other elements such as lights, smoke, and buildings. When we hover the mouse over the buttons, a small label appears identifying the category.
Let's try to add a 3D model to an empty scene. Something that will look really good in the scene is a tree, and to add one, we need to select the first button called Nature. So now, we have the Nature category activated; this means that we can control any 3D model that falls under this category. To add a 3D model and open the Nature Library, we need to click on the Change object button, as shown in the previous screenshot. Select a tree and now know we got back to the Build mode and controlled a yellow boundary box that represents the tree. Click with the left mouse button to place the tree somewhere in the scene, and click again next to the first tree to place a second tree.
However, now, we want to add a nice sports car. How can we do this? We will use the same principle we used for the tree, so we need to select the Transport button and click on the Change object button to open the Transport library. Inside this library, select the tab called Sports Cars and add a nice sports car to your scene.
At this point, you should have at least two trees and one car in your Grass scene, but how can we control the 3D models placed inside Lumion?
Hotkeys to control the 3D models
When we open the Objects menu or the Import menu on the left-hand side, a toolbar appears at the bottom of the screen, as you can see in the following screenshot:

If you followed the previous steps, your scene should look something like the one shown in the previous screenshot: two trees, one car, the Objects toolbar, and the Place object button activated. That is why we still control the yellow boundary box. We can deactivate the Place object button by selecting another tool, and for this, we can use the following keys:
- M: This is used to move the 3D model
- L: This is used to scale the 3D model
- R: This is used to rotate the 3D model
The previous screenshot helps you identify where you can find these tools, including a button that is really important; this allows you to delete 3D models. Let's move the car, and for this, press the M key or select the Move object tool from the toolbar. Since we have the Transport category activated and we selected the move tool, we can control any object from this category. To control a 3D model, we need to start by clicking on the small white dot that appears on the car, as you can see in the following screenshot:

With the left mouse button, click and drag the car to move the car to a different place, and a white line will appear showing the distance (in meters). The same principle applies to the other tools. To delete a 3D model, we just need to select the Trash object button and click on the small white dot to delete it.
However, this fantastic scene could look much better if one of the trees was smaller than the other. It is really easy; we just need to press the L key and select and scale the tree. However, this is not working, why? Well, right from the beginning, we have a problem because even if you press the L key, the move tool is still activated. To solve this, we need to press and hold the L key and scale the tree and then click on the Size object button. However, even after doing this, we cannot select and scale the tree. The reason is because we need to select the Nature category first before doing anything else. This is a key aspect to work with Lumion; we always need to select the category first before applying any transformation to the 3D model.
Now that we have our amazing scene ready, there is something really important we need to do: save the project.
Saving in Lumion
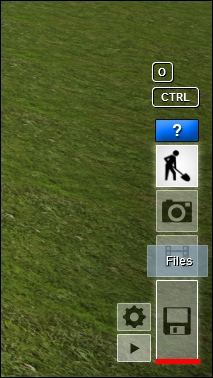
To save any project, we need to select the Files menu, which we can find on the right-hand side, as you can see in the next screenshot:

When we open the Files menu, the Save scene tab is automatically opened. Here, we can save the project by giving it a name and description (optional). After that, we have to click on the Save button (if you are in a hurry, press F5 to quickly save it) to save the first version of our project, as shown in the following screenshot:

When you click on the Save button, Lumion will be able to tell that Version 1 was saved. However, let's say that we totally forgot to save the project, and instead, we opened another project. Is everything lost? No, because Lumion has an autosave system to prevent any loss of work. So, if by mistake, we forget to save the project and we open another scene, Lumion creates an autosave file with the last version. In order to access this file, click on the Files button and select the Load scene tab on the left-hand side of the Save scene tab, as you can see here:

As a result of the Lumion's autosave feature, we can now select the autosaved file to restore the work we did in the previous project, but keep in mind that the autosaved file doesn't last forever and can be overwritten.
Before we finish this quick overview, let's have a look at an additional aspect that can help control and tweak Lumion's speed. For this, we need to open the Settings menu.
The Settings menu – how to use it
The Settings menu is where we can find some parameters and settings that help us tweak the way Lumion works. We can dramatically increase how fast Lumion works just by decreasing the quality of the editor, terrain, and trees. This will only affect the way Lumion presents the 3D models and environment in the Build mode.
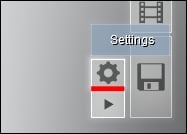
There are two ways to open the Settings menu. If we are in the Build mode, on the right-hand side next to the Files button, we would find the Settings button, as you can see in the following screenshot:

The second option is to click on the Files button and select the first tab called Home and then click on the Settings button. One way or another, we should get this menu:

As you can see, each setting has a number to help you follow along:
- Button 1 limits all the texture sizes to 512 x 512 pixels and saves a bit of memory for huge scenes or low-end graphics cards.
- Use the Toggle Tablet Input button if you want to use a graphic table to work with Lumion. It is useful for sculpting the terrain.
- Button 3 lets you invert the way the mouse works when we use it to look up and down.
- Button 4 is another setting to improve Lumion's speed by removing or adding a level of detail to the terrain. The shortcut for this setting is F7.
- If button 5 is pressed, all trees and plants in the Build mode are rendered with full quality and detail. The shortcut for this setting is F9.
- Button 6 mutes all the sounds in the Build mode.
- The Editor Quality button lets you define the quality of the 3D models, shadows, and materials on the Build mode, but this will not affect the output when the scene is rendered. The shortcuts for this setting are:
- F1 for low quality
- F2 for medium quality
- F3 for high quality
- F4 for very high quality
- The Editor Resolution button lets you control Lumion's resolution, and this setting has a big impact on the real-time performance. By reducing the resolution, you can get quicker updates on the Build mode.
- Finally, with button 9 you can define if you want to work with the metric or imperial system. By default, Lumion works with meters, so if your building was modeled using inches, this is the first place to check before importing the 3D model.
Here are a few more shortcuts to help you work with Lumion:
- F5: This is used as a quick save option
- Home and F11: Open the Home window and press the F11 key to toggle between a fullscreen and normal window
Now that we finished with the quick overview, let's jump to another important section that will help us understand how to model using Lumion.


