Declaring variables in JavaScript
Variables of the types previously described under the Types of variables used in JavaScript section, as we know, consist of numerical values, Boolean values, character strings, arrays, and objects.
JavaScript is a weakly typed language, which means that you can change the type of a variable at any time. For example, a numeric variable can be transformed into a character string, or even become an array.
Of course, it is not advisable to make such voluntary changes in our programs, and it is prudent to maintain the type of a variable throughout the program, for comprehension. However, it is important to know that JavaScript allows changing variable types. A variant of JavaScript called TypeScript provides more security by preventing these type changes for variables.
Now let’s learn how to define a variable. We will do so using one of the following keywords: const, var, or let.
Using the const keyword
The const keyword is used to define a variable whose value will be constant. Any subsequent attempt to change the value will produce an error.
Let’s define the constant variable c1 having the value 12. Let’s try to modify the value by assigning it a new value: an error will be displayed in the console:
Note
To say that we are defining a constant variable is an abuse of language. We should rather say that we are defining a constant value.
Defining a constant value (index.html file)
<html>
  <head>
    <meta charset="utf-8" />
    <script>
      const c1 = 12;
      console.log(c1);
      c1 = 13;   // attempt to modify the value of a
                 // constant: error
      console.log(c1);  // no display because an error
                        // occurred above
    </script>
  </head>
  <body>
  </body>
</html>
After implementing the preceding code, we will also see the error displayed in the console (if the console is not visible, it can be displayed by pressing the F12 key) of the browser as follows:
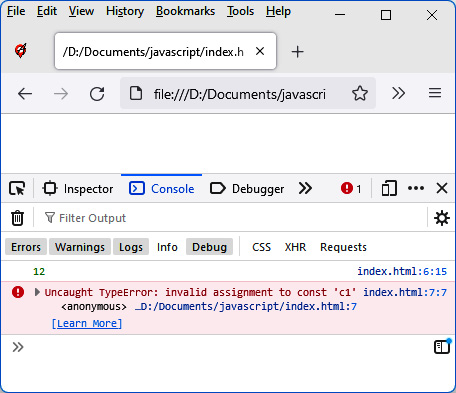
Figure 1.5 – Error when modifying a constant value
As we can see from the preceding figure, the first display of the constant c1 displays the value 12, while the second display does not occur because an error occurred before (while trying to change the value of a constant). Therefore, a value defined by the const keyword should not be modified.
Using the var keyword
Another way to define a variable (whose value can be modified) is to use the var keyword. Let’s see how using the following code example:
Definitions of several variables
<html>
  <head>
    <meta charset="utf-8" />
    <script>
      var a = 12;
      var b = 56;
      var c = a + b;
      var s1 = "My name is ";
      var firstname = "Bill";
      console.log("a + b = " + a + b);
      console.log("c = " + c);
      console.log(s1 + firstname);
    </script>
  </head>
  <body>
  </body>
</html>
We defined the variables a, b, s1, and firstname by preceding them with the keyword var and assigning them a default value. The variable c corresponds to the addition of the variables a and b.
Note
The name of a variable consists of alphanumeric characters but must start with an alphabetic character. Lowercase and uppercase are important in writing the variable name (variables’ names are case sensitive). Thus, the variable a is different from the variable A.
The result of the previous program is displayed in the browser console (if it is not visible, it must be displayed by pressing the F12 key):
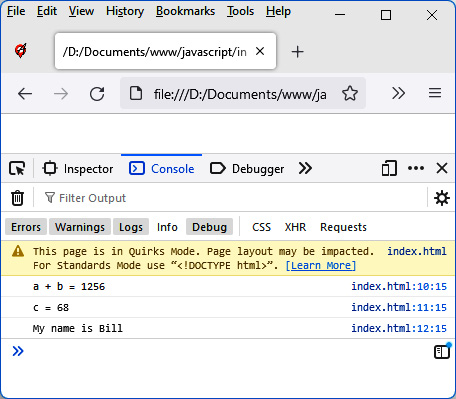
Figure 1.6 – Using the var keyword
In the preceding figure, we can see a result that may seem surprising. Indeed, the direct calculation of a + b produces the display of 1256 the first time, then 68 the second time.
Indeed, when we write console.log("a + b = " + a + b); the fact that we’ve started to display characters by writing "a + b = " means that JavaScript will interpret the rest of the display in the form of a character string; in particular, the values a and b, which follow on the line. So, the values a and b are no longer interpreted as numeric values, but as the character strings 12 and 56. When these character strings are connected by the + operator, this does not correspond to addition but to concatenation.
Conversely, the calculation of the variable c does not involve character strings, so the result of a + b here is equal to the sum of the values of the variables a and b, therefore 68.
Note that the same program can be run on the Node.js server. To do so, we would write it in our testnode.js file as follows:
testnode.js file
var a = 12;
var b = 56;
var c = a + b;
var s1 = "My name is ";
var firstname = "Bill";
console.log("a + b = " + a + b);
console.log("c = " + c);
console.log(s1 + firstname);
We can then execute the preceding code with the node testnode.js command. The result displayed under Node.js is similar to that displayed in the browser console:
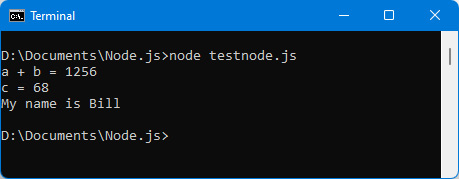
Figure 1.7 – Running the program under Node.js
We learned about the const and var keywords for defining variables; all that remains is for us to learn how to use the let keyword.
Using the let keyword
To understand the use of the let keyword and see the difference from the var keyword, we must use braces in our programs. Braces are used to create program blocks in which instructions are inserted, in particular after the conditional if and else instructions (which we will see in the Writing conditions section).
Let’s write a simple if(true) condition that is always true: the code included in the braces following the condition is therefore always executed:
index.html file including a condition
<html>
  <head>
    <meta charset="utf-8" />
    <script>
      var a = 12;
      if (true) {  // always executed (because always true)
        var b = 56;
        let c = 89;
        console.log("In the brace:");
        console.log("a = " + a);
        console.log("b = " + b);
        console.log("c = " + c);
      }
      console.log("After the brace:");
      console.log("a = " + a);
      console.log("b = " + b);
      console.log("c = " + c);
    </script>
  </head>
  <body>
  </body>
</html>
In the preceding code, we have defined the variable a outside of any braces. This variable will therefore be accessible everywhere (in and out of braces) as soon as it is defined.
The variables b and c are defined within braces following the condition. Variable b is defined using var, while variable c is defined using the let keyword. The difference between the two variables is visible as soon as you exit the block of braces. Indeed, the variable c (defined by let) is no longer known outside the block of braces where it is defined, unlike the variable b (defined by var), which is accessible even outside.
This can be checked by running the program in the browser as follows:
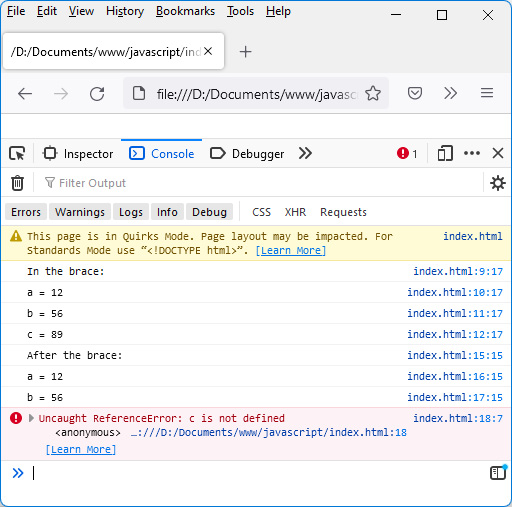
Figure 1.8 – The variable c defined by let is inaccessible outside the block where it is defined
Note that the same program gives a similar result on the Node.js server, as can be seen in the following screen: the variable c defined by let in a block becomes unknown outside the block.
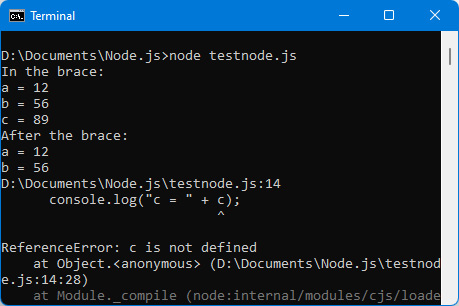
Figure 1.9 – The same results on the Node.js server
As we can see in the preceding screen, the variable c, defined by let in a block, becomes unknown outside the block.
What if we don’t use var or let to define a variable?
It is possible not to use the var or let keywords to define a variable. We can simply write the variable’s name followed by its value (separated by the sign =). Let’s see how using the following example:
Creating variables without specifying var or let
a = 12;
b = 56;
console.log("a = " + a);    // displays the value 12
console.log("b = " + b);    // displays the value 56
In the preceding example, where the variables are initialized without being preceded by var or let, these variables are global variables. As soon as they are initialized, they become accessible everywhere else in the program. This will become apparent when we study the functions in the Using functions section of this chapter.
Note
It is strongly advised to use as few global variables as possible in the programs, as this complicates the design and debugging of the programs that contain them.
What is an uninitialized variable worth?
Each of the preceding variables was declared by initializing its value, with the = sign, which is the assignment sign. Let’s see what happens if we don’t assign any value to the variable, but just declare it using var or let as follows:
Declaration of variables without initialization
<html>
  <head>
    <meta charset="utf-8" />
    <script>
      var a;
      let b;
      console.log("a = " + a);    // displays the value
                                  // undefined
      console.log("b = " + b);    // displays the value
                                  // undefined
    </script>
  </head>
  <body>
  </body>
</html>
In the preceding code, we have defined two variables, a and b – one using var, the other using let. Neither of the two variables has an initial value (that is, they’re not followed by an = sign).
The result displayed in this case for these uninitialized variables is a JavaScript value called undefined. This corresponds to the value of a variable that does not yet have a value. The undefined value is an important keyword in the JavaScript language.
Note
The variables a and b are not initialized, and it is necessary to declare them using var or let. Indeed, you cannot simply write a; or b; as this would cause a runtime error.
Let’s run the preceding program in the browser and observe the results displayed in the console:
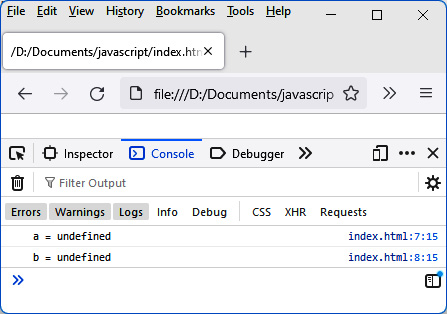
Figure 1.10 – An uninitialized variable is undefined
Note
The undefined value is also associated with an uninitialized variable if using server-side JavaScript with Node.js.
We now know how to define variables in JavaScript. To create useful JavaScript programs, you have to write sequences of instructions. One of the most used instructions allows you to write conditional tests with the if statement, which we will talk about next.


