Windows Server Migration Tools (Must know)
Some of the migrations can be accomplished by using native and built-in tools. So far we were using the built-in tools to migrate these services. Microsoft has included the latest version of the Windows Server Migration Tools in Windows Server 2012. We will be using this tool in the rest of the migrations. These are PowerShell cmdlets and are part of the Windows Server Migration Tools PowerShell module. In Windows Server 2008 and Windows Server 2008 R2, the source and target server have to be in the same subnet to migrate data using this tool. However, the new version of the Server Migration tool supports cross-subnet migrations. The TCP and UDP ports 7000, 7001, and 7002 must be open between source and target servers to support this scenario.
Getting ready
The following key PowerShell cmdlets will be used for this migration effort:
Export-SmigServerSetting: Export role, feature, and so on from the source server to a target serverImport-SmigServerSetting: Import role, feature, and so on from an export fileSend-SmigServerData: Send/migrate data and its associated permissions, properties, and so on from the source serverReceive-SmigServerData: Receive/copy data and its associated permissions, properties, and so on to the target server
It is time to install Windows Server Migration Tools on the Windows Server 2012. It is a best practice to use the latest version of the tool even if the older versions are available on the source servers.
How to do it...
- Log on to a Windows Server 2012.
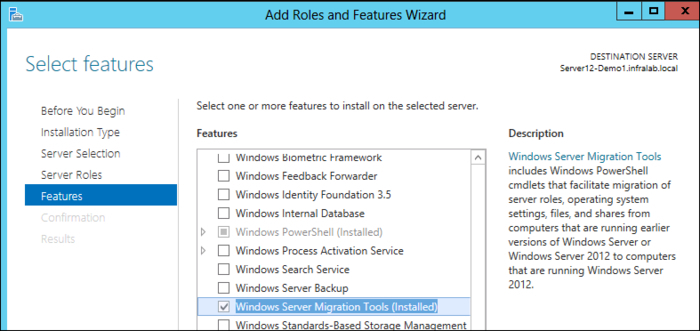
- Open Server Manager. From Server Manager, install the Windows Server Migration Tools feature. Refer to the Add and remove roles and features (Must know) recipe for role and feature installation details.

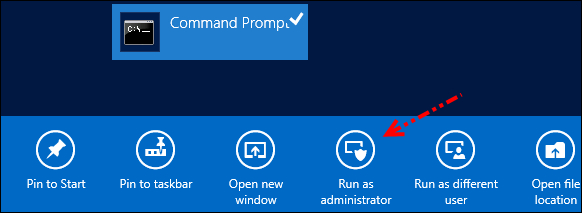
- From the Start screen, right-click on Command Prompt and select the Run as administrator option.

- Change the directory to
C:\Windows\System32\ServerMigraitonTool. Run theSmigDeploy.exe /Package /Architecture amd64 /os WS08 /Path /C:\MigTools\command. This will create a migration tool package for 64-bit servers in theC:\MigToolsfolder.Note
You can change the
/architecturevalue to create an application package for 32-bit servers.
Note
The SmigDeploy.exe tool creates a migration tool installation package. This package can be directly copied over to the source Windows Server 2008 and Windows Server 2008 R2 servers. Copy the C:\MigTools folder to a network share. We will be using this migration package for the rest of the migrations.
How it works...
Copy the C:\MigTools folder to a network share. For this scenario, I will be copying the C:\MigTools folder to the \\HOU-MGR-01 server and this will be referenced in the migrations described in this book.
There′s more...
At this point the Windows Server Migration Tools for a 64-bit server is available on a network share. This package can be copied to the source and target servers for the migration. No other configuration is required. The necessary parameters will be configured based on the role or feature that we will migrate.
If you have a 32-bit server, you can generate a 32-bit installation package by modifying the /Architecture parameter in the preceding command.


