Installing Windows Server 2012 (Must know)
Now it is time to start installing servers in your environment. In this recipe, we will start installing Windows Server 2012 in Server Core and later it will be converted to a Server with a GUI. We will cover the following:
- Installing Windows Server 2012 with Server Core option
- Converting from Server Core to Server with a GUI and vice versa
- Basic configuration tasks
Getting ready
Windows Server 2012 is only available as a 64-bit version. So the hardware needs to support this requirement. The following is the minimum hardware requirement for Windows Server 2012:
- Processor: 1.4 GHz 64-bit processor
- RAM: 512 MB
- Hard disk: 32 GB
You also need to select the correct edition (Data Center, Standard, Essential, or Foundation) of the server based on your business and technical requirements.
Note
The preceding hardware requirement is an absolute minimum requirement to install Windows Server 2012. The actual hardware and software requirements will vary based on the environment and the types of application you are going to support. It is recommended to perform a capacity planning session with various team owners before you finalize the hardware and server edition. Upgrade from the same server edition of Windows Server 2008 and Windows Server 2008 R2 to Windows Server 2012 is supported. Also, the Essentials and Foundation versions of Windows Server 2012 are on a separate install DVD.
How to do it...
- Boot the server from the Windows Server 2012 CD.
- Like other operating system (OS) installations, in the first screen you will see an option to select Language to Install, Time and Currency Format, and Keyboard of input method. Select the correct options based on your region. Click on Next.
- Click on Install Now in the next window to continue the installation.
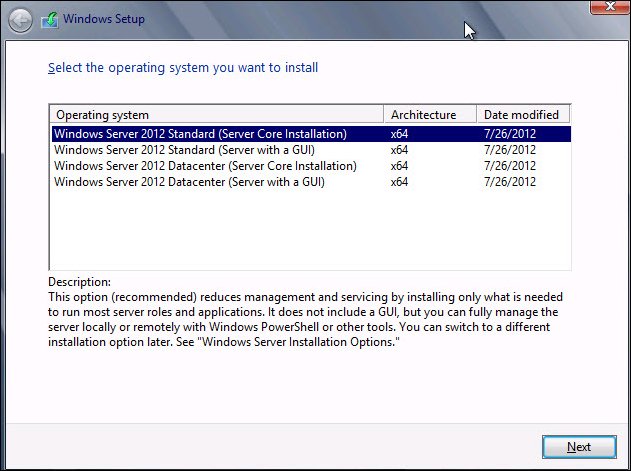
- As shown in the following screenshot, you will see the Server Core Installation and Server with a GUI options. For this installation, I will select Server Core Installation. Click on Next.

- Accept the license agreement. Click on Next.
- Since this is a new installation, you need to select the Custom: Install Windows Only (advanced) option. For an upgrade, select the Upgrade: Install Windows and keep files, settings, and applications option. Click on Next.
- Select the drive where you want to install the operating system. Click on Next.
Note
Use the advanced option to format the drive, change the partition size, load drivers, and so on.

Note
You can use the left arrow button on the top-left corner of the screen to go back to the previous install screen.
- Select the drive where you want to install the operating system. Click on Next. The installation process will start at this point. The installation process is categorized into five different stages: Copying Windows Files, Getting files ready for installation, Installing features, Installing updates, and Finishing up.
- The server will be rebooted after the initial installation. After the reboot, the server will prompt you to enter a password for the built-in Administrator account. Enter a new password and click on OK to complete the installation.
How it works...
As I mentioned before, the default install option is Server Core. The previously mentioned procedure completes the installation of Windows Server 2012. At this point this server will be a standalone server.
There′s more...
In Windows Server 2012, you can use the Setres (Set Resolution) command to change the default command windows resolution. Now you have completed the installation of a Server Core operating system (OS). Before we start configuring this server, I will explain the process of converting this server into a Server with a GUI option.


