Search icon CANCEL
Subscription
0
Cart icon
Your Cart (0 item)
Close icon
You have no products in your basket yet
Save more on your purchases! discount-offer-chevron-icon
Savings automatically calculated. No voucher code required.
Arrow left icon
Explore Products
Best Sellers
New Releases
Books
Videos
Audiobooks
Learning Hub
Free Learning
Arrow right icon
Arrow up icon
GO TO TOP
Extending Microsoft Dynamics 365 for Operations Cookbook

You're reading from   Extending Microsoft Dynamics 365 for Operations Cookbook Create and extend real-world solutions using Dynamics 365 Operations

Arrow left icon
Product type Paperback
Published in May 2017
Publisher Packt
ISBN-13 9781786467133
Length 442 pages
Edition 1st Edition
Languages
Arrow right icon
Author (1):
Arrow left icon
Simon Buxton Simon Buxton
Author Profile Icon Simon Buxton
Simon Buxton
Arrow right icon
View More author details
Toc

Table of Contents (16) Chapters Close

Preface 1. Starting a New Project FREE CHAPTER 2. Data Structures 3. Creating the User Interface 4. Application Extensibility, Form Code-Behind, and Frameworks 5. Business Intelligence 6. Security 7. Leveraging Extensibility 8. Data Management, OData, and Office 9. Consuming and Exposing Services 10. Extensibility Through Metadata and Data Date-Effectiveness 11. Unit Testing 12. Automated Build Management 13. Servicing Your Environment 14. Workflow Development 15. State Machines

Creating the Visual Studio Team Services project

The terms Visual Studio Team Services and Team Foundation Server (TFS) are often used interchangeably. In Visual Studio, the user interface states that we are connecting to a Team Foundation Server. However, we are actually connecting to VSTS, which is an online service. VSTS is required for Operations development, and that is what we will use.

The project is normally created under the end-user's VSTS site, unless the work is being written as an ISV solution (or a personal development or learning project). The reason for using the client's VSTS system is that LCS is associated with the VSTS site, and support calls created through Cloud-powered support are generated within the associated VSTS. Cloud powered support is an online support solution within LCS that is exposed to the Operations client, allowing users to log support issues with their internal support team.

For up to five users, VSTS is free, and the customer can create many accounts with limited access without charge. These accounts as called stakeholder accounts, and allows the user access to work items, which also allows the users the ability to log support calls from within Operations. For those with an MSDN subscription, the five user limit is not counted.

This process is normally performed as part of the LCS project creation. If this were an implementation project type, the project is created when the customer signs up for Operations. The customer would then invite their Cloud solution provider (Partner) to the project. If this were an internal development project, such as a new vertical solution by an ISV, a Migrate, create solutions, and learn Dynamics 365 for Operations project type would be used.

In either case, we will have an LCS project, which will usually have an Azure VM deployed that acts as a build server.

For simplicity, and to keep the focus on software development, a project of type Migrate, create solutions, and learn Dynamics 365 for Operations was created for the purpose of the example of the book.

Getting ready

How to do it...

To create the project, follow these steps:

  1. Navigate to your VSTS site, for example, https://<yourdomain>.visualstudio.com/.
  2. Under Recent projects & teams, click on New.
  3. Complete the form as shown as follows:

Field

Value

Project name

Unique name, careful to name the projects for easy recognition, and how they are ordered. This is more important for ISVs who may have many projects.

Description

Short description of the project

Process template

Agile

Version control

Team Foundation Version Control

  1. Press Create project.
  1. Once complete, you can then navigate to your project and work with VSTS in order to plan your project.
  2. To authenticate with LCS, we will need to generate a personal access token; to set this up, click on the control panel (cog) icon, as shown in the following screenshot:
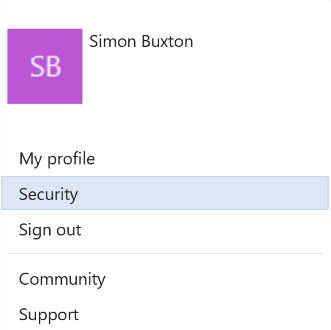
  1. This takes you to the control panel, again, on the top-right click on your name and choose Security, as shown in the following screenshot:
  1. The personal access tokens option is selected by default; on the right-hand pane, click on Add.
  2. On Create a personal access token form, enter a short description, for example, the LCS project name. Set the Expires in field based on how long you would like it to last for.
  3. Leaving the Accounts and Authorized scopes fields as default; press Create token.
  4. Finally, copy the resultant access code into a safe place; we will need it when we link VSTS to LCS. If we don't, we will have to create a new access token as you can't see it after the web page is closed.

Next, we will need to link the project to our LCS project. If an LCS project is not currently linked to a VSTS project, we get the following message on the left hand side, as shown in the following screenshot:

To configure VSTS for the LCS project, follow these steps:

  1. To authenticate with LCS, we will need to generate a personal access token, so from within VSTS.
  2. Click on the Setup Visual Studio Team Services button in the Action center dialog box.
  3. On the Enter the Visual Studio Team Service site page, enter the URL of our VSTS site into the Visual Studio Team Services site URL field; for example, https://<mysite>.visualstudio.com/.
  4. Enter the personal access token generated earlier into the Personal access token field.
  5. Press Continue.
  6. On the Select the Visual Studio Team Service project page, select the project from the Visual Studio Team Service list.
  7. You are then shown the Workitem type mapping list. This allows you to select how to LCS Workitem Type / LCS Workitem Sub Type elements to VSTS Workitem Type elements. Leave this as the default and press Continue.
  8. On the final Review and save page, press Save.
  9. This takes us back to the main project page and the action center will ask you to authorize the project; click on Authorize.
  1. You will be warned about being redirected to an external site; click on Yes.
  2. You may be asked to log on; if so, do it with the account you use for VSTS, which might be your Microsoft account.
  3. This will open the Authorize application page from within VSTS, and you will be told that you are allowing Microsoft Dynamics Lifecycle Services to access the VSTS and the specific permissions it will receive. Press Accept.

How it works...

Operations uses VSTS for its source control, work, and build management. The only steps here that we technically must perform are step 1 through step 5, but without performing the previous steps, we lose the ability to integrate LCS. If our project was for a customer implementation, we should consider it mandatory to integrate VSTS with LCS.

See also...

For more information on VSTS and LCS, please check out the following links:

The next link is useful background knowledge, but a lot of this is one for you when using an implementation LCS project:

This link is for when we have a customer implementation project and demonstrate some of the synergy of leveraging VSTS and LCS with Operations.

You have been reading a chapter from
Extending Microsoft Dynamics 365 for Operations Cookbook
Published in: May 2017
Publisher: Packt
ISBN-13: 9781786467133
Register for a free Packt account to unlock a world of extra content!
A free Packt account unlocks extra newsletters, articles, discounted offers, and much more. Start advancing your knowledge today.
Unlock this book and the full library FREE for 7 days
Get unlimited access to 7000+ expert-authored eBooks and videos courses covering every tech area you can think of
Renews at $19.99/month. Cancel anytime
Banner background image