Search icon CANCEL
Subscription
0
Cart icon
Your Cart (0 item)
Close icon
You have no products in your basket yet
Arrow left icon
Explore Products
Best Sellers
New Releases
Books
Videos
Audiobooks
Learning Hub
Free Learning
Arrow right icon
Arrow up icon
GO TO TOP
Ext JS 3.0 Cookbook

You're reading from   Ext JS 3.0 Cookbook Clear step-by-step recipes for building impressive rich internet applications using the Ext JS JavaScript library

Arrow left icon
Product type Paperback
Published in Oct 2009
Publisher Packt
ISBN-13 9781847198709
Length 376 pages
Edition 1st Edition
Languages
Tools
Arrow right icon
Toc

Table of Contents (15) Chapters Close

Ext JS 3.0 Cookbook
Credits
About the Author
About the Reviewer
1. Preface
1. DOM and Data Types, the Ext JS Way FREE CHAPTER 2. Laying Out a Rich User Interface 3. Load, Validate, and Submit Forms 4. Fun with Combo Boxes and Date Fields 5. Using Grid Panels to Display and Edit Tabular Data 6. More Applications of Grid and List Views 7. Keeping Tabs on Your Trees 8. Making Progress with Menus and Toolbars 9. Well-charted Territory 10. Patterns in Ext JS

Loading form data from the server


An important part of working with forms is loading the data that a form will display. Here's how to create a sample contact form and populate it with data sent from the server.
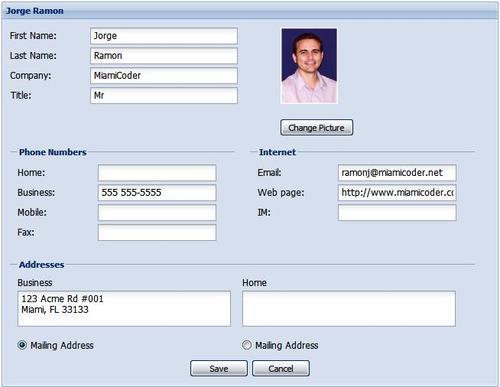
How to do it...

  1. 1. Declare the name and company panel:

    var nameAndCompany = { columnWidth: .5,
    layout: 'form',
    items: [
    { xtype: 'textfield',
    fieldLabel: 'First Name',
    name: 'firstName',
    anchor: '95%'
    },
    {
    xtype: 'textfield',
    fieldLabel: 'Last Name',
    name: 'lastName',
    anchor: '95%'
    },
    {
    xtype: 'textfield',
    fieldLabel: 'Company',
    name: 'company',
    anchor: '95%'
    },
    {
    xtype: 'textfield',
    fieldLabel: 'Title',
    name: 'title',
    anchor: '95%'
    }
    ]
    }
    
  2. 2. Declare the picture box panel:

    var picBox = {
    columnWidth: .5,
    bodyStyle: 'padding:0px 0px 0px 40px',
    items: [
    { xtype: 'box',
    autoEl: { tag: 'div', style: 'padding-bottom:20px', html: '<img id="pic" src="' + Ext.BLANK_IMAGE_URL + '" class="img-contact" />'
    }
    }, { xtype: 'button', text: 'Change Picture' }
    ]
    }
    
  3. 3. Define the Internet panel...

lock icon The rest of the chapter is locked
Register for a free Packt account to unlock a world of extra content!
A free Packt account unlocks extra newsletters, articles, discounted offers, and much more. Start advancing your knowledge today.
Unlock this book and the full library FREE for 7 days
Get unlimited access to 7000+ expert-authored eBooks and videos courses covering every tech area you can think of
Renews at $19.99/month. Cancel anytime
Banner background image