Now that we have all required tools and files to build OpenCV, we can start the process by running the CMake GUI application. If you've installed CMake correctly, then you should be able to run it from your desktop, start menu, or dock, depending on your operating system.
Linux users should run the following command in a terminal before proceeding with the OpenCV build. These are basically dependencies by OpenCV itself, which need to be in place before it's configured and built:
sudp apt-get install libgtk2.0-dev and pkg-config
After you run the CMake GUI application, you need to set the following two folders:
- The Where is the source code folder should be set to where you downloaded and extracted OpenCV source code
- The Where to build the binaries folder can be set to any folder, but it's common to create a subfolder named build under the source codes folder and select that as the binaries folder
After these two folders are set, you can proceed forward by clicking on the Configure button, as shown in the following screenshot:
Clicking on the Configure button will start the configuration process. You may be asked to create the build folder if it does not already exist, to which you need to answer by clicking on the Yes button. Don't worry if you still feel like you're just repeating what's in the book. This will all sink in as you move forward with the book and the instructions. For now, let's just focus on getting OpenCV built and installed on your computer. Consider this an installation process that is not as easy as just clicking on a few Next buttons, and as soon as you start using OpenCV, it will all make sense. So, in the window that will appear next, select the correct generator and click Finish. See the following instructions for the correct generator type on each operating system:
Windows users: You need to select Visual Studio 14 2015. Make sure you don't select the ARM or Win64 versions or a different Visual Studio version.
macOS and Linux users: You need to select Unix Makefiles.
You'll see a short process in CMake, and when it's finished, you'll be able to set various parameters to configure your OpenCV build. There are many parameters to configure, so we'll just bother with the ones that directly affect us.
Make sure you check the checkbox next to the BUILD_opencv_world option. This will allow building all OpenCV modules into a single library. So, if you're on Windows, you'll have only a single DLL file that includes all OpenCV functions. As you'll see later on, this has the advantage of bothering with only a single DLL file when you want to deploy your computer vision applications. Of course, the obvious downside to this is that your application installer size will be a little bit larger. But again, ease of deployment, will prove to be much more useful later on.
You need to click on the Configure button again after changing the build parameters. Wait for the reconfiguration to finish and finally click on the Generate button. This will make your OpenCV build ready to compile. For the next part, you'll need to execute somewhat different commands if you're using Windows, macOS, or Linux operating systems. So, here they are:
Windows users: Go to the OpenCV build folder that you set earlier in CMake (in our case it was c:\dev\opencv\build). There should be a Visual Studio 2015 Solution (that is, the type of MSVC projects) that you can easily execute and build OpenCV with. You can also immediately click on the Open Project button, which is right next to the Generate button on CMake. You can also just run Visual Studio 2015 and open the Solution file you just created for OpenCV.
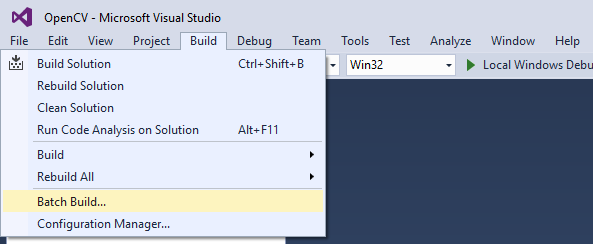
After Visual Studio is opened, you need to select Batch Build from the Visual Studio main menu. It's right under Build:
Make sure checkboxes in the Build column are enabled for ALL_BUILD and INSTALL, as shown in the following screenshot:
For macOS and Linux users: Run a terminal instance and execute the following commands after you switch to the Binaries folder you chose in CMake. To switch to a specific folder, you need to use the cd command. After you are in the OpenCV build folder (it should be the folder in your home that you chose when you opened CMake), you need to execute the following command. You'll be asked to provide the administrative password, just provide your password and press Enter to proceed forward with building OpenCV:
sudo make
This will trigger the build process, and depending on your computer speed this can take quite some time. Wait until building all libraries are finished and you see the progress bar reach 100%.
After the long wait, there's only one more command left to execute for macOS and Linux users. If you are on Windows, you can close Visual Studio IDE and proceed to the next step.
macOS and Linux users: After the building is completed, before closing the terminal instance, execute the following command while you're still in the OpenCV build folder:
sudo make install
This last command for non-Windows users will make sure OpenCV is installed on your computer and is completely ready to use. You're fine to proceed forward if you didn't miss any commands in this section. You have an OpenCV framework ready to build computer vision applications with.

 United States
 Great Britain
 India
India
 Germany
 France
 Canada
 Russia
 Spain
Spain
 Brazil
 Australia
 Singapore
 Hungary
 Ukraine
 Luxembourg
 Estonia
 Lithuania
 South Korea
 Turkey
 Switzerland
 Colombia
 Taiwan
 Chile
Chile
 Norway
 Ecuador
 Indonesia
 New Zealand
 Cyprus
 Denmark
 Finland
 Poland
 Malta
Malta
 Czechia
 Austria
 Sweden
 Italy
Italy
 Egypt
Egypt
 Belgium
 Portugal
 Slovenia
 Ireland
 Romania
 Greece
 Argentina
 Netherlands
 Bulgaria
 Latvia
 South Africa
 Malaysia
 Japan
Japan
 Slovakia
 Philippines
 Mexico
 Thailand