The Angular front-end
The front-end part of the template will probably be seen as more complex to understand, because Angular—just like most client-side frameworks—has evolved at a dramatic pace, thus experiencing many breaking changes in its core architecture, toolchain management, coding syntax, template, and setup.
For this very reason, it's very important to take our time understanding the role of the various files shipped with the template. This brief overview will start with root-level configuration files, which will also be updated with the latest versions of the Angular packages (and their dependencies) that we'll need to use.
Workspace
The Angular workspace is the filesystem place containing the Angular files: a collection of application files, libraries, assets, and so on. In our template, as in most ASP.NET Core and Angular projects, the workspace is located within the /ClientApp/ folder, which is defined as the workspace root.
The workspace is usually created and initialized by the CLI command used to create the app. Do you remember the dotnet new command we used in Chapter 1, Getting Ready? That's what we're talking about: the Angular part of the template was created by that command. We could achieve that same result with the Angular CLI, using the ng new command.
Any CLI commands operating on the app and/or their libraries (such as adding or updating new packages) will be executed from within the workspace folder.
angular.json
The most important role within the workspace is played by the angular.json file, created by the CLI in the workspace root. This is the workspace configuration file and contains workspace-wide and project-specific configuration defaults for all build and development tools provided by the Angular CLI.
It's worth noting that all the paths defined within this file are meant to be relative to the workspace root folder; in our scenario, for example, src/main.ts will resolve to /ClientApp/src/main.ts.
The first few properties at the top of the file define the workspace and project configuration options:
version: The configuration file version.newProjectRoot: The path where new projects are created, relative to the workspace root folder. We can see that this value is set to the projects folder, which doesn't even exist. That's perfectly normal since our workspace is meant to contain two Angular projects in two already defined folders: our HealthCheck Angular app, located in the/ClientApp/src/folder, and end-to-end tests, located in the/ClientApp/e2e/folder. Therefore, there is no need to define anewProjectRoot—and it's also important to not use an existing folder to avoid the risk of overwriting some existing stuff.projects: A container item that hosts a sub-section for each project in the workspace, containing project-specific configuration options.defaultProject: The default project name—any CLI command that doesn't specify a project name will be executed on this project.
It's worth noting that the angular.json file follows a standard generic-to-specific cascading rule. All configuration values set at the workspace level will be the default values for any project and can be overridden by those set at the project level. These, in turn, can be overridden by command-line values available when using the CLI.
It's also worth mentioning that, before Angular 8, manually modifying the angular.json file was the only way to make changes to the workspace config.
That's all we need to know, at least for the time being. All the configuration values are already good enough for our scenario, hence, we'll just leave them as they are for now.
Up to Angular 7, manually modifying the angular.json file was the only way to make changes to the workspace config. This changed with Angular 8 with the introduction of the workspace API, which now allows us to read and modify these configurations much more conveniently. For additional info regarding this new feature, we suggest taking a look at the following page: https://github.com/angular/angular-cli/blob/master/packages/angular_devkit/core/README.md#workspaces
package.json
The package.json file is the Node Package Manager (npm) configuration file. It basically contains a list of npm packages that the developer wants to be restored before the project starts. Those who already know what npm is and how it works can skip to the next section, while those who don't should definitely keep reading.
npm started its life as the default package manager for the JavaScript runtime environment known as Node.js. During recent years, though, it has also been used to host a number of independent JavaScript projects, libraries, and frameworks of any kind, including Angular. Eventually, it became the de facto package manager for JavaScript frameworks and tooling. Those who have never used it can think of it as the NuGet for the JavaScript world.
Although npm is mostly a command-line tool, the easiest way to use it from Visual Studio is to properly configure a package.json file containing all the npm packages we want to get, restore, and keep up-to-date later on. These packages get downloaded in the /node_modules/ folder within our project directory, which is hidden by default within Visual Studio; however, all retrieved packages can be seen from the npm virtual folder. As soon as we add, delete, or update the package.json file, Visual Studio will automatically update that folder accordingly.
In the Angular SPA template we've been using, the shipped package.json file contains a huge number of packages—all Angular packages—plus a good bunch of dependencies, tools, and third-party utilities such as Karma (a great test runner for JavaScript/TypeScript).
Before moving ahead, let's take a further look at our package.json file and try to get the most out of it. We can see how all packages are listed within a standard JSON object entirely made up of key-value pairs. The package name is the key, while the value is used to specify the version number. We can either input precise build numbers or use the standard npmJS syntax to specify auto-update rules bound to custom version ranges using supported prefixes, such as the following:
- The Tilde (
~): A value of"~1.1.4"will match all 1.1.x versions, excluding 1.2.0, 1.0.x, and so on. - The Caret (
^): A value of"^1.1.4"will match everything above 1.1.4, excluding 2.0.0 and above.
This is another scenario where IntelliSense comes in handy, as it will also visually explain the actual meaning of these prefixes.
For an extensive list of available npmJS commands and prefixes, it's advisable to check out the official npmJS documentation at: https://docs.npmjs.com/files/package.json
Upgrading (or downgrading) Angular
As we can see, the Angular SPA template uses fixed version numbers for all Angular-related packages; this is definitely a wise choice since we have no guarantees that newer versions will seamlessly integrate with our existing code without raising some potentially breaking changes and/or compiler errors. Needless to say, the version number will naturally increase with the passage of time, because template developers will definitely try to keep their good work up to date.
That said, here are the most important Angular packages and releases that will be used throughout this book (not including a small bunch of additional packages that will be added later on):
"@angular/animations": "11.0.1",
"@angular/common": "11.0.1",
"@angular/compiler": "11.0.1",
"@angular/core": "11.0.1",
"@angular/forms": "11.0.1",
"@angular/platform-browser": "11.0.1",
"@angular/platform-browser-dynamic": "11.0.1",
"@angular/platform-server": "11.0.1",
"@angular/router": "11.0.1",
"@angular-devkit/build-angular": "0.1100.1",
"@angular/cli": "11.0.1",
"@angular/compiler-cli": "11.0.1",
"@angular/language-service": "11.0.1"
The former group can be found in the dependencies section, while the latter is part of the devDependencies section. As we can see, the version number is mostly the same for all packages and corresponds to the latest Angular final release available at the time of writing.
The version of Angular that we use in this book was released a few weeks before this book hit the shelves. We did our best to use the latest available (non-beta, non-rc) version to give the reader the best possible experience with the most recent technology available. That said, that freshness will eventually decrease over time and this book's code will start to become obsolete. When this happens, try not to blame us for that!
If we want to ensure the highest possible level of compatibility between our project and this book's source code, we should definitely adopt that same release, which, at the time of writing, also corresponds to the latest stable one. We can easily perform the upgrade—or downgrade—by changing the version numbers; as soon as we save the file, Visual Studio should automatically fetch new versions through npm. In the unlikely scenario that it doesn't, manually deleting the old packages and issuing a full rebuild should be enough to fix the issue.
As always, we're free to overwrite such behavior and get newer (or older) versions of these packages, assuming that we properly understand the consequences and according to the Disclaimer in Chapter 1, Getting Ready.
If you encounter problems while updating your package.json file, such as conflicting packages or broken code, ensure that you download the full source code from the official GitHub repository of this book, which includes the same package.json file that has been used to write, review, and test this book. It will definitely ensure a great level of compatibility with the source code you'll find here.
Upgrading (or downgrading) the other packages
As we might expect, if we upgrade (or downgrade) Angular to 11.0.1, we also need to take care of a series of other npm packages that might need to be updated (or downgraded).
Here's the full package list (including the Angular packages) we'll be using in our package.json file throughout the book, split into dependencies, devDependencies, and optionalDependencies sections. The relevant packages are summarized in the following snippet—be sure to triple-check them!
{
  "name": "healthcheck",
  "version": "0.0.0",
  "scripts": {
    "ng": "ng",
    "start": "ng serve",
    "build": "ng build",
    "build:ssr": "ng run HealthCheck:server:dev",
    "test": "ng test",
    "lint": "ng lint",
    "e2e": "ng e2e"
  },
  "private": true,
  "dependencies": {
    "@angular/animations": "11.0.1",
    "@angular/common": "11.0.1",
    "@angular/compiler": "11.0.1",
    "@angular/core": "11.0.1",
    "@angular/forms": "11.0.1",
    "@angular/platform-browser": "11.0.1",
    "@angular/platform-browser-dynamic": "11.0.1",
    "@angular/platform-server": "11.0.1",
    "@angular/router": "11.0.1",
    "aspnet-prerendering": "3.0.1",
    "bootstrap": "4.5.3",
    "core-js": "3.8.0",
    "jquery": "3.5.1",
    "oidc-client": "1.10.1",
    "popper.js": "1.16.1",
    "rxjs": "6.6.3",
    "zone.js": "0.10.3"
  },
  "devDependencies": {
    "@angular-devkit/build-angular": "0.1100.1",
    "@angular/cli": "11.0.1",
    "@angular/compiler-cli": "11.0.1",
    "@angular/language-service": "11.0.1",
    "@types/jasmine": "3.6.2",
    "@types/jasminewd2": "2.0.8",
    "@types/node": "14.14.10",
    "codelyzer": "6.0.1",
    "jasmine-core": "3.6.0",
    "jasmine-spec-reporter": "5.0.2",
    "karma": "5.2.3",
    "karma-chrome-launcher": "3.1.0",
    "karma-coverage-istanbul-reporter": "3.0.3",
    "karma-jasmine": "4.0.1",
    "karma-jasmine-html-reporter": "1.5.4",
    "typescript": "4.0.5"
  },
  "optionalDependencies": {
    "node-sass": "4.14.1",
    "postcss": "8.1.10",
    "protractor": "7.0.0",
    "ts-node": "9.0.0",
    "tslint": "6.1.3"
  }
}
It's advisable to perform a manual command-line npm install followed by an npm update from the project's root folder right after applying these changes to the package.json file in order to trigger a batch update of all the project's npm packages. Sometimes, Visual Studio doesn't update the packages automatically and doing that using the GUI can be tricky.
For this very reason, a convenient update-npm.bat batch file has been added to this book's source code repository on GitHub (inside the /ClientApp/ folder) to handle that without having to type the preceding command manually. Such a batch file can be launched either by opening a command prompt or by installing the Open Command Line Visual Studio extension by Mads Kristensen. This extension adds a neat "Execute File" command in the Visual Studio contextual menu that opens when we right-click to a file from the Solution Explorer.
Those who run into npm and/or ngcc compilation issues after the npm update command can also try to delete the /node_modules/ folder and then perform an npm install from scratch.
Upgrading the Angular code
It's worth noting that our updated package.json file doesn't include some of the packages that were present in the Visual Studio default ASP.NET and Angular SPA project template. The reason for that is quite simple: those packages are either deprecated, obsolete, or not required by the code samples we'll be working with from now on.
At the same time, since we're upgrading an existing (albeit minimalistic) Angular app, excluding some of them might lead to compiler errors and a broken source code. As a matter of fact, if we try to run our project now that we're changed our package.json file (and updated the /node_modules/ folders accordingly using npm), we'll definitely get some TypeScript errors coming from the /ClientApp/src/app/app.server.module.ts file, as shown in the following screenshot:
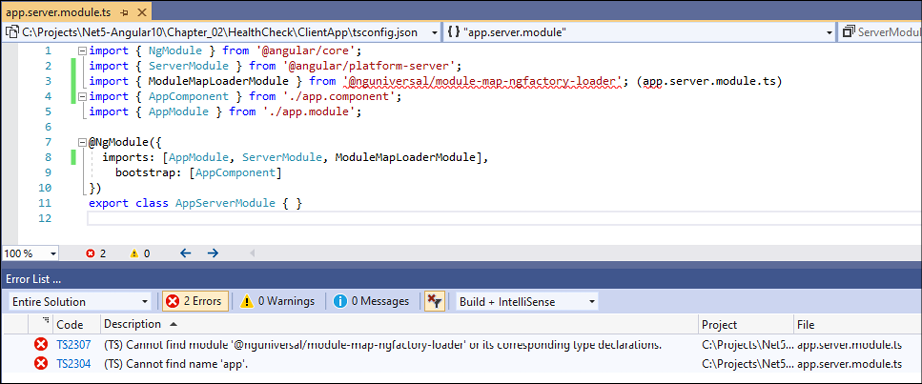
Figure 2.5: Errors after trying to run our project
These errors are due to the fact that we've removed the @nguniversal/module-map-ngfactory-loader JS library, which has been obsolete since Angular 9. In order to fix them, we need to perform the following updates to the app.server.module.ts file:
- Remove the whole line starting with
import { ModuleMapLoaderModule }(line 3) - Remove
ModuleMapLoaderModulefrom the imports array (line 8)
Here is the /ClientApp/src/app/app.server.module.ts file's updated source code:
import { NgModule } from '@angular/core';
import { ServerModule } from '@angular/platform-server';
import { AppComponent } from './app.component';
import { AppModule } from './app.module';
@NgModule({
  imports: [AppModule, ServerModule],
    bootstrap: [AppComponent]
})
export class AppServerModule { }
Once done, we need to perform another minor, yet necessary, change to upgrade our existing project structure to the new naming conventions introduced by Angular 10 and 11:
- Locate the
/ClientApp/browserlistfile - Rename it to
/ClientApp/.browserlistrc(don't forget the starting dot!)
For additional information regarding these changes, refer to this section of the Angular 9 to 10 official migration guide at the following URL: https://update.angular.io/?l=3&v=9.0-10.0
For further reference and/or future updates, please also check the updated source code in this book's official GitHub repository, which will always contain the latest improvements, bug fixes, compatibility fixes, and so on.
tsconfig.json
The tsconfig.json file is the TypeScript configuration file. Again, those who already know what TypeScript is won't need to read all this, although those who don't should.
In fewer than 100 words, TypeScript is a free, open source programming language developed and maintained by Microsoft that acts as a JavaScript superset; this means that any JavaScript program is also a valid TypeScript program. TypeScript also compiles to JavaScript, so it can seamlessly work on any JavaScript-compatible browser without external components. The main reason to use it is to overcome JavaScript's syntax limitations and overall shortcomings when developing large-scale applications or complex projects. Simply put, it makes the developer's life easier when they are forced to deal with non-trivial JavaScript code.
In this project, we will definitely use TypeScript for a number of good reasons; the most important ones are as follows:
- TypeScript has a number of features over JavaScript, such as static typing, classes, and interfaces. Using it in Visual Studio also gives us the chance to benefit from the built-in IntelliSense, which is a great benefit and often leads to a remarkable productivity boost.
- For a large client-side project, TypeScript will allow us to produce more robust code, which will also be fully deployable anywhere a plain JavaScript file would run.
Not to mention the fact that the Angular SPA template we chose already uses TypeScript. Hence, we can say that we already have a foot in the water!
Jokes aside, we're not the only ones praising TypeScript; this has been acknowledged by the Angular team itself, considering the fact that the Angular source code has been written using TypeScript since Angular 2, as was proudly announced by Microsoft in the following MDSN blog post in March 2015: https://devblogs.microsoft.com/typescript/angular-2-built-on-typescript/
This was further emphasized in this great post by Victor Savkin (cofounder of Narwhal Technologies and acknowledged Angular consultant) on his personal blog in October 2016: https://vsavkin.com/writing-angular-2-in-typescript-1fa77c78d8e8
Getting back to the tsconfig.json file, there's not much to say; the option values used by the Angular SPA template are more or less what we need to configure both Visual Studio and the TypeScript compiler (TSC) to properly transpile the TypeScript code files included in the /ClientApp/ folder.
For additional info about the tsconfig.json file and all the available options, visit the following URL: https://angular.io/config/tsconfig
Other workspace-level files
There are also other notable files created by the CLI in the workspace root. Since we'll not be changing them, we'll just briefly mention them in the following list:
.editorconfig: Workspace-specific configuration for code editors..gitignore: A text file that tells Git—a version-control system you most likely know quite well—which files or folders to ignore in the workspace. These are intentionally untracked files that shouldn't be added to the version control repository.README.md: Introductory documentation for the workspace. The.mdextension stands for Markdown, a lightweight markup language created by John Gruber and Aaron Swartz in 2004.package-lock.json: Provides version information for all packages installed in the/node_modules/folder by the npm client. If you plan to replace npm with Yarn, you can safely delete this file (theyarn.lockfile will be created instead).Yarn is a package manager for the JavaScript programming language developed and released by Facebook in October 2016 to address some of the limitations that npm had at the time, and is meant to be a drop-in replacement for npm. For further info, read here: https://yarnpkg.com/
/node_modules/: A folder containing all the npm packages for the entire workspace. This folder will be populated with packages defined in thepackage.jsonfile located on the workspace root, which will be visible to all projects.tslint.json: Default TSLint configuration options for all projects in the workspace. These general rules will be integrated and/or overwritten with the project-specifictslint.jsonfile included in the project root folder.
TSLint is an extensible static analysis tool that checks TypeScript code for readability, maintainability, and functionality errors; it's very similar to JSLint, which performs the same tasks for JavaScript code. The tool is widely supported across modern editors and build systems and can be customized with your own linting rules, configurations, and formatters.
For additional info, check out the following URL: https://palantir.github.io/tslint/
The /ClientApp/src/ folder
It's now time to pay a visit to our sample Angular app and see how it works. Rest assured, we won't stay for long; we just want to get a glimpse of what's under the hood.
By expanding the /ClientApp/src/ directory, we can see that there are the following sub-folders:
- The
/ClientApp/src/app/folder, along with all its subfolders, contains all the TypeScript files related to our Angular app; in other words, the whole client-side application source code is meant to be put here. - The
/ClientApp/src/assets/folder is meant to store all the application's images and other asset files. These files will be copied and/or updated as-is in the/wwwroot/folder whenever the application is built. - The
/ClientApp/src/environment/folder contains build configuration options that target specific environments; this template, just like any Angular new project default, includes anenvironment.tsfile (for development) and anenvironment.prod.tsfile (for production).
There is also a bunch of root-level files:
browserslistrc: Configures the sharing of target browsers and Node.js versions among various front-end tools.index.html: The main HTML page that is served when someone visits your site. The CLI automatically adds all JavaScript and CSS files when building your app, so you typically don't need to add any<script>or<link>tags here manually.karma.conf.js: Application-specific Karma configuration. Karma is a tool used to run Jasmine-based tests. We can safely ignore the whole topic for now, as we'll get to it later on.main.ts: The main entry point for your application. Compiles the application with the JIT compiler and bootstraps the application's root module (AppModule) to run in the browser. You can also use the AOT compiler without changing any code by appending the--aotflag to CLI build and serve commands.polyfills.ts: Provides polyfill scripts for improving browser support.styles.css: A list of CSS files that supply styles for a project.test.ts: The main entry point for the project's unit tests.tsconfig.*.json: Project-specific configuration options for various aspects of our app:.app.jsonfor application-level,.server.jsonfor server-level, and.spec.jsonfor tests. These options will override those set in the generictsconfig.jsonfile in the workspace root.tslint.json: The TSLint configuration for the current project.
The /app/ folder
Our template's /ClientApp/src/app/ folder follows Angular folder structure best practices and contains our project's logic and data, thus including all Angular modules, services, and components, as well as templates and styles. It's also the only sub-folder worth investigating, at least for the time being.
AppModule
As we briefly anticipated in Chapter 1, Getting Ready, the basic building blocks of an Angular application are NgModules, which provide a compilation context for components. The role of NgModules is to collect related code into functional sets. Therefore, the whole Angular app is defined by a set of one or more NgModules.
An Angular app requires a root module—conventionally called AppModule—that tells Angular how to assemble the application, thus enabling bootstrapping and starting the initialization life cycle (see the diagram that follows). The remaining modules are known as feature modules and serve a different purpose. The root module also contains a reference list of all available components.
The following is a schema of the standard Angular Initialization Cycle, which will help us better visualize how it works:
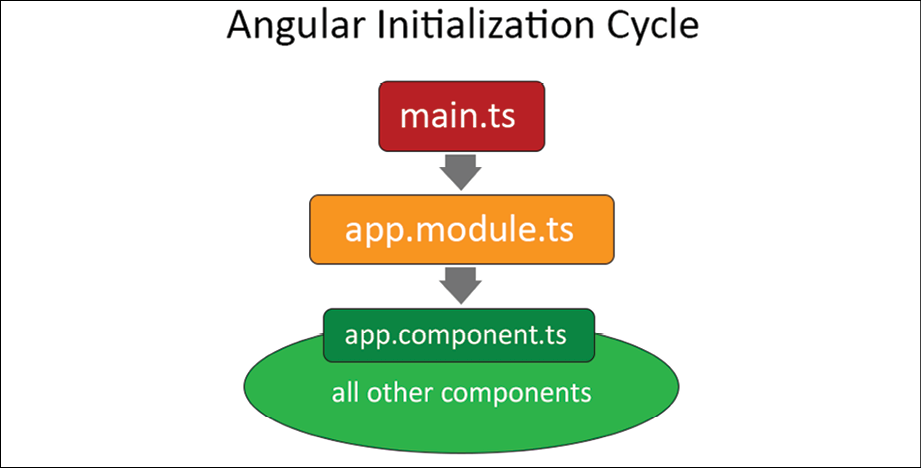
Figure 2.6: The Angular initialization cycle
As we can see, the main.ts file bootstraps app.module.ts (AppModule), which then loads the app.component.ts file (AppComponent); the latter, as we'll see in a short while, will then load all the other components whenever the application needs them.
The root module of the sample Angular app created by our template can be found in the /ClientApp/src/app/ folder and is defined within the app.module.ts file. If we take a look at the source code, we can see that it contains a bunch of import statements and some arrays referencing components, other modules, providers, and so on. This should be no mystery since we just said that the root module is basically a reference file.
Server-side AppModule for SSR
As we can see, the /ClientApp/src/app/ folder also contains an app.server.module.ts file, which will be used to enable the Angular Universal Server-Side Rendering (SSR)—a technology that renders Angular applications on the server, provided that the back-end framework supports it. The template generated this file because .NET natively supports such convenient features.
The following is the improved Angular initialization schema when using SSR:
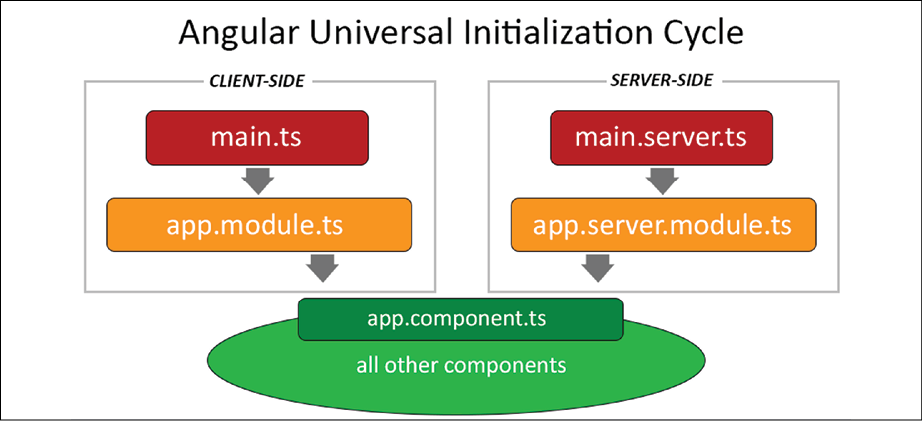
Figure 2.7: The Angular universal initialization cycle
That's about it, at least for now. If you feel like you're still missing something here, don't worry—we'll come back to this soon enough to help you understand all of this better.
To avoid losing too much time on the theoretical aspects of ASP.NET Core and Angular, we won't enter into the details of SSR. For a more detailed look at different techniques and concepts surrounding Angular Universal and SSR, we suggest checking out the following article: https://developers.google.com/web/updates/2019/02/rendering-on-the-web
AppComponent
If NgModules are Angular building blocks, Components can be defined as the bricks used to put the app together, to the extent that we can say that an Angular app is basically a tree of components working together.
Components define views, which are sets of screen elements that Angular can choose between and modify according to your program logic and data, and use services, which provide specific functionality not directly related to views. Service providers can also be injected into components as dependencies, thus making the app code modular, reusable, and efficient.
The cornerstone of these components is conventionally called AppComponent, which is also the only component that—according to Angular folder structure conventions—should be placed in the /app/ root folder. All other components should be put in a sub-folder, which will act as a dedicated namespace.
As we can see, our sample AppComponent consists of two files:
app.component.ts: Defines the component logic, that is, the component class source code.app.component.html: Defines the HTML template associated with theAppComponent. Any Angular component can have an optional HTML file containing its UI layout structure instead of defining it within the component file itself. This is almost always a good practice unless the component comes with a very minimal UI.
Since the AppComponent is often lightweight, it doesn't have other optional files that could be found in other components, such as:
<*>.component.css: Defines the base CSS style sheet for a component. Just like the.htmlfile, this file is optional and should always be used unless the component doesn't require UI styling.<*>.component.spec.ts: Defines a unit test for the component.
Other components
Other than AppComponent, our template contains four more components, each one in a dedicated folder, as follows:
CounterComponent: Placed in thecountersubfolderFetchDataComponent: Placed in thefetch-datasubfolderHomeComponent: Placed in thehomesubfolderNavMenuComponent: Placed in thenav-menusubfolder
As we can see by looking at the source files within their respective subfolders, only one of them has some defined tests: CounterComponent, which comes with a counter.component.spec.ts file containing two tests. It might be useful to run them to see whether the Karma + Jasmine testing framework that has been set up by our template actually works. However, before doing that, it might be wise to take a look at these components to see how they are meant to function within the Angular app.
In the next sections, we'll take care of both of these tasks.
Testing the app
Let's start by taking a look at these components to see how they are meant to work.
HomeComponent
As soon as we hit F5 to run the app in debug mode, we'll be greeted by HomeComponent, as seen in the following screenshot:
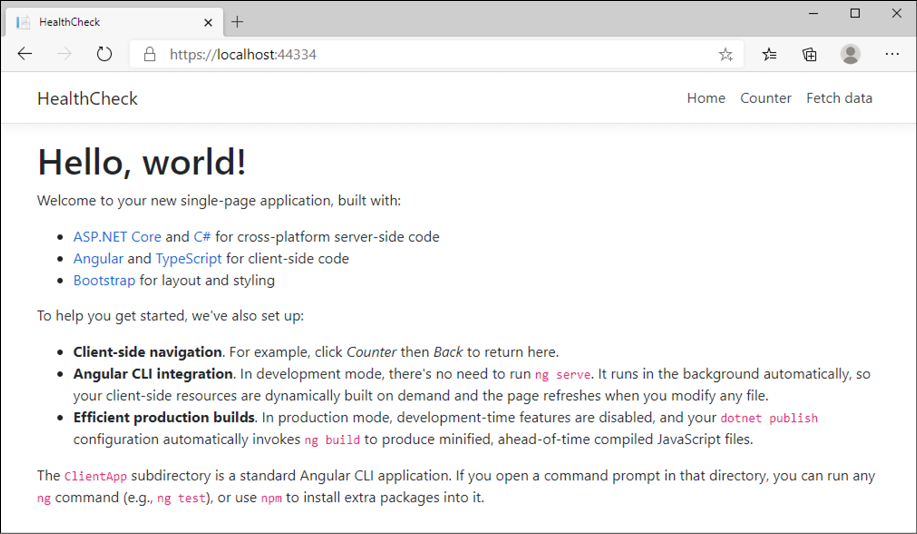
Figure 2.8: Viewing HomeComponent
As the name clearly suggests, the HomeComponent could be considered the home page of our app; however, since the page concept might be rather misleading when dealing with single-page apps, we'll call them views instead of pages throughout the book. The word view basically refers to the combined HTML template generated by the Angular component (including all sub-components) that corresponds to a given navigation route.
NavMenuComponent
Do we have sub-components already? Yes, we do. The NavMenuComponent is a perfect example of that, since it doesn't have a dedicated route for itself, but is rendered as part of other components within their corresponding view.
More precisely, it's the top portion of each view, as we can see from the following screenshot:

Figure 2.9: Examining the NavMenuComponent subcomponent
The main purpose of the NavMenuComponent is to let users navigate through the main views of the app. In other words, it's where we implement all first-level navigation routes defined in AppModule, all pointing to a given Angular component.
First-level navigation routes are those that we want our users to reach with a single click, that is, without having to navigate through other components first. In the sample app we're reviewing now, there are three of them:
/: Pointing to theHomeComponent/counter: Pointing to theCounterComponent/fetch-data: Pointing to theFetchDataComponent
As we can see, these navigation routes have been implemented in the NavMenuComponent by using anchor links placed within a single unordered list; a bunch of <a> elements placed inside a <ul> / <li> structure, which is rendered on the right-hand side of the component, and at the top-right corner of any component containing it.
Let's now review the design to handle the two remaining first-level navigation routes: CounterComponent and FetchDataComponent.
CounterComponent
The CounterComponent shows an incrementing counter that we can increase by pressing an Increment button:
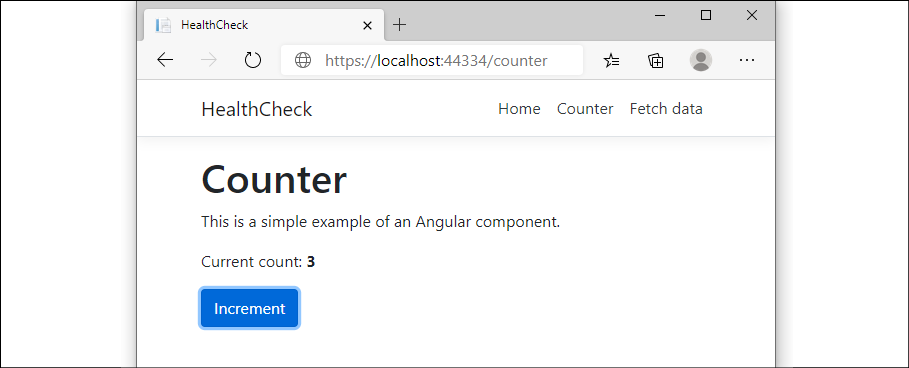
Figure 2.10: Viewing CounterComponent
The FetchDataComponent is an interactive table populated with the JSON array generated by the server-side web API via WeatherForecastController, which we saw a while ago when we were examining the back-end part of our project:
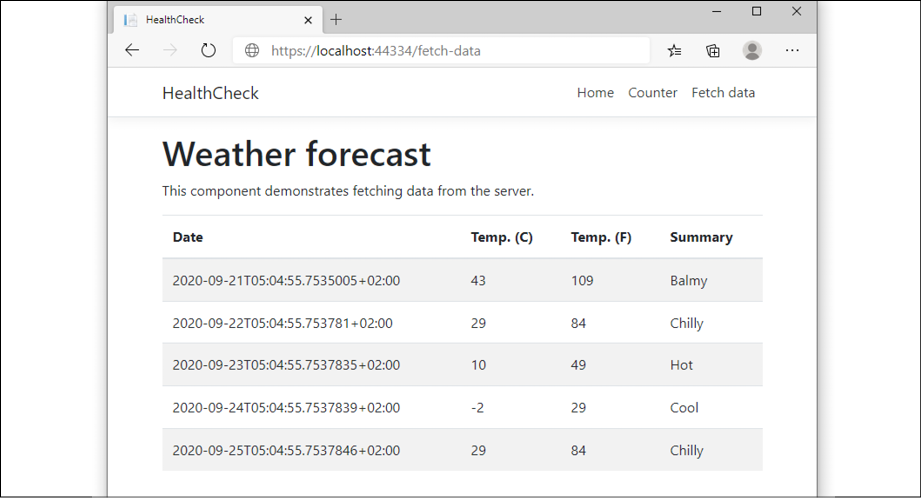
Figure 2.11: Viewing FetchDataComponent
The spec.ts file(s)
If we take a look at the source files within the preceding component's subfolders, we can see that the CounterComponent comes with a counter.component.spec.ts file. Those files, as per the Angular naming convention, are meant to contain unit tests for the counter.component.ts source file and are run using the Jasmine JavaScript test framework through the Karma test runner.
For additional info regarding Jasmine and Karma, check out the following guides:
Jasmine: https://jasmine.github.io/
Karma: https://karma-runner.github.io/
Angular Unit Testing: https://angular.io/guide/testing
While we're there, it could be useful to give them a run to see whether the Jasmine + Karma testing framework that has been set up by our template actually works.
Our first app test
Before running the test, it may be useful to understand a little more about Jasmine and Karma. If you don't know anything about them, don't worry—you will soon. For now, just know that Jasmine is an open source testing framework for JavaScript that can be used to define tests, while Karma is a test runner tool that automatically spawns a web server that will execute JavaScript source code against Jasmine-made tests and output their respective (and combined) results on a command line.
In this quick test, we'll basically launch Karma to execute the source code of our sample Angular app against the Jasmine tests defined by the template in the counter.component.spec.ts file; this is actually a much easier task than it might seem.
Open Command Prompt, navigate to the <project>/ClientApp/ folder, and then execute the following command:
> npm run ng test
This will call the Angular CLI using npm.
IMPORTANT: Chrome needs to be installed, otherwise the test won't work.
Alternatively, we can install the Angular CLI globally using the following command:
> npm install -g @angular/cli
Once done, we'll be able to directly call it in the following way:
> ng test
In the unlikely event that the npm command returns a program not found error, check that the Node.js/npm binary folder is properly set within the PATH variable. If it's not there, be sure to add it, and then close and re-open the command-line window and try again.
Right after we hit Enter, a new browser window should open with the Karma console and a list of results for the Jasmine tests, as shown in the following screenshot:
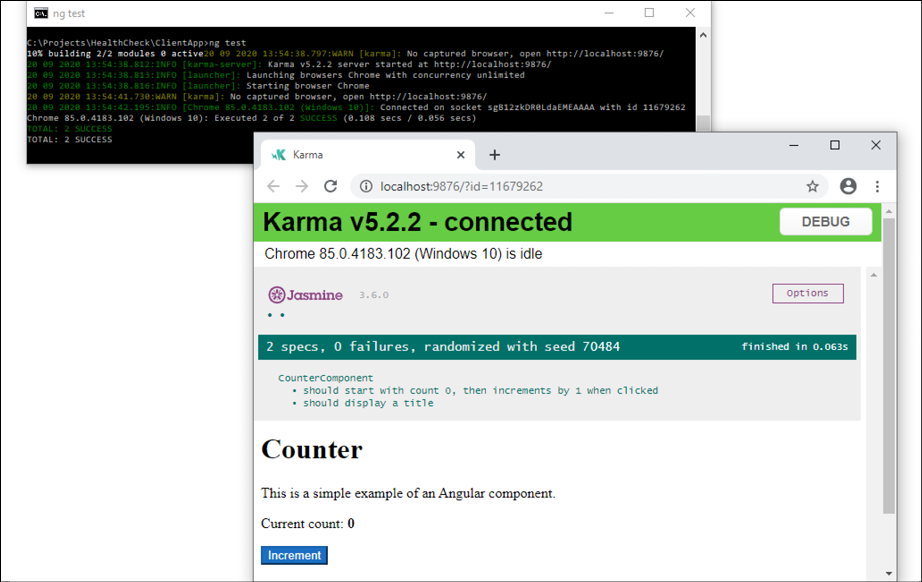
Figure 2.12: Results of the Jasmine test
As we can see, both tests have been completed successfully—that's everything we need to do for now. There's no need to peek at the counter.component.spec.ts source code since we're going to ditch it—together with all the template components—and create new ones (with their own tests).
For the sake of simplicity, we're going to stop here with Angular app tests for the time being; we'll discuss them in far greater depth in Chapter 9, ASP.NET Core and Angular Unit Testing.


