In this article by Jason Ventresco, the author of VMware Horizon View 6 Desktop Virtualization Cookbook, has explained about the Windows Remote Desktop Services (RDS) and how they are implemented in Horizon View. He will discuss about configuring the Windows RDS server and also about creating RDS farm in Horizon View.
(For more resources related to this topic, see here.)
Configuring the Windows RDS server for use with Horizon View
This recipe will provide an introduction to the minimum steps required to configure Windows RDS and integrate it with our Horizon View pod. For a more in-depth discussion on Windows RDS optimization and management, consult the Microsoft TechNet page for Windows Server 2012 R2 (http://technet.microsoft.com/en-us/library/hh801901.aspx).
Getting ready
VMware Horizon View supports the following versions of Window server for use with RDS:
- Windows Server 2008 R2: Standard, Enterprise, or Datacenter, with SP1 or later installed
- Windows Server 2012: Standard or Datacenter
- Windows Server 2012 R2: Standard or Datacenter
The examples shown in this article were performed on Windows Server 2012 R2. Additionally, all of the applications required have already been installed on the server, which in this case included Microsoft Office 2010.
Microsoft Office has specific licensing requirements when used with a Windows Server RDS. Consult Microsoft's Licensing of Microsoft Desktop Application Software for Use with Windows Server Remote Desktop Services document (http://www.microsoft.com/licensing/about-licensing/briefs/remote-desktop-services.aspx), for additional information.
The Windows RDS feature requires a licensing server component called the Remote Desktop Licensing role service. For reasons of availability, it is not recommended that you install it on the RDS host itself, but rather, on an existing server that serves some other function or even on a dedicated server if possible. Ideally, the RDS licensing role should be installed on multiple servers for redundancy reasons. The Remote Desktop Licensing role service is different from the Microsoft Windows Key Management System (KMS), as it is used solely for Windows RDS hosts. Consult the Microsoft TechNet article, RD Licensing Configuration on Windows Server 2012 (http://blogs.technet.com/b/askperf/archive/2013/09/20/rd-licensing-configuration-on-windows-server-2012.aspx), for the steps required to install the Remote Desktop Licensing role service. Additionally, consult Microsoft document Licensing Windows Server 2012 R2 Remote Desktop Services (http://download.microsoft.com/download/3/D/4/3D42BDC2-6725-4B29-B75A-A5B04179958B/WindowsServerRDS_VLBrief.pdf) for information about the licensing options for Windows RDS, which include both per-user and per-device options.
Windows RDS host – hardware recommendations
The following resources represent a starting point for assigning CPU and RAM resources to Windows RDS hosts. The actual resources required will vary based on the applications being used and the number of concurrent users; so, it is important to monitor server utilization and adjust the CPU and RAM specifications if required. The following are the requirements:
- One vCPU for each of the 15 concurrent RDS sessions
- 2 GB RAM, base RAM amount equal to 2 GB per vCPU, plus 64 MB of additional RAM for each concurrent RDS session
- An additional RAM equal to the application requirements, multiplied by the estimated number of concurrent users of the application
- Sufficient hard drive space to store RDS user profiles, which will vary based on the configuration of the Windows RDS host:
- Windows RDS supports multiple options to control user profiles' configuration and growth, including a RD user home directory, RD roaming user profiles, and mandatory profiles. For information about these and other options, consult the Microsoft TechNet article, Manage User Profiles for Remote Desktop Services, at http://technet.microsoft.com/en-us/library/cc742820.aspx.
This space is only required if you intend to store user profiles locally on the RDS hosts.
- Horizon View Persona Management is not supported and will not work with Windows RDS hosts. Consider native Microsoft features such as those described previously in this recipe, or third-party tools such as AppSense Environment Manager (http://www.appsense.com/products/desktop/desktopnow/environment-manager).
Based on these values, a Windows Server 2012 R2 RDS host running Microsoft Office 2010 that will support 100 concurrent users will require the following resources:
- Seven vCPU to support upto 105 concurrent RDS sessions
- 45.25 GB of RAM, based on the following calculations:
- 20.25 GB of base RAM (2 GB for each vCPU, plus 64 MB for each of the 100 users)
- A total of 25 GB additional RAM to support Microsoft Office 2010 (Office 2010 recommends 256 MB of RAM for each user)
While the vCPU and RAM requirements might seem excessive at first, remember that to deploy a virtual desktop for each of these 100 users, we would need at least 100 vCPUs and 100 GB of RAM, which is much more than what our Windows RDS host requires.
By default, Horizon View allows only 150 unique RDS user sessions for each available Windows RDS host; so, we need to deploy multiple RDS hosts if users need to stream two applications at once or if we anticipate having more than 150 connections. It is possible to change the number of supported sessions, but it is not recommended due to potential performance issues.
Importing the Horizon View RDS AD group policy templates
Some of the settings configured throughout this article are applied using AD group policy templates. Prior to using the RDS feature, these templates should be distributed to either the RDS hosts in order to be used with the Windows local group policy editor, or to an AD domain controller where they can be applied using the domain. Complete the following steps to install the View RDS group policy templates:
When referring to VMware Horizon View installation packages, y.y.y refers to the version number and xxxxxx refers to the build number. When you download packages, the actual version and build numbers will be in a numeric format. For example, the filename of the current Horizon View 6 GPO bundle is VMware-Horizon-View-Extras-Bundle-3.1.0-2085634.zip.
Obtain the VMware-Horizon-View-GPO-Bundle-x.x.x-yyyyyyy.zip file, unzip it, and copy the en-US folder, the vmware_rdsh.admx file, and the vmware_rdsh_server.admx file to the C:WindowsPolicyDefinitions folder on either an AD domain controller or your target RDS host, based on how you wish to manage the policies. Make note of the following points while doing so:
- If you want to set the policies locally on each RDS host, you will need to copy the files to each server
- If you wish to set the policies using domain-based AD group policies, you will need to copy the files to the domain controllers, the group policy Central Store (http://support.microsoft.com/kb/929841), or to the workstation from which we manage these domain-based group policies.
How to do it…
The following steps outline the procedure to enable RDS on a Windows Server 2012 R2 host. The host used in this recipe has already been connected to the domain and has logged in with an AD account that has administrative permissions on the server. Perform the following steps:
- Open the Windows Server Manager utility and go to Manage | Add Roles and Features to open the Add Roles and Features Wizard.
- On the Before you Begin page, click on Next.
- On the Installation Type page, shown in the following screenshot, select Remote Desktop Services installation and click on Next. This is shown in the following screenshot:

- On the Deployment Type page, select Quick Start and click on Next.
You can also implement the required roles using the standard deployment method outlined in the Deploy the Session Virtualization Standard deployment section of the Microsoft TechNet article, Test Lab Guide: Remote Desktop Services Session Virtualization Standard Deployment (http://technet.microsoft.com/en-us/library/hh831610.aspx). If you use this method, you will complete the component installation and proceed to step 9 in this recipe.
Unlock access to the largest independent learning library in Tech for FREE!
Get unlimited access to 7500+ expert-authored eBooks and video courses covering every tech area you can think of.
Renews at €18.99/month. Cancel anytime
- On the Deployment Scenario page, select Session-based desktop deployment and click on Next.
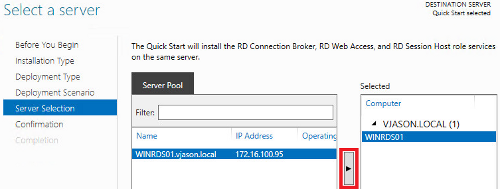
- On the Server Selection page, select a server from the list under Server Pool, click the red, highlighted button to add the server to the list of selected servers, and click on Next. This is shown in the following screenshot:
- On the Confirmation page, check the box marked Restart the destination server automatically if required and click on Deploy.
- On the Completion page, monitor the installation process and click on Close when finished in order to complete the installation. If a reboot is required, the server will reboot without the need to click on Close. Once the reboot completes, proceed with the remaining steps.
- Set the RDS licensing server using the Set-RDLicenseConfiguration Windows PowerShell command. In this example, we are configuring the local RDS host to point to redundant license servers (RDS-LIC1 and RDS-LIC2) and setting the license mode to PerUser. This command must be executed on the target RDS host. After entering the command, confirm the values for the license mode and license server name by answering Y when prompted. Refer to the following code:
Set-RDLicenseConfiguration -LicenseServer @("RDS-LIC1.vjason.local","RDS-LIC2.vjason.local") -Mode PerUser
- This setting might also be set using group policies applied either to the local computer or using Active Directory (AD). The policies are shown in the following screenshot, and you can locate them by going to Computer Configuration | Policies | Administrative Templates | Windows Components | Remote Desktop Services | Remote Desktop Session Host | Licensing when using AD-based policies. If you are using local group policies, there will be no Policies folder in the path:

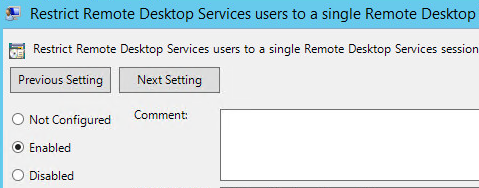
- Use local computer or AD group policies to limit users to one session per RDS host using the Restrict Remote Desktop Services users to a single Remote Desktop Services session policy. The policy is shown in the following screenshot, and you can locate it by navigating to Computer Configuration | Policies | Administrative Templates | Windows Components | Remote Desktop Services | Remote Desktop Session Host | Connections:
- Use local computer or AD group policies to enable Timezone redirection. You can locate the policy by navigating to Computer Configuration | Policies | Administrative Templates | Windows Components | Horizon View RDSH Services | Remote Desktop Session Host | Device and Resource Redirection when using AD-based policies. If you are using local group policies, there will be no Policies folder in the path. To enable the setting, set Allow time zone redirection to Enabled.
- Use local computer or AD group policies to enable Windows Basic Aero-Styled Theme. You can locate the policy by going to User Configuration | Policies | Administrative Templates | Control Panel | Personalization when using AD-based policies. If you are using local group policies, there will be no Policies folder in the path. To configure the theme, set Force a specific visual style file or force Windows Classic to Enabled and set Path to Visual Style to %windir%resourcesThemesAeroaero.msstyles.
- Use local computer or AD group policies to start Runonce.exe when the RDS session starts. You can locate the policy by going to User Configuration | Policies | Windows Settings | Scripts (Logon/Logoff) when using AD-based policies. If you are using local group policies, there will be no Policies folder in the path. To configure the logon settings, double-click on Logon, click on Add, enter runonce.exe in the Script Name box, and enter /AlternateShellStartup in the Script Parameters box.
- On the Windows RDS host, double-click on the 64-bit Horizon View Agent installer to begin the installation process. The installer should have a name similar to VMware-viewagent-x86_64-y.y.y-xxxxxx.exe. On the Welcome to the Installation Wizard for VMware Horizon View Agent page, click on Next.
- On the License Agreement page, select the I accept the terms in the license agreement radio check box and click on Next.
- On the Custom Setup page, either leave all the options set to default, or if you are not using vCenter Operations Manager, deselect this optional component of the agent and click on Next.
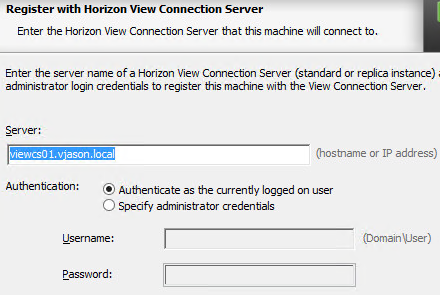
- On the Register with Horizon View Connection Server page, shown in the following screenshot, enter the hostname or IP address of one of the Connection Servers in the pod where the RDS host will be used. If the user performing the installation of the agent software is an administrator in the Horizon View environment, leave the Authentication setting set to default; otherwise, select the Specify administrator credentials radio check box and provide the username and password of an account that has administrative rights in Horizon View. Click on Next to continue:
- On the Ready to Install the Program page, click on Install to begin the installation.
- When the installation completes, reboot the server if prompted.
The Windows RDS service is now enabled, configured with the optimal settings for use with VMware Horizon View, and has the necessary agent software installed. This process should be repeated on additional RDS hosts, as needed, to support the target number of concurrent RDS sessions.
How it works…
The following resources provide detailed information about the configuration options used in this recipe:
Creating an RDS farm in Horizon View
This recipe will discuss the steps that are required to create an RDS farm in our Horizon View pod. An RDS farm is a collection of Windows RDS hosts and serves as the point of integration between the View Connection Server and the individual applications installed on each RDS server. Additionally, key settings concerning client session handling and client connection protocols are set at the RDS farm level within Horizon View.
Getting ready
To create an RDS farm in Horizon View, we need to have at least one RDS host registered with our View pod. Assuming that the Horizon View Agent installation completed successfully in the previous recipe, we should see the RDS hosts registered in the Registered Machines menu under View Configuration of our View Manager Admin console. The tasks required to create the RDS pod are performed using the Horizon View Manager Admin console.
How to do it…
The following steps outline the procedure used to create a RDS farm. In this example, we have already created and registered two Window RDS hosts named WINRDS01 and WINRDS02. Perform the following steps:
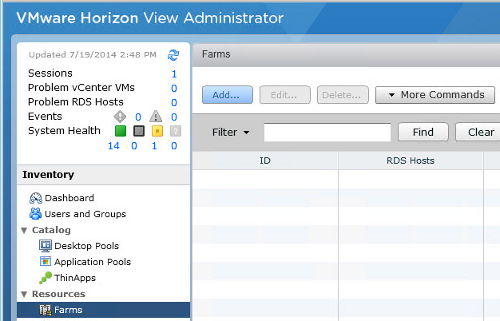
- Navigate to Resources | Farms and click on Add, as shown in the following screenshot:
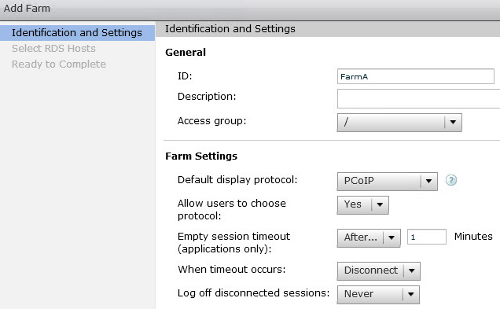
- On the Identification and Settings page, shown in the following screenshot, provide a farm ID, a description if desired, make any desired changes to the default settings, and then click on Next. The settings can be changed to On if needed:
- On the Select RDS Hosts page, shown in the following screenshot, click on the RDS hosts to be added to the farm and then click on Next:

- On the Ready to Complete page, review the configuration and click on Finish.
The RDS farm has been created, which allows us to create application.
How it works…
The following RDS farm settings can be changed at any time and are described in the following points:
- Default display protocol: PCoIP (default) and RDP are available.
- Allow users to choose protocol: By default, Horizon View Clients can select their preferred protocol; we can change this setting to No in order to enforce the farm defaults.
- Empty session timeout (applications only): This denotes the amount of time that must pass after a client closes all RDS applications before the RDS farm will take the action specified in the When timeout occurs setting. The default setting is 1 minute.
- When timeout occurs: This determines which action is taken by the RDS farm when the session's timeout deadline passes; the options are Log off or Disconnect (default).
- Log off disconnected sessions: This determines what happens when a View RDS session is disconnected; the options are Never (default), Immediate, or After. If After is selected, a time in minutes must be provided.
Summary
We have learned about configuring the Windows RDS server for use in Horizon View and also about creating RDS farm in Horizon View.
Resources for Article:
Further resources on this subject:
 Germany
 Slovakia
 Canada
 Brazil
 Singapore
 Hungary
 Philippines
 Mexico
 Thailand
 Ukraine
 Luxembourg
 Estonia
 Lithuania
 Norway
 Chile
Chile
 United States
 Great Britain
 India
India
 Spain
Spain
 South Korea
 Ecuador
 Colombia
 Taiwan
 Switzerland
 Indonesia
 Cyprus
 Denmark
 Finland
 Poland
 Malta
Malta
 Czechia
 New Zealand
 Austria
 Turkey
 France
 Sweden
 Italy
Italy
 Egypt
Egypt
 Belgium
 Portugal
 Slovenia
 Ireland
 Romania
 Greece
 Argentina
 Malaysia
 South Africa
 Netherlands
 Bulgaria
 Latvia
 Australia
 Japan
Japan
 Russia


