Setting up your development environment
In this book, the focus will be on Windows development, and any screenshots are going to be from Visual Studio (unless stated otherwise). But since .NET 7 is cross-platform, we will go through how to set up your development environment on Windows, macOS, and Linux.
The go-to link for all the platforms can be found at https://visualstudio.microsoft.com/.
We can download Visual Studio, Visual Studio Code, or Visual Studio for Mac from the web page.
Windows
On Windows, we have many different options for developing Blazor applications. Visual Studio 2022 is the most powerful tool we can use.
There are three different editions, which are as follows:
- Community 2022
- Professional 2022
- Enterprise 2022
In short, the Community Edition is free, while the others cost money. The Community Edition does have some limitations, and we can compare the different editions here: https://visualstudio.microsoft.com/vs/compare/.
For this book, we can use any of these versions. Take the following steps:
- Download Visual Studio 2022 from https://visualstudio.microsoft.com/vs/. Choose the version that is right for you.
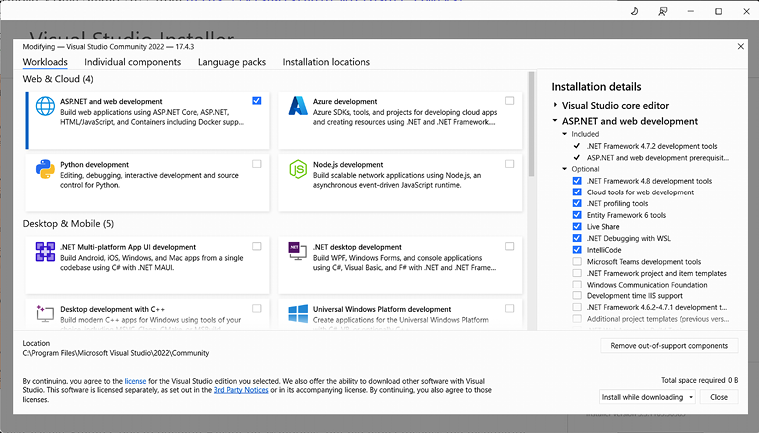
- Install Visual Studio and during the installation, make sure to select ASP.NET and web development, as shown in Figure 2.1:

Figure 2.1: Visual Studio 2022 installation on Windows
- To the right is a list of all the components that will be installed. Check .NET WebAssembly Build Tools.
We can also use Visual Studio Code to develop Blazor on Windows, but we won’t discuss the installation process for Windows.
macOS
On macOS, we also have some options. Visual Studio for Mac is the most powerful IDE we can use.
Download Visual Studio for Mac from https://visualstudio.microsoft.com/vs/mac/ as follows:
- Click on the Download Visual Studio for Mac button.
- Open the file that we downloaded.
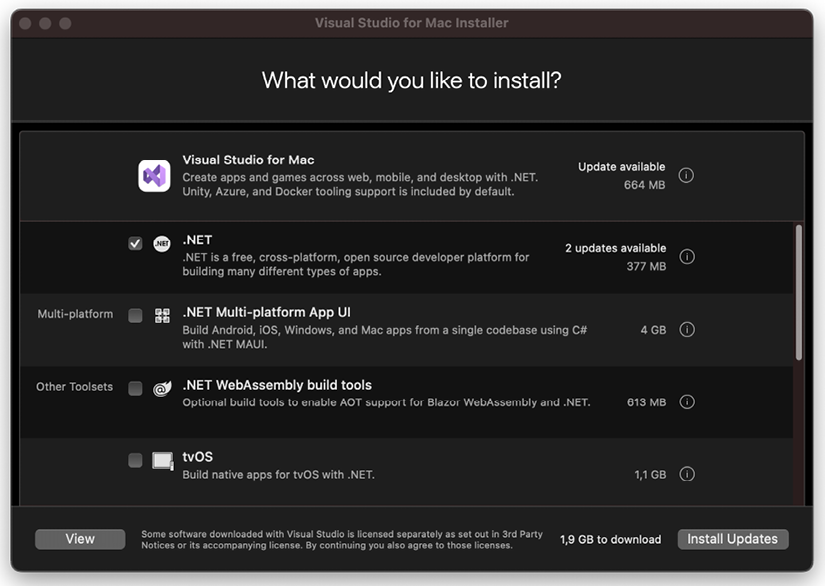
Make sure to select .NET, as shown in Figure 2.2:

Figure 2.2: Visual Studio for Mac installation screen
Since Visual Studio Code is a cross-platform software, we can use it here as well.
Linux (or macOS or Windows)
Visual Studio Code is cross-platform, which means we can use it on Linux, macOS, or Windows.
The different versions are available at https://code.visualstudio.com/Download.
Once installed, we also need to add two extensions:
- Open Visual Studio Code and press Ctrl + Shift + X.
- Search for
C# for Visual Studio Code (powered by OmniSharp)and click Install. - Search for
JavaScript Debugger (Nightly)and click Install.
To create a project, we can use the .NET CLI, which we will return to throughout this book, but we won’t do a deep dive into the .NET CLI.
Now that everything is set up, let’s create our first app.


