Creating a chair
In this recipe, we will be creating a chair prop using primitive-shaped parts. We will start by boxing out the shape of the chair with a primitive part and then attach a seat, which will allow players to sit on the chair. You will see how to orientate the seat part before we apply color and wood to our chair. We will finish off this recipe by using the MaterialFlip plugin, which can be downloaded from here: roblox.com/library/166951203.
How to do it…
We will begin by creating the basic shape of the chair out of square parts. We will further render out the chair’s shape by adding legs. Next, will add a seat part to the model and then detail the chair with color and the Wood material. To finish, we will correct the woodgrain of the chair using the MaterialFlip plugin.
So, to create a chair, follow these steps:
- Insert a square part into Workspace by navigating to the Model tab in the top bar and then selecting the Part tab.
- Next, select the part and then navigate to the Property tab. In the Size value field, change the increments to
2,1.5,2.25studs. - Duplicate the square part and place it flush on top of the original part. Resize the duplicated part to
0.35,2.5,2.25to make this the back of the chair. - Rescale the original part to
2,0.2,2.25, which will be the seat of the chair. Adjust as necessary using the Scale and Move tools. - Next, create four legs on each corner of the bottom of the chair using a square part scaled to
0.2,1.3,0.2studs. - Now, in the Model tab, select the Rotate tool. In the Snap to Grid part of the Model tab, checkmark the box labeled Rotate, and then change the number in the value field box to
5degrees. - Rotate each of the legs
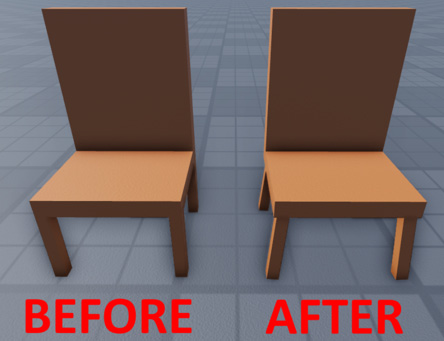
5degrees outward on the x and z axes. You can see a before-and-after comparison in Figure 1.1:

Figure 1.1: Rotated chair legs
- Now, to make sure there’s no gap between the legs and the chair seat, select all four legs and then use the Move tool to move the legs upward so the tops of the legs are hidden inside of the chair part.
- Next, insert a Seat object from Toolbox or the
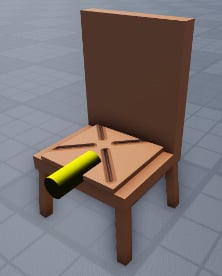
Chapter1folder. - Next, place the Seat object onto the chair with the yellow marker facing where the player’s legs will point. You can press Ctrl + R and Ctrl + T to rotate the seat or part selected:

Figure 1.2: A seat object placed on the chair
- Change the transparency of the seat to
1by navigating to the Appearance tab found within the seat’s Properties box. - Change the color of the chair to (
108,88,75). - Next, change the chair part Material type to Wood.
- If your wood grain does not flow the proper way, select the
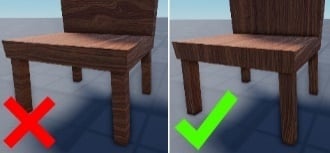
MaterialFlipplugin found in the Plugin tab within the top bar and then click on the part with improper woodgrain to flip the texture’s orientation:

Figure 1.3: Images of incorrect (left) and correct (right) woodgrain
- Select all of the parts of the chair and then checkmark the Anchored box found in the Properties menu. This will cause the parts to remain in place and not be affected by physics.
- With all of the parts still selected, click Ctrl + G to group the parts of the chair, and name the model
Chairwithin the Workspace.
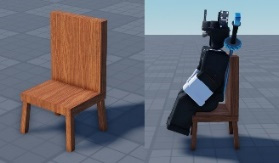
This completes this recipe for creating a chair:

Figure 1.4: Completed chair model
You now should have a basic understanding of how to manipulate parts within Roblox Studio, set transparency, and use seat parts.


