Keeping your notes (Must know)
Wouldn't it be great to capture notes, save research, collaborate on projects, snap photos of whiteboards, record audio, and do much more with just one tool? The Evernote app, which is one of the most popular pieces of software provides all such facilities. It is available for iOS, Android, Mac, and PC and anything added to your account is automatically synced and made available on all your devices.
Getting ready
We begin by downloading the free Evernote app from the App Store. You might also like to download its Mac/PC apps as well if you wish to keep your iPad and Mac/PC in sync. After download log in with your existing Evernote account or create a new one.
How to do it...
You can start by creating new notebook for each subject you teach and then start adding notes under them. Just tap on the New note button in the bottom-left corner of your screen to start creating a new note. You can now give an appropriate title to your note and select the notebook you wish to add it to. You can also add tags (to organize content well), textual content, pictures, or recorded media to your note. Click on Save in the top-right corner to save it. The note you just created will appear under selected notebook and will sync across all your devices.
To review all notes under a particular notebook, tap on the Notebooks tab present at the top of the home screen and select a particular subject's notebook. You can now see all your subject notes. A sleek search bar in the top-right corner of the screen enables you to look for content within notes and images whenever you wish to. This is shown in the next screenshot:

Now that you know how to create and find notes, we should look closely at adding content to notes and editing it. One of the most exciting features of Evernote is that it can access different kinds of media.
To open a note and add content to it, just tap on it and use the editing options at the bottom of the screen.
In Evernote you can do something more than usual with text also. You can use advanced editing options of the inbuilt editor (which opens by default) to customize text. These options include font settings such as bold, italic, underline, and text options such as hyperlink, and so on.
Taking pictures of whiteboard and adding them to lesson notes is a great way of organizing notes. To add pictures to your note, use the Camera and Images buttons, shown as icons present on the top bar of the note view. Camera lets you take pictures on the spot and add them while the Images button opens the device gallery of saved pictures. Look at the following screenshot:

It is very easy to record lectures with the Mike button on the top bar. The recorded piece of audio is automatically attached to the selected note.
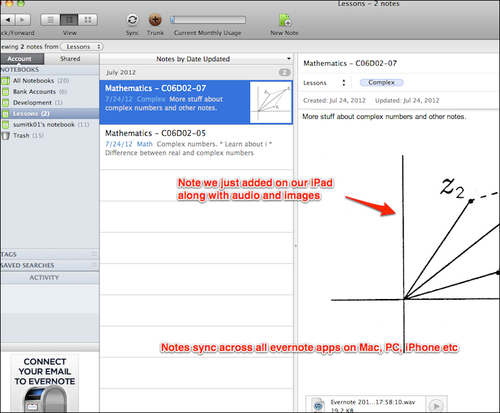
Once you are done editing your note, click on the Save button on the top-right corner. Evernote exhibits its most powerful feature here and syncs your note across all available devices attached to your account!
Evernote also lets you share your note on Facebook, Twitter, or via e-mail right from within the app. It also gives you the option to print a note via air print. These options can be exercised with the Share button present at the center of the bottom bar and are helpful for distributing notes to students and collaborating with teachers to develop better course content.
To see more details about a created note, tap on Details within notes view. It provides you information about notebook, tags, created date, last updated date, geo data, and more.
Evernote desktop apps for Mac and PC also let you import PDF files and attach .doc files within notes. The next screenshot shows this syncing:

How it works...
Adding content to a note links all text and media to that particular note file and links the note file to a notebook. This content is kept in a user's Evernote account and some data is stored locally on the device too. When a user logs in to his/her Evernote account on any device, all notes are synced and brought to that device, irrespective of where the note was created.
There's more...
For most of the users using Evernote free account is fine. But if you would like to allow collaborators to edit and modify notebooks that are shared with them, you will require a premium subscription. For schools and teachers there is discount under educational rate.
Creating notes via e-mail
You can also create notes by sending an e-mail to Evernote. If you tag your e-mail in the prescribed format these notes will get added to designated notebooks. You can get your Evernote e-mail under Settings | Evernote email address. If you don't tag your e-mail it will end up in your default notebook.
Making handwritten notes searchable
Image recognition makes handwritten notes searchable on Evernote. This is ideal for teachers as they make lots of notes by hand.


