Downloading the code samples
The recipes in this book include short, and some not so short, sample programs that will lead you through your first steps in programming quantum computers. You can type in these programs directly from the instructions in the book if you want, but for convenience, you can also grab the sample code directly from the Packt Cookbook GitHub organization.
The Python samples are written for Python 3.5+ and the Qiskit® extension that you installed in your Python environment. The Python samples all have the extension: .py.
Getting ready
While you can type the recipes directly into your Python environment, or into Jupyter Notebooks on IBM Quantum Experience® or on your local Anaconda environment, it is somewhat more efficient to download or use Git to clone the sample code to your local environment. The advantage of cloning is that you can later refresh your local files from the remote repository if any updates are made.
If you do not plan to use Git, but instead to download the recipes as a compressed file, continue on with How to do it.
To use Git to clone the sample code, you must first do the following:
- Get a GitHub account. These are free and you can sign up for one at https://github.com.
- Install Git in your local environment. For more information, see https://git-scm.com/book/en/v2/Getting-Started-Installing-Git.
- If you are a user interface person, you might also want to install GitHub Desktop, available here: https://desktop.github.com/.
How to do it...
You have several different options to download the sample recipes to your local machine.
For each, start by opening your web browser and then go to the Quantum-Computing-in-Practice-with-Qiskit-and-IBM-Quantum-Experience GitHub repository at https://github.com/PacktPublishing/Quantum-Computing-in-Practice-with-Qiskit-and-IBM-Quantum-Experience.
Downloading the repository as a compressed file
The easiest way to get the recipes is to just grab the sample files as a compressed directory and decompress it on your local machine:
- At the preceding URL, click the Clone or download button and select Download zip.
- Download the compressed file and select a location.
- Decompress the file.
Cloning the repository using git
- Click the Clone or download button and copy the URL.
- Open your command line and navigate to the location where you want to clone the directory.
- Enter the following command:
$ git clone https://github.com/PacktPublishing/Quantum-Computing-in-Practice-with-Qiskit-and-IBM-Quantum-Experience.git
The command should result in something like the following:
Cloning into 'Quantum-Computing-in-Practice-with-Qiskit-and-IBM-Quantum-Experience'...
remote: Enumerating objects: 250, done.
remote: Counting objects: 100% (250/250), done.
remote: Compressing objects: 100% (195/195), done.
remote: Total 365 (delta 106), reused 183 (delta 54), pack-reused 115
Receiving objects: 100% (365/365), 52.70 MiB | 5.42 MiB/s, done.
Resolving deltas: 100% (153/153), done.
Cloning the repository using GitHub Desktop
- Click the Clone or download button and select Open in desktop.
- In the GitHub Desktop dialog, select a directory to clone the repository to and click OK.
You can now browse the recipes in this cookbook. Each chapter includes one or more recipes. If you want, you can copy and paste the recipes directly into your Python environment, or into Jupyter Notebooks on IBM Quantum Experience® or on your local Anaconda environment.
Opening a recipe file
So far, you have done everything with the command line. So how about you grab the following Python program and run it from your favorite Python interpreters, such as Anaconda Spyder or Jupyter Notebooks?
If you have downloaded the sample files, the recipe file is available in the following local directory:
<The folder where you downloaded the files>/https://github.com/PacktPublishing/Quantum-Computing-in-Practice-with-Qiskit-and-IBM-Quantum-Experience/blob/master/Chapter01/ch1_r1_version.py
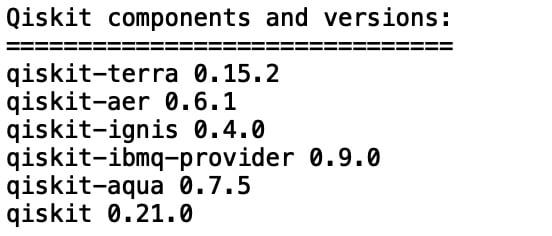
The ch1_r1_version.py code sample lists the version numbers of the Qiskit® components that we just installed:
# Import Qiskit
import qiskit
# Set versions variable to the current Qiskit versions
versions=qiskit.__qiskit_version__
# Print the version number for the Qiskit components
print("Qiskit components and versions:")
print("===============================")

for i in versions:
    print (i, versions[i])
When run, the preceding code should give an output similar to the following:

Figure 1.2 – A list of the Qiskit® components and versions
The following sections cover how to run the script in the environments that we have available.
Python scripts in Spyder
In your local environment, you can now open the Python scripts in the Python interpreter of your choice; for example, Spyder, which is included with Anaconda:
Important
Be sure that you run your interpreter in the virtual environment in which you installed Qiskit®. Otherwise, it will not be able to find Qiskit®, and the program will not run correctly.
- Open your Anaconda user interface.
- Select your virtual environment.
- Click the Spyder tile. If Spyder is not yet installed for your virtual environment, it will now install. This might take a while. Be patient!
- In Spyder, open the Python script that is included with this chapter:
<The folder where you downloaded the files>/https://github.com/PacktPublishing/Quantum-Computing-in-Practice-with-Qiskit-and-IBM-Quantum-Experience/blob/master/Chapter01/ch1_r1_version.py
- Click Run. The script will now pull out the version numbers of the installed Qiskit® components. You can also open the Python scripts in a Jupyter notebook, for example, in the online IBM Quantum Experience® environment, but this takes a little extra work.
Jupyter Notebooks in Anaconda
- Open your Anaconda user interface.
- Select your virtual environment.
- Click the Jupyter Notebooks tile. If Jupyter Notebooks is not yet installed for your virtual environment, it will now install.
- Your default web browser opens at your root directory. Browse to and open the following:
<The folder where you downloaded the files>/https://github.com/PacktPublishing/Quantum-Computing-in-Practice-with-Qiskit-and-IBM-Quantum-Experience/blob/master/Chapter01/ch1_r1_version.py
- The sample script opens in a Jupyter text editor. You can now see the code but not run it.
- Go back to the Jupyter browser and click New | Notebook.
- Copy and paste the Python script code into the new notebook. You can now click Run and see the code execute.
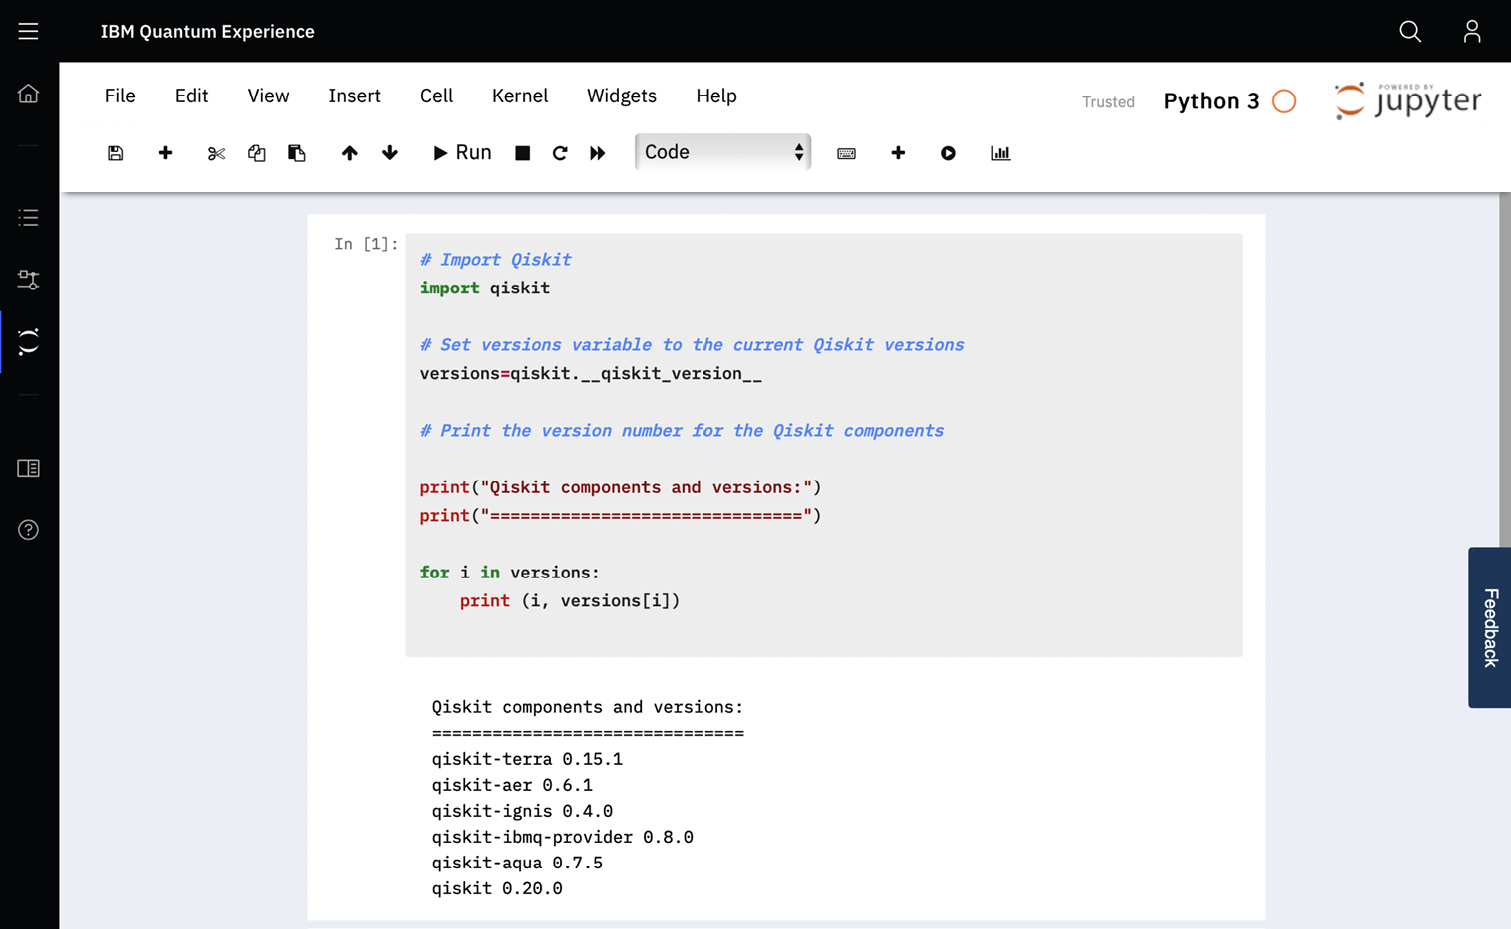
Jupyter Notebooks in IBM Quantum Experience®
- To run the Python scripts in the online IBM Quantum Experience® notebooks, log in to IBM Quantum Experience® at https://quantum-computing.ibm.com/login.
- On the main dashboard, click on the Quantum Lab left-menu icon (
 ), then click New Notebook and follow the process we discussed in the Jupyter Notebooks in Anaconda section.:

Figure 1.3 – Running your Qiskit® code on IBM Quantum Experience®
How it works...
The Qiskit®-based Python code that we will be going through in the chapters that follow can be run in any Python environment that meets the Qiskit® requirements, so you have free reins to pick the environment that suits you. And with that environment, you can also freely pick your favorite tools to run the programs.
For this book, I have tested running the code in both the Spyder editor that comes as standard with Anaconda and with the Jupyter Notebook environments on both IBM Quantum Experience® and Anaconda.


