Preparing the Intranet site
It is important to set the right foundation for the Intranet site. It is easy to get lost in all of the options available, but this section will cover the design decisions behind choosing a site template, selecting which features to activate, and then selecting a page layout to support the landing page(s).
Choosing a site template
SharePoint ships with a number of site template options, but most of the templates were built for a very specific type purpose. When choosing a template for an Intranet site, it is best to select one of the more generic site options. The three to consider are:
Blank site: A generic template that includes no lists or libraries. This is my first choice when building a top-level site collection such as this Intranet portal.
Team site: A generic template that includes a standard site with commonly used lists and libraries including shared documents, calendar, and a discussions list.
Publishing template (SharePoint Server): A generic template that can be leveraged in large-scale publishing scenarios. The publishing template is by far the template that will require the most design work to get to a usable state, so therefore should only be used in this scenario if you have specific requirements for it. It is important to note that the publishing template is not required in order to leverage the publishing features. See the Activating supporting features section that follows.
A full overview of the available templates can be found on the Microsoft Office website at http://office.microsoft.com/en-us/sharepoint-server-help/a-preview-of-the-sharepoint-server-2010-site-templates-HA101907564.aspx
Activating supporting features
After choosing a site template and provisioning the site collection, the next step is to activate the initial features needed to support the Intranet site. The robust feature deployment and activation system supported in SharePoint makes it very easy to fine-tune the functionality available within a site. Since the available features vary depending on which version you are running (Foundation, Server Standard, and Server Enterprise), I will specify which version each feature ships with.
The following is a list of features activated on the site being configured for this book:
|
Site collection features | ||
|---|---|---|
|
Document ID service |
SharePoint Server Standard and Enterprise |
Assigns IDs to documents in the site collection, which can be used to retrieve items independent of their current location |
|
Search Server Web Parts |
SharePoint Server Standard and Enterprise |
This feature uploads all Web Parts required for the Search Center |
|
SharePoint Server Standard Site Collection features |
SharePoint Server Standard and Enterprise |
Features such as user profiles and search, included in SharePoint Server Standard License |
|
SharePoint Server Enterprise Site Collection features |
SharePoint Server Enterprise |
Features such as InfoPath Forms Services, Visio Services, Access Services, and Excel Services Application |
|
SharePoint Server Publishing Infrastructure |
SharePoint Server Standard and Enterprise |
Provides centralized libraries, content types, master pages and page layouts, and enables page scheduling and other publishing functionality for a site collection |
|
Site features | ||
|
SharePoint Server Standard Site Collection features |
SharePoint Server Standard and Enterprise |
Features such as user profiles and search |
|
SharePoint Server Enterprise Site Collection features |
SharePoint Server Enterprise |
Features such as InfoPath Forms Services, Visio Services, Access Services, and Excel Services Application |
|
SharePoint Server Publishing Infrastructure |
SharePoint Server Standard and Enterprise |
Creates a web page library as well as supporting libraries to create and publish pages based on page layouts |
For anyone that is not familiar with the publishing features, it is important to understand that the document libraries setup for publishing, including the resources provisioned when the feature is activated such as the Style Library, will require that all changes be fully published for non-administrators to be able to view the most recent changes. If changes are made to pages, scripts, images, or CSS stylesheets included in any of these libraries and are not fully published, you will see unexpected behaviors such as 404 errors, out of date content, or miscellaneous unexpected SharePoint page level errors relating to the item's status.
A full overview of the publishing features in SharePoint 2010 is available at http://technet.microsoft.com/en-us/library/ff628963.aspx
Selecting a layout
Then next step is to choose the high-level structure of the front page. The two default options are a standard home page or the new Wiki home page. While the Wiki home page offers some nice improvements over the standard home page formatting, a better option is to configure a new library to hold Web Part pages in order to leverage the configuration and security capabilities of a SharePoint document library.
Note
When using SharePoint Foundation where the publishing features are not available your options are limited to page level customizations using SharePoint Designer 2010.
With the publishing features activated on SharePoint Server Standard or Enterprise there are a number of layout options to consider. One of the important changes with SharePoint 2010 is that page layouts can now be changed, where previously they were set at the time the page was created and could not be changed later.
Note
It is important to note that if you change the layout, any Web Parts that are contained in a Web Part zone that no longer exists, will no longer be displayed and will need to be reapplied to the page.
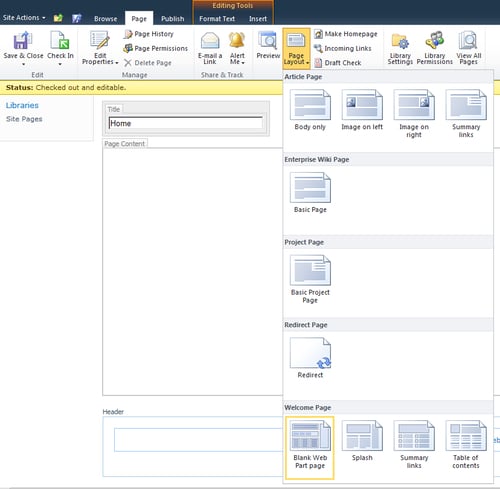
After creating the library, create a page and select the Page tab. If this is going to be the home page for the site, be sure to click the Make Homepage button in the ribbon. The Page Layout option will be displayed in the ribbon, and clicking it will provide you thumbnails of the layout options as seen in the following screenshot:

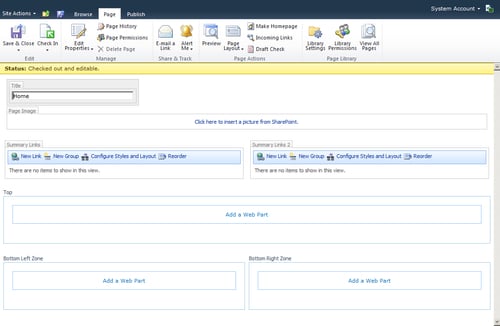
When choosing one of the layouts it is important to consider if you want the left hand navigation to be displayed or hidden. In scenarios where the left hand navigation is important I would select the Blank Web Part page layout under the Welcome Page grouping. In scenarios where you need more screen real estate or where the left hand navigation is not as important on the top-level site you can select the Splash layout. The Splash layout I have selected for this exercise is displayed in the following screenshot:

It is also possible to customize this layout if needed in SharePoint Designer, which may be preferable for simple changes instead of creating custom page layouts. It is important to note that editing page and page layouts directly with SharePoint Designer will put the item in an unghosted state which means that the page will no longer reference the common version of the item and instead store a version of the item in the content database that the site is stored in. This change will have a small impact on performance, but can also complicate future upgrades and should therefore be done with caution.
In the Top Web Part Zone, the default orientation is set to "Vertical", but for the page we are creating, it is more valuable set to "Horizontal" as shown in the following code snippet:
<WebPartPages:WebPartZone runat="server"
AllowPersonalization="false" ID="TopZone" FrameType="TitleBarOnly"
Title="<%$Resources:cms,WebPartZoneTitle_Top%>"
Orientation="Horizontal">
Note
Downloading the example code
You can download the example code files for all Packt books you have purchased from your account at http://www.packtpub.com. If you purchased this book elsewhere, you can visit http://www. packtpub.com/support and register to have the files e-mailed directly to you.
To make the change perform the following steps:
1. Open the page layout in SharePoint Designer.
2. Locate the control with the
ID "TopZone".3. Change the orientation property from
"Vertical" to"Horizontal".4. Save the page layout.
5. Publish the page layout.
With the layout selected and the page set as the home page, we are now ready to start adding content.


