Creating a list from Excel
Often, you won't want to create a new list when starting from a blank canvas, as you may have already defined the data structure and potentially even have existing data. A lot of corporate and personal information resides in Excel spreadsheets. In some cases, you may want to take this information from an existing spreadsheet and put it into a list, in order to make use of additional functionalities such as formatting columns or creating a workflow to respond to changes.
If we have a spreadsheet where we keep track of our annual leave, we will likely have the structure of our information already defined, and will also have some data already available in this spreadsheet:

Figure 2.19 – Existing spreadsheet with a data table
As we saw previously, Microsoft Lists can be created from such existing Excel spreadsheets. Generally, it is highly recommended to review and clean up the data inside your spreadsheet before you perform any imports. Any data that exists in the table you want to import from your spreadsheet will be added to your list as new items. But if you do not want to import everything, performing a cleanup in Excel beforehand is easier than doing the cleanup afterward in your list.
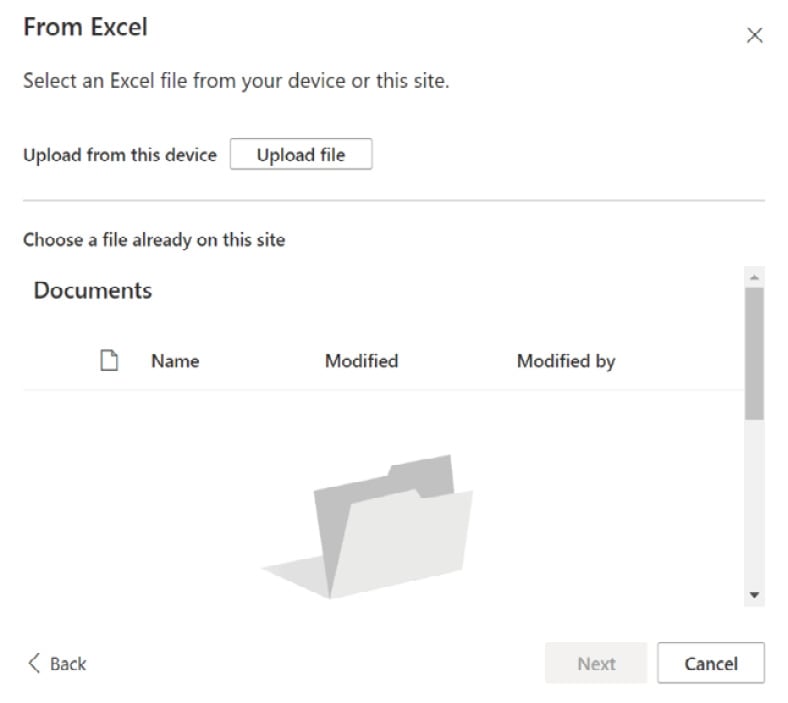
When you start the process of creating a new list, you can select From Excel as a starting point. The dialog that appears allows you to either upload a local file or select an existing file from the current site's Documents library:

Figure 2.20 – Creating a new list from an Excel spreadsheet
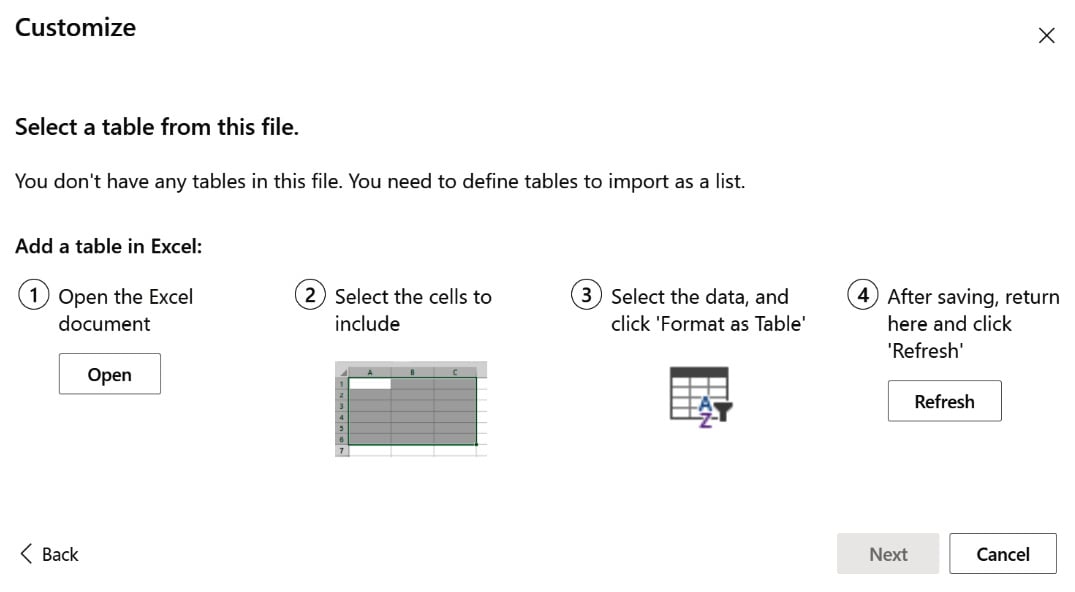
Once you have selected your spreadsheet, the import process will start by examining the file for any existing tables. If no tables are available in your file, you will be informed about how to format your data accordingly to make use of the import functionality:

Figure 2.21 – Information dialog informing you of how to format your spreadsheet
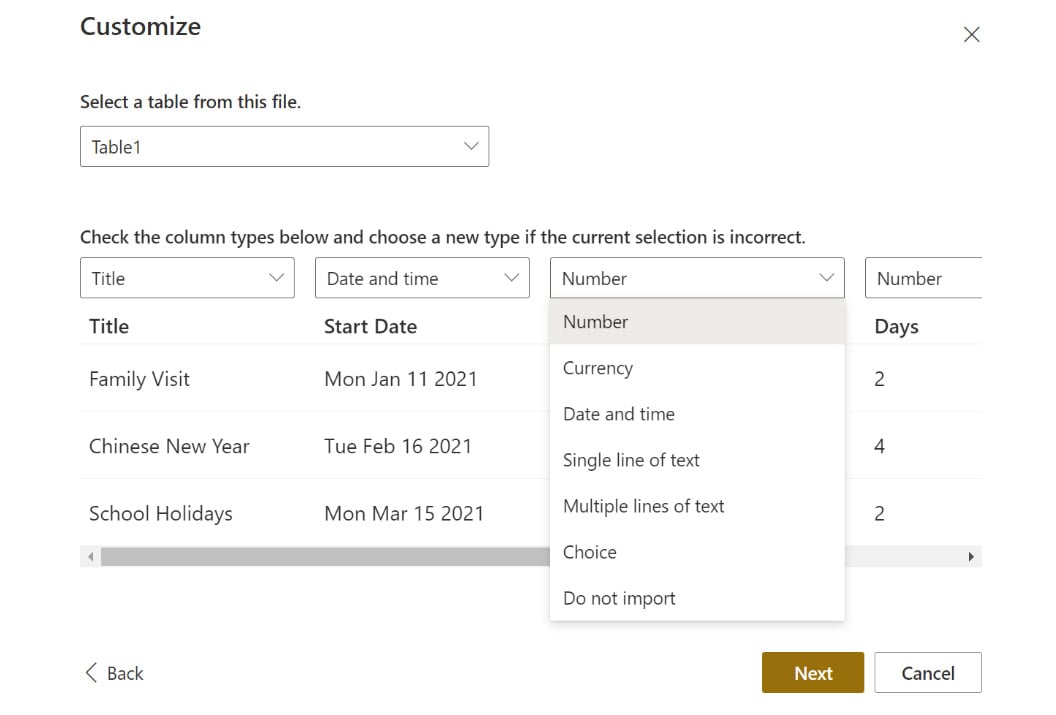
If tables are found in your document, the import process will ask you to select the table to be used. If there are multiple tables in your spreadsheet, you need to define which single table should be used. You can also review the identified column from the selected table and define which column type to use, respectively. Depending on the format of the data in your spreadsheet, different options are available.
For example, a column that has been formatted as a date or as a number in Excel can be set up as text, number, choice, date, or currency in your list:

Figure 2.22 – Import dialog showing the column type options for columns with number values
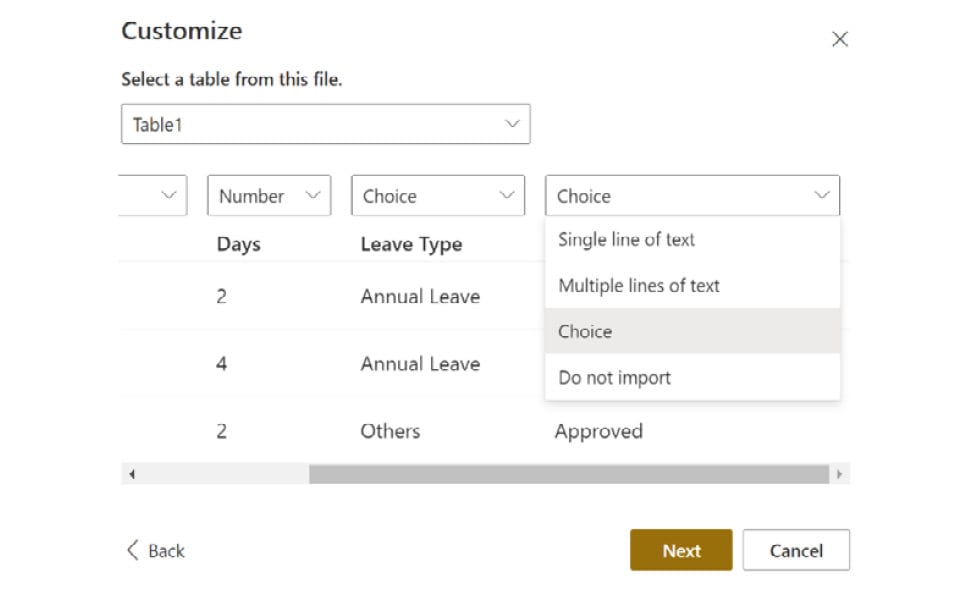
If the column is formatted as text only, the provided options are restricted to text and choice only:

Figure 2.23 – Import dialog showing the column options for columns with text values
If desired, you can also choose to exclude columns from your table by selecting Do not import as the column type. It should also be noted that not all column types can be imported. Complex types, such as Person or Group, can't be imported easily, so they can't be selected. When you import a spreadsheet, you should consider this limitation and plan for it accordingly. Further configuration and manual data imports might be required.
Once you've confirmed the column configuration, you can define a name and description for your list and complete the process. The list will then be set up with the selected columns, and any available data from the spreadsheet will be imported into it:

Figure 2.24 – A list created from an Excel spreadsheet
Instead of creating a blank list and adding columns manually, you now know how to leverage the From Excel creation functionality to easily and quickly set up a new list based on an existing spreadsheet. As a lot of corporate data is often stored in Excel spreadsheets first, this method is extremely useful for converting such spreadsheets into a list in a convenient manner.
With that, we have seen how to create our own lists by starting from scratch and adding relevant columns as needed, and we have also looked at how to create a list based on an existing Excel spreadsheet. The next step is to learn how to duplicate a list that already exists.


