Opening Audacity
No matter what operating system you use on your computer, all you need to do is find the Audacity program and open it, just as you would with any other software on your computer. The Audacity main window opens with an empty project window. This will look something like the next screenshot:
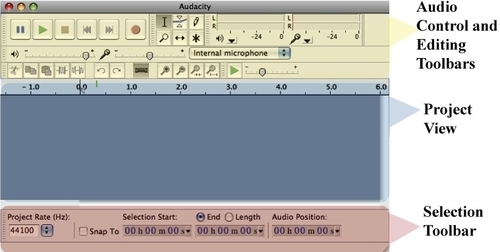
Don't be overwhelmed by this screen. Sure, there are a lot of icons and terms that might not be familiar, but we're going to review each element and how it is used. And as we begin our own sample recording session, we'll again review the icons and their use.
There are three main areas on this screen, as discussed in the following sections.
Audio controls and editing toolbars
The top portion, which includes audio controls and the many editing toolbars. These are the buttons and tools that you will use to edit and manipulate your recorded audio tracks.
Project View
The middle portion of the screen is the project view. This area will look very different when a project is open, as the timeline won't be empty. In this case it will show a digital representation of the audio that you recorded, along with some more settings that you can adjust.
Selection Toolbar
Just below the project view is the settings tool bar, which displays the frequency and bit rate information, and more timeline information, which we will cover as we start working on our sample project. But let's first discuss the main menu, and each of the toolbars on the screen.
Using the main menu
The main menu bar contains basic functionality for Audacity. You can open and save projects, add or hide toolbars in the main window, set preferences, as well as open the program Help file. This menu bar gives access to the entire program, even if you don't have all of the toolbars viewable.

Note
The main menu appears a bit differently when using different operating systems. When using Audacity on the Windows or Linux operating systems, the main menu is seen on top of the program window. With the Macintosh operating system, it is along the top bar of the computer screen.
When we begin our sample project, you'll see the most common uses of this main menu—for opening and saving Audacity project files.
Understanding the toolbars
You'll notice that on the main screen there are a number of toolbars, each with their unique icons and uses. Each of the described toolbars are displayed automatically when you first open Audacity, but the screen can also be customized for your own use by hiding some of these toolbars from the main screen. But first, let's just review each toolbar and it's constituent items at a high level, so that you can become familiar with Audacity and it's simple interface.
Control Toolbar
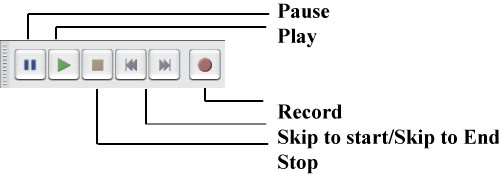
Most prominent on the screen is the Control Toolbar. This should look very familiar, in that it contains common icons that are used for any audio device: Play, Pause, Record, Skip to Start, Skip to End, and Stop. These are the basic controls for recording and playing back the sound that you record using Audacity.
In fact, if you are anxious to try the software out, let's learn a bit about the Mixer Toolbar, in order to perform a simple set up and sample recording.
Mixer Toolbar
The Mixer Toolbar is all about setting the volume and choosing the recording device. On the left-hand side (the speaker icon), you can adjust the input volume levels. In the middle, to the right of the microphone icon, you can adjust the volume of the output that you'd like your audio track to have.

On the right-hand side, you can choose the device that you'd like to use to make the recording. As you can see in the previous screenshot, we use an internal microphone (the one that is pre-installed on the computer that we are using), but you could also choose to use an external microphone or other recording device as the input.
Changing any of these settings is as simple as using your mouse to adjust the volumes, or clicking on the drop-down box to change the recording device. If you want a specific value for your volumes, you can also double-click on the volume scale to open a window where you can enter a specific audio level value.
Give it a try!
Ready to try out the software? Then go back to the Control Toolbar and click on the Record button. Start speaking into your computer's internal microphone (that is, if you computer or laptop has one! If not, connect a microphone to the USB or input port). Click on the Stop button when you are finished. You've just completed your first test recording session! It's as simple as that to record voice tracks. Click on the Play button to review your first composition!
Tools Toolbar
The Tools Toolbar gives you some control options in the recorded audio's timeline. It is not as complicated as it sounds. When you record some audio, the digital translation of that appears in the project view portion of the Audacity screen. Then select one of these tools and you are able to manipulate the recorded audio track. You can select specific sections of the audio track, zoom into the details to delete any unwanted noise, fade in and out at the beginning or end of tracks, shift audio clips on the timeline (which is particularly important if you are adding an introduction or exit), and work to select and replicate certain sounds.
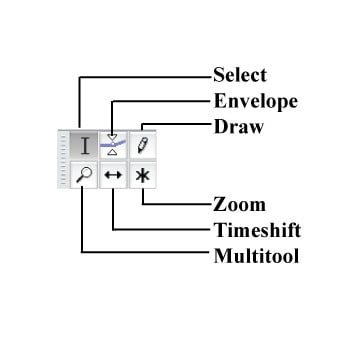
Let's give it a try. Use the Selection Tool  to "highlight" a portion of the test track that you
sampled when you first opened the program, as seen in the next screenshot:
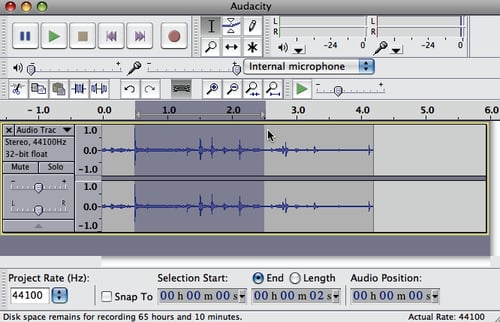
All you need to do is use your mouse to activate the Selection Tool, and then click-and-drag the mouse across the timeline, releasing the mouse button when you want to stop selecting. The "selected" portion of the audio track will appear in a darker shade of gray, as seen in the previous screenshot. Try it a few times to get a feel of how you make selections.
You use selections to make changes to only a specific portion of the audio track. For example, if you wanted what you selected here to be louder than the rest of the track, keep this portion selected, and then go to the main menu and select Effect and then Amplify. You'll see the audio waves in that area increase, indicating that the volume of this portion is now much higher.
Let's also give one of the other edit tools a try. Select the Zoom Tool, and drag your mouse over the area and click on it. The timeline intervals decrease to show you even more detail of the audio waves that were recorded.
You can also select any of the other tools and perform the same action (clicking on the audio track).
Meter Toolbar
Simply put, the Meter Toolbar displays the mono or stereo channels of your audio track. As an example, when recording a song, different instruments are placed in different channels. So in this example, there are mono (1) or stereo (2) channels in which we can record audio for our tracks.
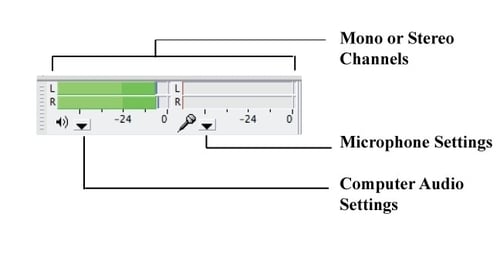
You can select preferences, and even disable certain inputs, by clicking on the down arrow icons near the microphone or speaker settings. However, the inputs (and outputs) listed in these fields are dependent on what hardware or peripheral items you have connected and installed on your computer. Feel free to take a look at what settings are available here.
This toolbar also displays input levels. The green bars move during recording or playback, to show the volume levels. So they move higher (to the right) when the recording or playback is louder. Peaks in the volume, or the highest volume reached when recording are also indicated here, by a small line. This can be useful when editing later, if you see a peak point, but if most of the volume levels are below that point throughout the rest of the track, then you might need to normalize the entire audio track.
Edit Toolbar
Probably the most useful toolbar is the Edit Toolbar. This will be one of the most used toolbars when we work through our sample project.
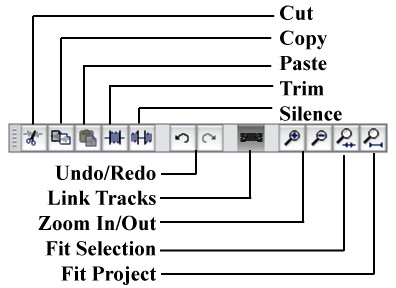
Once a track has been recorded and is displayed in the project window, the items on this toolbar become active. You can cut pieces out of the audio tracks, paste new items in, trim, link, and silence any unwanted noise. This toolbar also lets you undo your last editing option, zoom into a certain area of the recorded track, and adjust the viewing window so that it works with your preferences. You can even fit the audio tracks to your window size.
For example, with your test recording, use the Selection Tool from the Tools Toolbar to select a small portion of the audio track. Then select Cut from the Edit menu. Did that portion of the track disappear? If so, select Undo, and you should see the selection re-appear in your audio timeline. You will see details on each of these items as we work through our sample project in this book.
Transcription Toolbar
A toolbar for more advanced editing features is the Transcription Toolbar. This toolbar helps you to speed up or slow down playback for the the selected audio in your timeline.
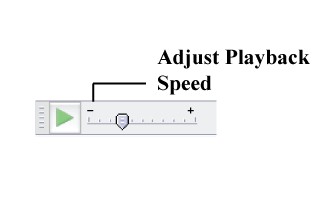
Using this toolbar is as easy as using the Selection Tool to highlight a portion of an audio track, and then using the scale to slow down (move the marker to the left) or speed up (move the marker to the right) the audio. Conveniently, you can also use the green Play button to play back the selected portion, to check if you have the correct playback speed.
Again, if you'd rather set a specific value for the playback speed, double-click the scale and a window is displayed that lets you you enter a number for the playback speed.
Selection Toolbar
The Selection Toolbar is at the bottom of the Audacity main window—just below the project window. Its most common use is to set the Project Rate (commonly measured in Hertz). Technically, it measures the number of computer bits that are conveyed or processed per unit of time. The higher the sample rate, the better the quality of the recording. The sample rate used by audio CDs is 44100 Hz, and this is the default in Audacity and is by far the most common sample rate for most audio recordings.

You can also use the Snap To feature, which allows you to have specific settings for when a new clip of audio starts. So, for example, if you wanted this audio track to align with some video content, then you can exactly match the visual frame timing with this audio. This is an advanced feature of the software, and can be adjusted for various time formats and settings.
When the Snap To box is checked, it is considered active, and the remaining fields also become active. You can choose a particular unit of measurement (in the example, the format is in hours : minutes : seconds), and the format is changed for all three display ranges at a time. You can choose between End and Length for the second field. Audio Position is shown in the third field, and shows the current cursor position, and also allows you to manually set it.
As you work more with Audacity and you need to do more precise audio editing, these Snap To fields will be important in creating a clean audio track.


