Search icon CANCEL
Arrow left icon
Explore Products
Best Sellers
New Releases
Books
Videos
Audiobooks
Learning Hub
Conferences
Free Learning
Arrow right icon
Arrow up icon
GO TO TOP
Android Things Projects

You're reading from   Android Things Projects Efficiently build IoT projects with Android Things

Arrow left icon
Product type Paperback
Published in Jun 2017
Publisher Packt
ISBN-13 9781787289246
Length 232 pages
Edition 1st Edition
Languages
Tools
Arrow right icon
Author (1):
Arrow left icon
Francesco Azzola Francesco Azzola
Author Profile Icon Francesco Azzola
Francesco Azzola
Arrow right icon
View More author details
Toc

Table of Contents (9) Chapters Close

Preface 1. Getting Started with Android Things 2. Creating an Alarm System Using Android Things FREE CHAPTER 3. How to Make an Environmental Monitoring System 4. Integrate Android Things with IoT Cloud Platforms 5. Create a Smart System to Control Ambient Light 6. Remote Weather Station 7. Build a Spying Eye 8. Android with Android Things

How to install Android Things on Raspberry

Raspberry Pi 3 is the latest board developed by Raspberry. It is an upgrade of Raspberry Pi 2 Model B and like its predecessor it has some great features:

  • Quad-core ARMv8 Cpu at 1.2Ghz
  • Wireless Lan 802.11n
  • Bluetooth 4.0

The following image shows a Raspberry Pi 3 Model B:
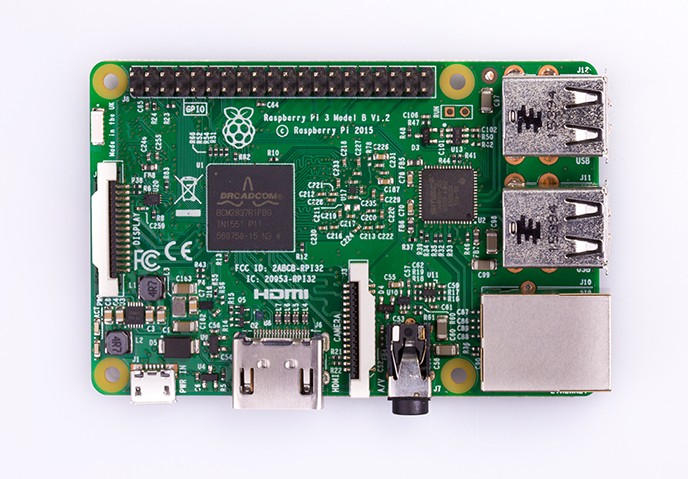
In this section, you will learn how to install Android Things on Raspberry Pi 3 using a Windows PC or a macOS.

Before starting the installation process you must have:

  • Raspberry Pi 3 Model B
  • At least an 8Gb SD card
  • A USB cable to connect Raspberry to your PC
  • An HDMI cable to connect Raspberry to a tv/monitor (optional)

If you do not have an HDMI cable you can use a screen mirroring tool. This is useful to know the result of the installation process and when we will develop the Android Things UIs. The installation steps are different if you are using Windows, OS X, or Linux.

How to install Android Things using Windows

At the beginning we will cover how to install Android Things on Raspberry Pi 3 using a Windows PC:

  1. Download the Android Things image from this link: https://developer.android.com/things/preview/download.html. Select the right image; in this case, you have to choose the Raspberry Pi image.
  2. Accept the license and wait until the download is completed.
  3. Once the download is complete, extract the ZIP file.
  4. To install the image on the SD card, there is a great application called Win32 Disk Imager that works perfectly. It is free and you can download it from SourceForge at: https://sourceforge.net/projects/win32diskimager/. At the time of writing, the application version is 0.9.5.
  5. After you have downloaded it, you have to run the installation executable as Administrator. Now you are ready to burn the image into the SD card.
  6. Insert the SD card into your PC.
  7. Select the image you have unzipped in step 3 and be sure to select the right disk name (your SD). At the end, click on Write.

You are done! The image is installed on the SD card and we can now start Raspberry Pi.

How to install Android Things using OS X

If you have a Mac OS X, the steps to install Android Things are slightly different. There are several options to flash this OS to the SD card; you will learn the fastest and easiest one.

These are the steps to follow:

  1. Format your SD card using FAT32. Insert your SD card into your Mac and run Disk Utility. You should see something like this:
  1. Download the Android Things OS image using this link: https://developer.android.com/things/preview/download.html.
  2. Unzip the file you have downloaded.
  3. Insert the SD card into your Mac.
  4. Now it is time to copy the image to the SD card. Open a terminal window and write the following:
sudo dd bs=1m if=path_of_your_image.img of=/dev/rdiskn

Where the path_to_your_image is the path to the file with the img extension you downloaded at step 2. In order to find out the rdiskn you have to select Preferences and then System Report. The result is shown in the following screenshot:

The BSD name is the disk name we are looking for. In this case, we have to write the following:

sudo dd bs=1m if=path_of_your_image.img of=/dev/disk1

That's all. You have to wait until the image is copied into the SD card. Do not forget that the copying process could take a while. So be patient!

Testing the installation

Once we have flashed the Android Things image into the SD card, we can remove it from the PC or Mac and insert it into the board:

  1. Connect Raspberry Pi to a video using the HDMI.
  2. Connect Raspberry Pi to your network using the LAN connection.
  3. Connect Raspberry Pi to your Mac/PC using a USB cable.

Wait until Android Things completes the boot phase. At the end, you should see the following:

Now your development board is ready and we can start developing our first Android Things project. To confirm that your Android Things is up and running, you can execute from the command line the following command:

adb devices

You should see, in the list, at least one Android device with an IP address. Congratulations; you have just installed and tested your Android Things OS. By now you should see the Android Things default screen because we did not install an app on the system.

lock icon The rest of the chapter is locked
Register for a free Packt account to unlock a world of extra content!
A free Packt account unlocks extra newsletters, articles, discounted offers, and much more. Start advancing your knowledge today.
Unlock this book and the full library FREE for 7 days
Get unlimited access to 7000+ expert-authored eBooks and videos courses covering every tech area you can think of
Renews at €18.99/month. Cancel anytime