Hosting the WCF service in IIS Express
HelloWorldService is a class library. It has to be hosted in an environment where client applications can access it. In this section, we will learn how to host it using IIS Express. Later in the next chapter, we will discuss more hosting options for a WCF service.
Creating the host application
There are several built-in host applications for WCF services within Visual Studio 2013. However, in this section, we will manually create the host application so that you can have a better understanding of what a hosting application is really like under the hood. In subsequent chapters, we will learn and use the built-in hosting application.
To host the library using IIS Express, we need to add a new website to the solution. Follow these steps to create this website:
- In the Solution Explorer, right-click on the solution HelloWorld and select Add | New Web Site… from the context menu (Always show solution must be enabled in DEBUG | Options and Settings... | Projects and Solutions in order to see the solution file). The Add New Web Site dialog window should pop up.
- Select Visual C# | ASP.NET Empty Web Site as the template and leave the Web location field set to File System, but change the default address to
C:\SOAwithWCFandEF\Projects\HelloWorld\HostExpressServerand click on OK.
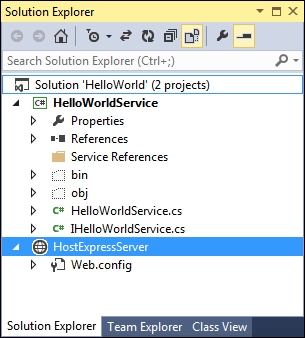
- Now in Solution Explorer, you have one more item (HostExpressServer) within the solution. It will look like the following:

- Next, we need to set the website as the startup project. In the Solution Explorer, right-click on the HostExpressServer website and select Set as StartUp Project from the context menu (or you can first select the website from Solution Explorer and then select the menu item WEBSITE | Set as StartUp Project). The HostExpressServer website should be highlighted in Solution Explorer, indicating that it is now the startup project.
- As we will host
HelloWorldServicefrom this website, we need to add aHelloWorldServicereference to the website. In the Solution Explorer, right-click on the HostExpressServer website and select Add | Reference… from the context menu. The Reference Manager dialog box should appear, as shown in the following screenshot:
- In the Reference Manager dialog box, click on the Solutions tab and then click on Projects. Check the HelloWorldService project and then click on OK. You will see that a new directory (
bin) has been created under theHostExpressServerwebsite and two files from the HelloWorldService project have been copied to this new directory. Later on, when this website is accessed, the web server (IIS Express) will look for executable code in thebindirectory.
Testing the host application
Now we can run the website inside IIS Express. If you start the HostExpressServer website by pressing Ctrl + F5 or by selecting DEBUG | Start Without Debugging in the menu, you will see an empty website in your browser with an error:

If you press F5 (or select DEBUG | Start Debugging from the menu), you might see a dialog saying Debugging Not Enabled. Choose the Run without debugging (equivalent to Ctrl + F5) option and click on the OK button to continue. We will explore the debugging options of a WCF service later. Until then, we will continue to use Ctrl + F5 to start the website without debugging.
IIS Express
At this point, you should have the HostExpressServer site up and running. This site actually runs inside IIS Express. IIS Express is a lightweight, self-contained version of IIS optimized for developers. This web server is intended to be used by developers only and has functionality similar to that of the Internet Information Services (IIS) server. It also has some limitations, for example, it only supports the HTTP and HTTPS protocols.
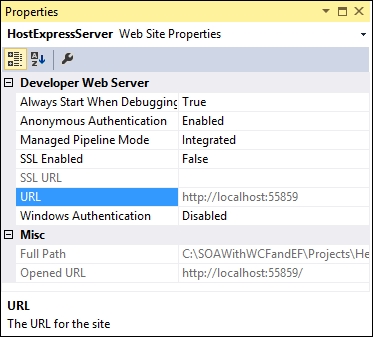
When a new website is created within Visual Studio, IIS Express will automatically assign a port for it. You can find your website's port in the Properties window of your website, as shown in the following screenshot:

IIS Express is normally started from within Visual Studio when you need to debug or unit test a web project. If you really need to start it from outside of Visual Studio, you can use a command-line statement in the following format:
"C:\Program Files\IIS Express\iisexpress" /path:c:\myapp\ /port:[your_port] /clr:v4.0
For our website, the statement should be as follows:
"C:\Program Files\IIS Express\iisexpress" /path:C:\SOAwithWCFandEF\Projects\HelloWorld\HostExpressServer /port:55859 /clr:v4.0
Note
iisexpress.exe is located under your Program Files\ IIS Express\ directory. In an x64 system, it should be under your Program Files (x86)\ IIS Express\ directory.
Modifying the Web.config file
Although we can start the website now, it is only an empty site. Currently, it does not host our HelloWorldService website. This is because we haven't specified which service this website should host or an entry point for this website.
To specify which service our website will host, we can add a .svc file to the website. From .NET 4.0 onwards, we can also use the file-less (svc-less) activation service to accomplish this. In this section, we will take the file-less approach to specify the service.
Now, let's modify the Web.config file of the website to host our HelloWorldService (WCF service). Open the Web.config file of the website and change it to the following:
<?xml version="1.0"?>
<!--
  For more information on how to configure your ASP.NET application, please visit
  http://go.microsoft.com/fwlink/?LinkId=169433
  -->
<configuration>
  <system.web>
    <compilation debug="true" targetFramework="4.5"/>
    <httpRuntime targetFramework="4.5"/>
  </system.web>

  <system.serviceModel>
    <serviceHostingEnvironment >
      <serviceActivations>
        <add factory="System.ServiceModel.Activation.ServiceHostFactory"
         relativeAddress="./HostExpressServer/HelloWorldService.svc"
         service="HelloWorldService.HelloWorldService"/>
      </serviceActivations>
    </serviceHostingEnvironment>
    <behaviors>
      <serviceBehaviors>
        <behavior>
          <serviceMetadata httpGetEnabled="true"/>
        </behavior>
      </serviceBehaviors>
    </behaviors>
  </system.serviceModel>

</configuration>
Note that the system.serviceModel node is the only code that we have manually added to the Web.config file.
The httpGetEnabled behavior is essential because we want other applications to be able to locate the metadata of this service via HTTP. Without the metadata, the client applications can't generate the proxy and thus won't be able to use the service.
The following is a brief explanation of the other elements in this configuration file:
- The
configurationnode is the root node of the file. - The
system.serviceModelnode is the top node for all the WCF service-specific settings. - The
serviceHostingEnvironmentnode is used to specify the hosting environment. - The
serviceActivationsnode is where you specify the service name and its relative address. This configuration element allows you to define the virtual service activation settings that map to your WCF service types. This makes it possible to activate services hosted in WAS/IIS without a.svcfile. - Within the
serviceBehaviorsnode, you can define specific behaviors for a service. In our example, we have specified one behavior, which enables the service metadata exchange for the service.
Starting the host application
Now, if you start the website by pressing Ctrl + F5 (don't use F5 or the menu option DEBUG | Start Debugging until we discuss these later), you will still see the same empty website with the same error. However, this time we have a service hosted within this website, so just append HostExpressServer/HelloWorldService.svc after the address (it should look something like http://localhost:55859/HostExpressServer/HelloWorldService.svc). Then, you will get the description of this service, that is, how to get the wsdl file of this service and how to create a client to consume this service. You should see a page similar to the one shown in the following screenshot:

Now, click on the WSDL link on this page and you will get the WSDL XML file for this service. The wsdl file gives all of the contract information for this service. In the next section, we will use this wsdl file to generate a proxy for our client application.


