Modeling accurately using SketchUp’s tools and inferences
Creating accuracy in SketchUp requires the knowledge and use of the following tools and commands. You might already be familiar with some of these, but their importance will be outlined as we go along.
Measurements toolbar
Think of the Measurements toolbar or Measurements box as your side view mirrors while driving. When we drive, we should consistently monitor those mirrors to avoid accidents. The same goes for the Measurements toolbar.
The Measurements box is a major way to draft accurately in SketchUp. Many designers believe that creating precision drafting is impossible with SketchUp, but it is done flawlessly by correctly typing in dimensions.
Depending on the template you are using (we are using the Inches template for this book), there is a default unit of measurement. However, you are not locked into using the template’s units. Typing in additional information after the number value will change the unit of measurement for the command you are performing:
- Inches: Type
"after the number, then Enter or Return on the keyboard. Example:6". - Feet: Type
'after the number, then Enter or Return on the keyboard. Example:6'. - Millimeters: Type
mmafter the number, then Enter or Return on the keyboard. Example:6mm. - Centimeters: Type
cmafter the number, then Enter or Return on the keyboard. Example:6cm. - Meters: Type
mafter the number, then Enter or Return on the keyboard. Example:6m.
Inferences
As a beginner to SketchUp, you should have learned about the inference types. SketchUp comes equipped with little “helpers” to make sure you are getting the most out of each tool. Here is a list to remind you of your helpers:
- ScreenTips: Yellow boxes of black text that pop up when you hover over anything in the model while in a command or tool (other than Select). The ScreenTip quickly tells you what your mouse is hovering over (whether it’s an endpoint, component, edge, etc.).
- Cursor/Icons: Your cursor will look like the icon of the tool you are using. The icons themselves give a glimpse of what the tool does. For example, the Tape Measure tool looks like a tape measure.
- Point inferences: Each point (endpoint, midpoint, face, grouped endpoint, grouped midpoint, etc.) has a different color and, sometimes, a different shape. These are helpful for snapping to precise areas.
- Shape inferences: While using a shape tool (rectangle, circle, arc), we can see the shape at the tip of our cursor. It will change color based on which axis we are drawing. A ScreenTip will pop up when we have created a half circle with the arc tool, a golden section with the rectangle, or a perfect square (all four sides equal) with the rectangle.
- Linear inferences: These are the most common types of inference because they include most other inference types: point, shape, axes colors, and ScreenTip. Locking in any axis will show the linear inference by referencing the axes colors: red for the x-axis, green for the y-axis, and blue for the z-axis. We will discuss this more later on.
- If you are using SketchUp 2024 or newer, your file’s title will include an asterisk (*) to the right of the name, just like in other software programs, indicating that you need to save your work.
- Dashboard: The dashboard at the bottom of the modeling window gives instructions on what to do with the tool you chose based on your operating system. For example, when using the Select tool on a Windows computer, it shows this information:

Figure 1.5: Dashboard with Select tool activated
More information
For more information about inferences, head over to https://help.sketchup.com/en/sketchup/introducing-drawing-basics-and-concepts to refresh your memory.
Locking in the axes (another type of inference)
To be more efficient when modeling, tapping arrow keys on the keyboard will easily lock in a particular axis. This is much more efficient than holding down Shift to lock it in for many reasons, such as easily switching the axis when the wrong one was chosen and the ability to perform a command without Shift hindering you from doing so.
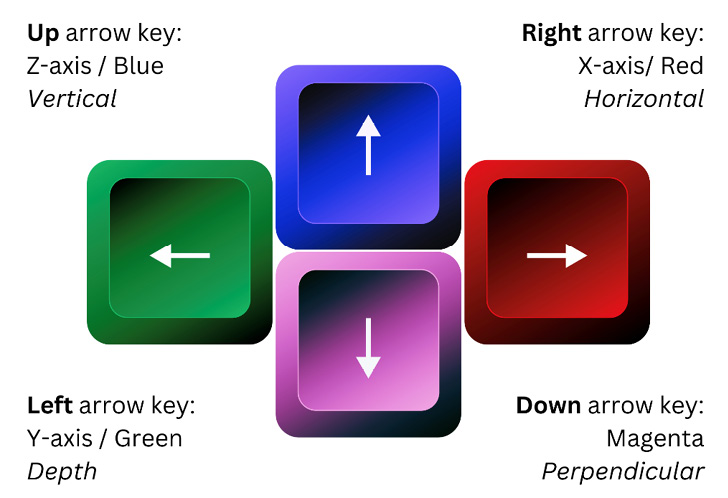
Figure 1.6: Keyboard arrow keys compared to the axes in SketchUp
To lock in an axis, tap the corresponding arrow keys. When you do, you will notice the line turns from a regular line thickness to a bold one:
- Right arrow key = red or x-axis (horizontal)
- Left arrow key = green or y-axis (depth)
- Up arrow key = blue or z-axis (vertical)
- Down arrow key = magenta; draw a line perpendicular to another
Important note
For those with some form of color blindness, the colors of the axes can be changed under Window | Preferences | Accessibility on Windows, or SketchUp | Settings | Accessibility on macOS.
As beginning modelers, it was important to practice drafting along an axis to get comfortable drawing accurately in the interface. If you have not already, you can begin drafting off the axes. However, note that you will still draft using axes approximately 80–90% of the time and should always try to lock in an axis, whether a novice or pro.
The Flip tool
The Flip tool is mentioned at this point in the chapter because it relies on the axis colors to use, though some users only rely on the rectangular plane it creates for flipping. Whichever method you rely on for the Flip tool, here are the basics to using it.
The Flip tool is for flipping or mirroring an object along an axis (x/red, y/green, or z/blue).
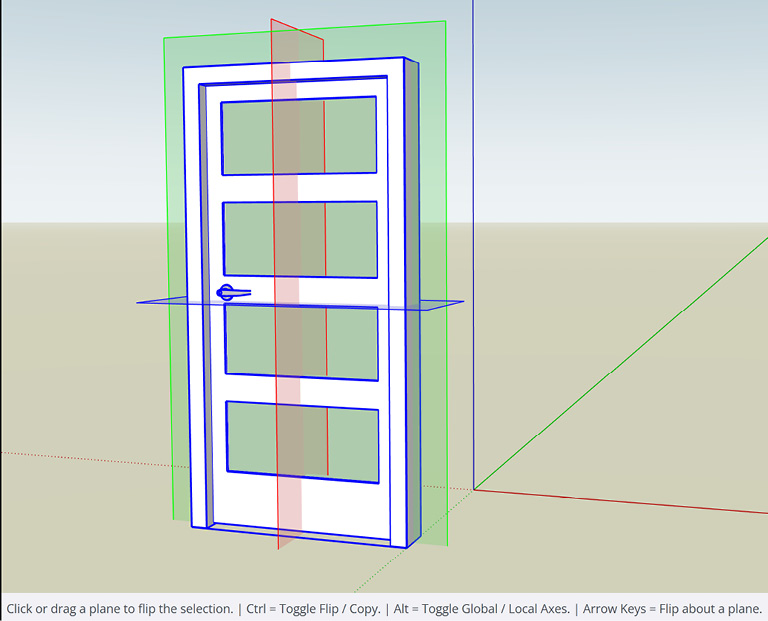
Figure 1.7: Door with Flip tool activated and the Dashboard with instructions for the tool
As mentioned in the Locking in the axes section, anything that uses axis colors means you can use the arrow keys to toggle through x, y, and z. Once you activate the Flip tool, you see the three planes. Lock in the plane to the corresponding axis using the right arrow for red (x-axis), left arrow for green (y-axis), and up arrow for blue (z-axis).
The Flip tool is also used for mirroring an object while copying it.
You can find the Flip tool in Tools | Flip, or in toolbars such as Getting Started and Large Toolset. It does not have a default shortcut, but you can assign one to it.
You can flip any object, whether a group, component, or loose geometry.
While most find it easier to select the object to flip first, you can activate the Flip tool and then click on the object to flip.
Objects are flipped along the central point of the object, where the three planes intersect. If you want to change where the objects flip from, click and drag the plane (not in Copy mode) to change the point where the flip happens.
Objects are flipped based on where the axes lie. If you get into Edit mode of a rotated component, for example, the local axes (inside Edit mode) are likely different from the model axes (called global axes). In Figure 1.8, the door on the right was rotated 30 degrees. In Edit mode of the group, the local axes have changed to match the rotation:
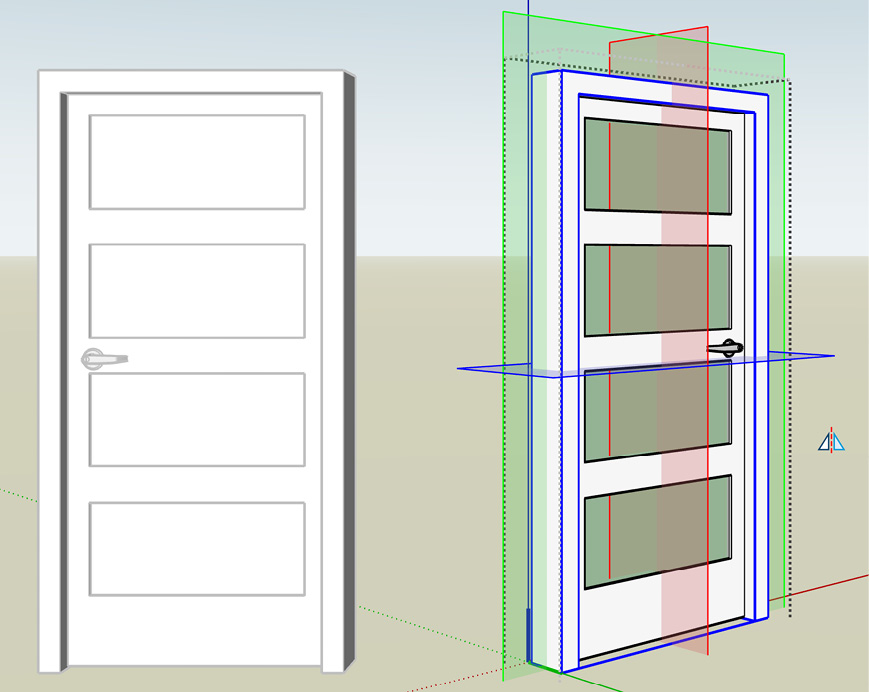
Figure 1.8: Local axes in Edit mode of a rotated object
If you prefer to flip along the global axes, tap Alt (Windows) or Command (⌘, macOS) to toggle the axes between global and local.
Here’s how to flip or mirror an object:
- Select the object and activate the Flip tool (or vice versa).
- Click once on a plane to flip the object along the x-, y-, or z-axis, or tap the corresponding axis’ arrow key one time.
- That’s it! Your object will be flipped.
Here’s how you can copy with the Flip tool:
- Select the object to copy.
- With the Flip tool active, tap Ctrl (Windows) or Opt (macOS) to start Copy mode. You will see the plus sign inference attached to the cursor, which means you are in copy mode.
- Click and drag a plane to the desired spot for copying.
Tip
You can snap the copy to a point or edge for precision. While you are getting used to the tool, some find it easier to copy the original to line up with the object they are mirroring and then use the Move tool to place the object.
- When you release your mouse button, SketchUp creates a mirrored copy of your selected geometry.
The Flip tool is a great addition to SketchUp! Those of you who enjoyed Flip Along (the previous mirroring tool) will eventually come to like Flip (it took us a bit before we finally relinquished our loyalty).
Undo and redo (your new best friends)
If you are familiar with the Undo command in other software, it is the same in SketchUp.
Typing Ctrl/⌘) + Z will undo the last step you performed in SketchUp (though remember that the default undo cache holds no more than 100 undo actions).
To Redo a command after accidentally (or purposely) using Undo, use Ctrl/⌘) + Y.
Remember, once you close out of a SketchUp model and re-open it later, you can no longer use undo or redo work prior to closing out of the model (though one workaround for this is using Version History, which will be discussed in Chapter 3).
SketchUp Modeling Tips from the Pros: Shortcuts
Tip 1: You should always have one hand resting on the keyboard and the other hand on your three-button mouse (or 3D mouse).
Tip 2: Use keyboard and mouse shortcuts to boost productivity!
Using a three-button mouse
Who doesn’t want to increase their productivity? You will save a lot of time using a three-button mouse to navigate the modeling window rather than clicking the icons or tapping the keyboard shortcuts. You save time because you do not need to exit out of a command to navigate around the model and then get back into the command. You can perform the command and navigate all at the same time!
Mouse navigation shortcuts
Learning how to effectively use the mouse navigation shortcuts can take a bit of time to feel comfortable with, but once you get the hang of it, you will understand why it is so important. Give yourself time to practice using these shortcuts over and over:
- Orbit = scroll wheel: Orbit is how you move three-dimensionally within the model, circling around objects. Hold down the scroll wheel in short increments, moving your mouse in all directions. Every now and then, lift your finger and put it down again so you don’t run out of room.
- Zoom = scroll wheel: Move your cursor to the object or area you want to view better. Then, move the scroll wheel up (unless you inverted your scroll wheel). To zoom away from the object, move the scroll wheel down.
Cursor placement is vital to making this work properly! Your cursor should be on the object or area you are scrolling to or away from. If you scroll randomly in your modeling window, your zoom may take you to Timbuktu. Be purposeful with your cursor placement. Do the same when scrolling out so you do not become stuck.
SketchUp Modeling Tips from the Pros: Zoom In!
Zoom in for accuracy! Modeling further away from the object you are editing negates SketchUp’s precision. For example, zoom in on existing points before adding a line, or make sure you selected a single face (or multiple) before adding materials.
- Pan = scroll wheel + Shift: Pan takes you up and down and side to side. Hold down the scroll wheel and the Shift key at the same time. Just as with orbit, hold down the scroll wheel in short increments while moving your mouse to go where you want, toggling between lifting your finger and holding it down again.
Note that you can also use scroll wheel + left-click, though some find this difficult depending on the preferred finger for the scroll wheel.
Other mouse tips
There is much more to the mouse than navigating through SketchUp. The mouse is another powerful tool within SketchUp, allowing users to find hidden tools and effectively select and deselect one or more objects at one time:
- Right-clicking in SketchUp: Whether you are in the modeling window or on an object, this quickly leads to additional tools within the Context menu. Right-click often!
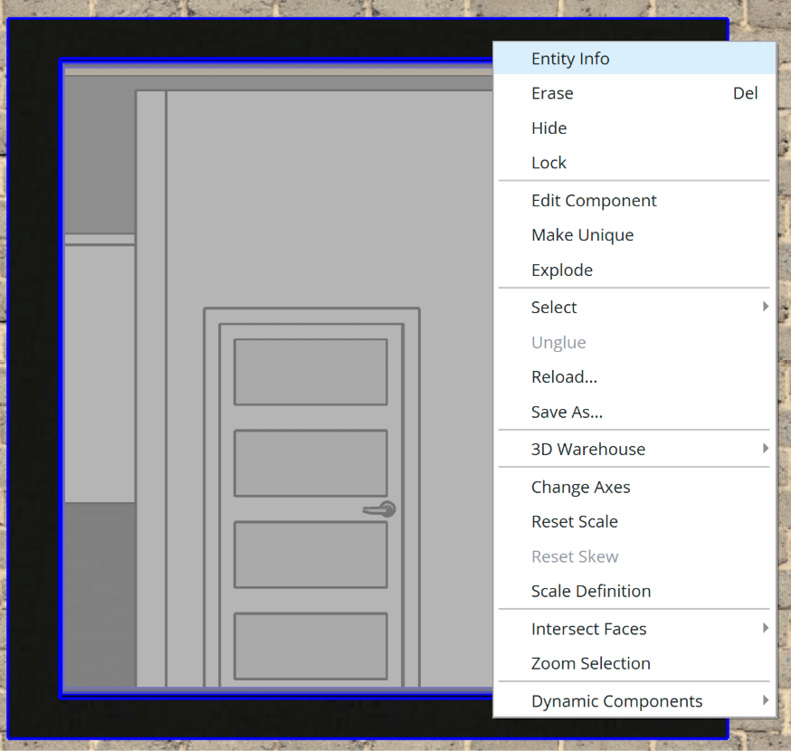
Figure 1.9: Context menu (accessed by using a right-click on a component)
- Ways to select objects with the mouse:
- We always select an object with a left-click; however, there is an important tip for this: do not hold down the button. You will almost always release the mouse before moving to the next step. The mantra for this tip is click and release, click and release.
- When working with 2D shapes, edges and faces that are loose geometry, double-click the face to pick up the connected edges and faces that make up that shape.
- When selecting 3D forms that are not yet grouped, triple-click (a fast 1-2-3) any of the faces to choose all connected shapes and edges that create the form.
- After selecting, you can add other objects to the selection by holding down the Ctrl or Opt keys and left-clicking the new selections.
- Holding down the Shift key allows you to add or subtract objects from the selection.
- Ways to use the crossing windows:
- Left-to-right crossing window (solid line): Clicking to the left side of the entities and dragging right, which is called a window selection or bounding box, selects only those elements completely within the selection rectangle.
- Right-to-left crossing window (dotted lines): Clicking from the right side and dragging to the left, which is called a crossing selection, selects any elements within the selection rectangle, including those that are only partially contained in the rectangle.
- With one or more edges selected, right-click and choose Select, and there are options based on what you have selected.
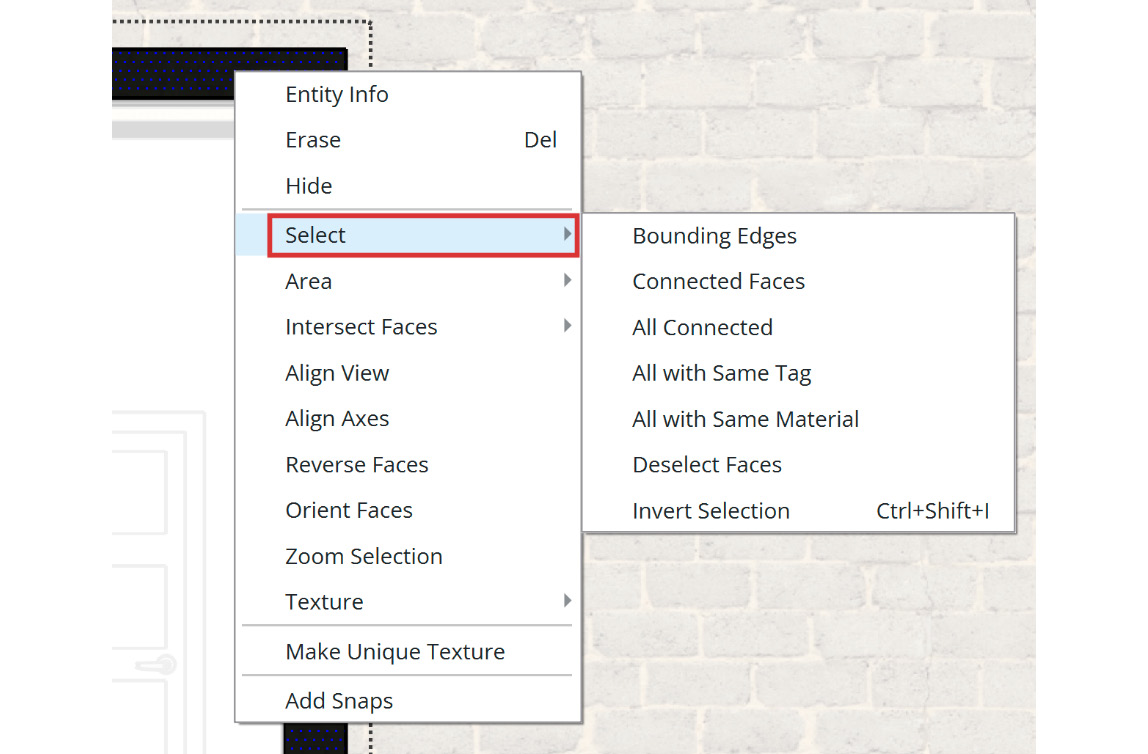
Figure 1.10: Right-click Context menu for the Select flyout
- To invert the scroll wheel, do the following:
- On Mac, click the SketchUp menu | Preferences | Compatibility. Then, in the Mouse Wheel Style area, check Invert and click OK
- On Windows, click the Window menu | Preferences | Compatibility. Then, in the Mouse Wheel Style area, check Invert and click Close
Using a three-button mouse is critical to your success with the software. SketchUp is intuitive and powerful, but it cannot read our minds. We must choose the correct command and move our mouse purposefully, creating a symbiotic relationship between ourselves and our computer.
3D mouse compatibility
If you prefer using a 3D mouse, also referred to as a space mouse or CAD mouse, rest assured that SketchUp Pro and Studio support most brands. Whether it’s a compact travel-size 3D mouse or the robust 3dconnexion SpaceMouse Pro, many SketchUp users find great satisfaction in utilizing their 3D mouse within the SketchUp environment.
Creating keyboard shortcuts
While the SketchUp icons are a helpful visualization of a tool, using shortcuts will (you guessed it) shave a lot of time off modeling. If you do not have a list of shortcuts, one of our favorites— with corresponding large-scale shortcut graphics—comes from Matt Donley of Master SketchUp (mastersketchup.com).
You can also find a list of shortcuts in beginners’ SketchUp books, online at https://help.sketchup.com/en/quick-reference-cards, and when looking through the menu bar. Figure 1.10 shows the Tools menu (on a Windows computer), where the shortcuts are listed to the right of the name. Some of the shortcuts are ones we created specific for our needs, so they won’t match yours:
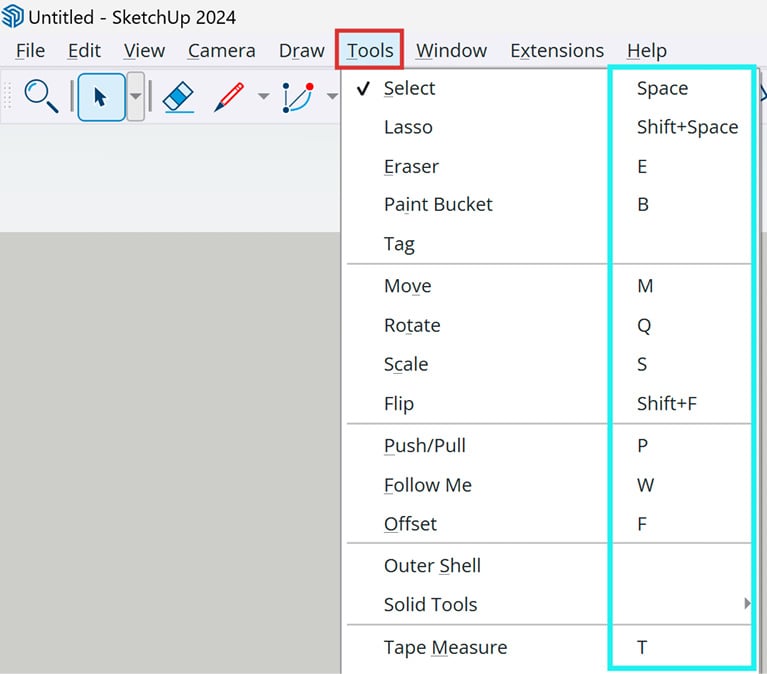
Figure 1.11: Shortcut letters to the right of a tool’s name
Creating your own shortcuts is imperative to a good modeling workflow. There are a few stipulations to creating your own shortcuts, but almost anything native to SketchUp can have a shortcut (and many of the plugins can, too!). Here are some basic rules for creating them. If you break one of these rules, you will see a popup telling you to choose another one:
- You can use modifier keys in the command, such as Shift or Option (Opt).
- The shortcut cannot start with a number due to conflicting with the Measurements box.
- You cannot use shortcuts that are specific to your computer’s operating system. For example, Ctrl + P is not allowed on a Windows computer because that is the system’s shortcut for printing.
- If there is a SketchUp default shortcut that you do not use and want to assign to another, you can reassign the shortcut. For example, the default shortcut G creates a component of the selected objects, but the authors of this book carefully pick and choose what should be made a component, so we do not need a shortcut for it. However, every object in our model should be grouped, so we reassigned G to Make Group.
Another command we use often is Paste in Place, which does not have a default shortcut.
What is Paste in Place? Sometimes, we need to move or copy an object from inside a group to outside a group or vice versa. This is done by cutting it—Ctrl/⌘ + X—or copying with Ctrl/⌘ + C, then pasting it in the exact same place outside the grouping using Paste in Place. It is also a great way to paste to the exact location in an identical SketchUp file.
To manually use Paste in Place after copying or cutting an object, use the Edit menu and arrow down to Paste in Place. To create a shortcut for the Paste in Place command instead, follow these steps:
- In the menu bar, select Window | Preferences (Windows) or SketchUp | Settings (macOS).
- A dialog box called SketchUp Preferences appears. In the sidebar (on the left), select Shortcuts.
- In the Filter box, start typing the name of the command you want to add a shortcut to. In this instance, type
paste. Under Function, the menu bar where the tool or command can be found is listed first:
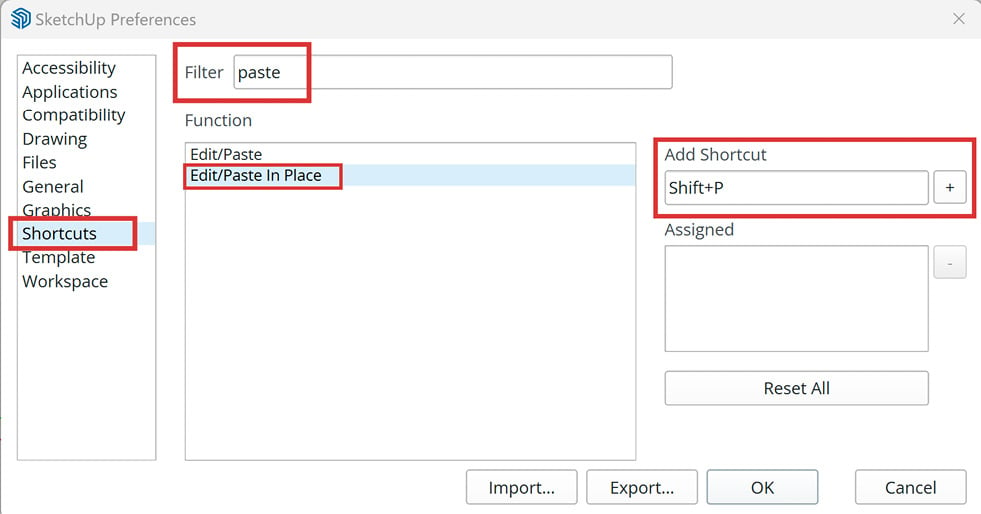
Figure 1.12: Adding a shortcut for Paste in Place (Windows)
- Highlight the correct field (Edit/Paste in Place) to add a shortcut.
- For Windows users, click the box underneath Add Shortcut. Then, do the following:
- For this shortcut, we are using a modifier key (Shift) plus the letter P. So, hold down the Shift key to make it auto-populate to the Add Shortcut field, then tap P.
- Click the + sign next to the field. The shortcut will now show up in the Assigned box.
- Click OK if you are done, or continue adding shortcuts.
- For macOS users, click the text box in the lower-left of the Shortcuts pane and type the keyboard shortcut that you want to assign to the command:
- Hold down the Shift key to make it auto-populate to the Add Shortcut field, then tap P.
- Your assigned shortcut then appears in the Key column. Do not hit Enter, or the shortcut will be deleted.
- You can continue adding shortcuts, or close out of the dialog box.
- If you try to override a shortcut already in the system, a popup like this one will be displayed. You can select Yes to reassign the shortcut, or No to choose another command:
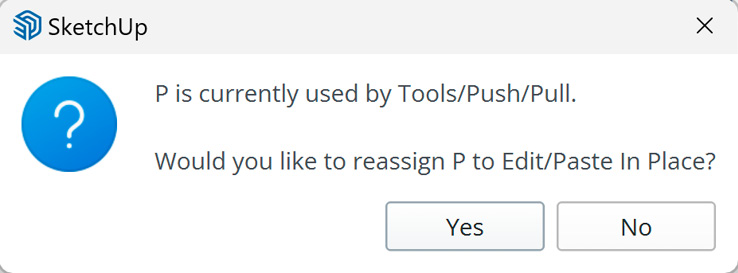
Figure 1.13: Shortcut warning dialog box
Other software-to-software shared shortcuts will also work in SketchUp, and are already enabled, some of which we already mentioned:
- Copy = Ctrl/⌘ + C = Copy
- Paste = Ctrl/⌘ + V
- Cut= Ctrl/⌘ + X
- Select All = Ctrl/⌘ + A (this selects everything in the model or, when in edit mode of a group or component, it selects everything inside that grouping)
- Deselect All = Ctrl/⌘ + T or click a blank area in the modeling window (this is not a software-to-software shortcut, but one that should be mentioned)
Note regarding Copy and Paste
Do not make a habit of using the shortcuts for Copy and Paste in your model when copying objects. Use the Move + Copy commands (copy is activated with a modifier key after activating Move (M) so you copy along the axis).
Guide lines and guide points
The Tape Measure tool not only measures objects, but its default purpose is to create guides for precision modeling. Both types of guides do not interfere with regular geometry and can be easily deleted or hidden using the Edit or View menus.
Here are tips for creating guides:
- To create guide lines (dashed lines that stretch on infinitely), click an edge, face, or midpoint of an object, move your mouse in the direction of the measurement, and type in an increment. Note that you can lock in the tape measure movements (axes) using the arrow keys.
- If a guide is not created, the Tape Measure tool might be in measure mode. You will know by looking at your cursor. When using the Tape Measure tool, if your cursor looks like a tape measure without a plus sign, it is only measuring. In the command, tap the modifier key (Ctrl on Windows or Opt on macOS) once, and a red plus sign will show above the Tape Measure tool. Try creating a guide line again.
- To create a guide point, a dotted line with a black point at its end, click an endpoint, and move your mouse towards another endpoint, typing in the desired increment.
- The beauty of a guide point versus a guide line is that objects can easily snap to the point. Whether you are moving an object to the point or creating a line or shape that begins or ends at that point, guide points are much easier to use as references than lines or guide lines.
- If a guide point is not created, follow the steps for the guide line to ensure you are not in measure mode. Otherwise, make sure you are clicking an endpoint to create the guide point. It will not work if you first click a midpoint or edge.
Also, remember that the Protractor tool creates guide lines on a specific angle, which is great for roof pitch and other angled guides.
In this section, we reviewed multiple ways to model efficiently, including using mouse and keyboard shortcuts, inferences, and guides. In the next section, we will look at how to create a 2D sofa for a reusable space plan item with step-by-step instructions.


