Hands-on development in Business Central
One of the best ways to learn a new set of tools, such as those that make up a programming language and environment, is to experiment with them. We’re going to have some fun doing that throughout this book. To do so, we’re going to experiment where the cost of errors (otherwise known as learning) is small. Our development work will consist of a custom Business Central application that will be relatively simple but realistic.
We’re going to do our work using the Cronus demo database that is available with all Business Central distributions and is installed by default when we install the Business Central demo system. The simplest way is to use the sandbox.
Note
You can find up-to-date information on getting started with Business Central sandboxes via Microsoft Docs at https://learn.microsoft.com/en-us/dynamics365/business-central/dev-itpro/developer/devenv-sandbox-overview.
The Cronus database contains all of the Business Central objects and a small, but reasonably complete, set of data populated in most of the system’s functional application areas. Our exercises will interface very slightly with the Cronus data, but they will not depend on any specific data values already there.
Business Central development exercise scenario
Our business is a small radio station that features a variety of programming, news, music, listener call-ins, and other program types. Our station call letters are WDTU. Our broadcast materials come from several sources and in several formats: vinyl records, CDs, MP3s, and downloaded digital (usually MP3s). While our station has a large library, especially of recorded music, sometimes, our program hosts (also called disc jockeys or DJs) want to share material from other sources. For that reason, we need to be able to easily add items to our playlists (the list of what is to be broadcast) and also have an easy-to-access method for our DJs to preview MP3 material.
Like any business, we have accounting and activity tracking requirements. Our income is from selling advertisements. We must pay royalties for music played, fees for purchased materials, such as prepared text for news, sports, and weather information, and service charges for our streaming internet broadcast service. As part of our licensed access to the public airwaves, a radio station is required to broadcast public service programming at no charge. Often, this is in the form of public service announcements (PSAs), such as encouraging traffic safety or reduction in tobacco use.
Like all radio stations, we must plan what is to be broadcast (create schedules) and track what has been broadcast (such as advertisements, music, purchased programming, and PSAs) by date and time. We bill our customers for this advertising, pay our vendors their fees and royalties, and report our public service data to the appropriate government agency.
Getting started with application design
The design for our radio station will start with a Radio Show table, a Radio Show Card page, a Radio Show List page, and a simple Radio Show List report. Along the way, we will review the basics of each Business Central object type.
When we open Visual Studio, we need to create a new project folder. This can be done using the Command Palette via View | Command Palette... or F1 or Ctrl + Shift + P. Then, type AL:Go!:

Figure 1.12 – Command Palette in VS Code
The project folder will default to your Documents folder if you run this on a Windows machine. We will call our project WDTU:

Figure 1.13 – Naming the project folder
Select the version with which you are working (the public cloud will always be the latest version; your on-premises version may be a different version):

Figure 1.14 – Platform and corresponding BC major release
In the bottom right corner of VS Code, a notification about missing symbols will appear. Clicking on the Download symbols button, we now need to choose a server type to download the symbols from. Both provided options (own server or Microsoft-hosed SaaS, such as a sandbox) will create a launch.json file that we will deal with soon. But first, we must close the Could not download symbols error message that appeared together with the server selection prompt.
Now, let’s inspect the folder structure that has been created.
Folder structure
A folder called WDTU has been created with some default files and subfolders. The HelloWorld.al file can be deleted immediately. This file is a page extension that will be explored more fully in Chapter 4, Pages – The Interactive Interface:
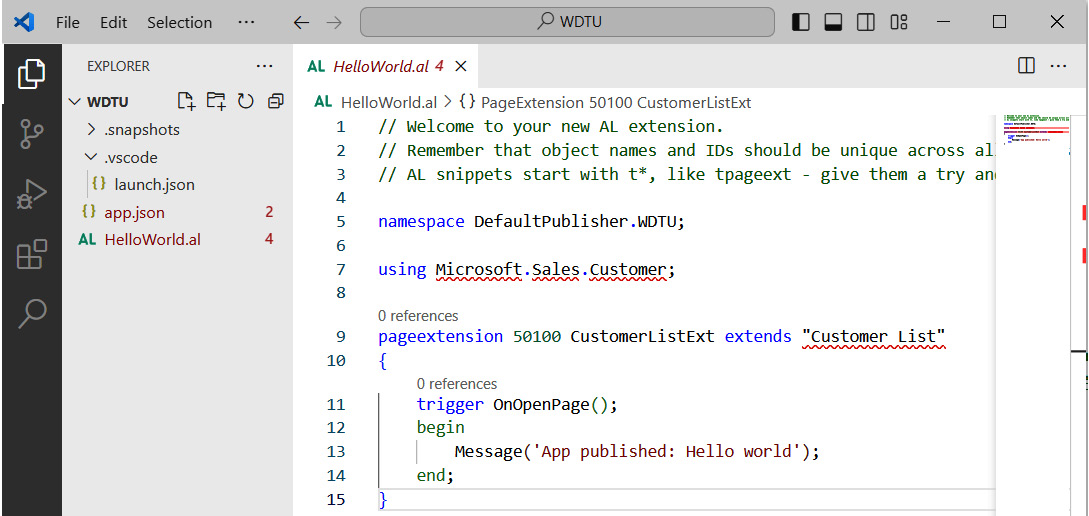
Figure 1.15 – Folder structure after AL: Go
Let’s dive a bit deeper into the folder structure.
Note
The json files that will be explained in the upcoming sections consist of more settings than this book is going to cover. We will only look at the mandatory or most used settings for now.
All settings are explained at Microsoft Docs (https://learn.microsoft.com/en-us/dynamics365/business-central/dev-itpro/developer/devenv-json-files).
launch.json
Inside a subfolder called .vscode, a file is created called launch.json that defines the connection to all our Business Central target environments. Each connection is defined in a separate configuration object. We will soon use a configuration for downloading symbols, publishing our application, and debugging.
Let’s take a moment to update the configuration that was recently created for us. The following settings apply to all configurations:
name: For documentation purposes only. You can put the name of your project here. If more than one configuration is defined, VS Code uses the names to build a lookup list.environmentType: This specifies which environment to use to connect to Business Central. It must be set toSandboxorProductionin the cloud, and toOnPremfor on-premises. This field is mandatory.startupObjectId: This setting determines which object is executed when the project is published. Specifying any startup settings is optional.startupObjectType: This setting works alongsidestartupObjectIdand specifies whether the object to open after publishing is a table, page, report, or query object. The default isPage.startupCompany: This specifies the name of the company to open after publishing. If specified, thestartupObjectIdandstartupObjectTypesettings must also be defined.
For addressing cloud environments (production or sandbox), we will need to populate one additional setting:
environmentName: This specifies which named environment to use in cases where multiple sandboxes are owned by the same tenant
The following settings are required for connecting to your own servers:
server: This contains a URL to the development endpoint of your server.port: This optional setting specifies the port that’s assigned to the development service. This is for on-premises installations only and is required if the default port is not used for the server instance you are connecting to.serverInstance: A server can have multiple instances.authentication: This can beUserPassword,AAD, orWindows. The default isUserPassword.
app.json
Located in the main folder, the app.json file contains properties about your extension, such as its name and version. These are mandatory fields; the others that are available are optional:
id: This is a unique ID (GUID) for your extension and is autogenerated. Never change this value.name: The name of your extension as it will be displayed to the user.publisher: This usually contains the name of the company or individual who owns the intellectual property of the extension. It will be displayed to the user.version: Your extensions can be versioned using this property. You can use this when you create a new version of the extension to determine if upgrade code needs to be executed.idRange: This tells the compiler which object numbers are to be used for this extension. You must provide a range for application object IDs in"idRanges": [{"from": 50100,"to": 50200},{"from": 50202,"to":50300}]format.platform,application, andruntime: These properties were automatically set when we ranAL: Go!. They determine the minimum version of Business Central (platform,application) and the minimum AL Language features (runtime) our application shall be compatible with.
Symbol files
Before we can start creating our extension, we need to do one more thing: download the symbol files. The compiler needs the symbol files to determine whether the dependencies are correct. The symbol files contain metadata about other extensions. To download the required Business Central applications from our development environment, we need to select AL: Download symbols from the Visual Studio Command Palette:

Figure 1.16 – The AL: Download symbols command
Note
When the symbol files are downloaded, by default, they’ll be placed in the ./alpackages folder of your project.
Later, in Chapter 2, in the Non-Extensible Tables section, and Chapter 3, in the Data Structure Examples section, we will use the AL Explorer in VS Code to inspect the symbol files.
Application tables
Table objects are the foundation of every Business Central application. Tables contain data structure definitions, as well as properties that describe the behavior of the data, including data validations and constraints.
More business logic is required in complex applications than in simple data type validation, and Business Central allows AL code to be put in the table to control the insertion, modification, and deletion of records, as well as logic at the field level.
Note
When the bulk of the business logic is coded at the table level, it is easier to develop, debug, support, modify, and even upgrade. Good design in Business Central requires that as much of the business logic as possible resides in the tables.
Having the business logic coded at the table level doesn’t necessarily mean that the code resides in the table. The Business Central online documentation recommends the following guidelines for placing AL code:
- In general, put the code in codeunits instead of on the object on which it operates. This promotes a clean design and provides the ability to reuse code. It also helps enforce security. For example, typically, users do not have direct access to tables that contain sensitive data, such as the general ledger entry table, nor do they have permission to modify objects. If you put the code that operates on the general ledger in a
codeunitobject, give thecodeunitobject access to the table, and give the user permission to execute thecodeunitobject, then you will not compromise the security of the table and the user will be able to access the table. - Outside codeunit objects, put the code as close as possible to the object on which it operates. For example, you should put code that modifies records in the triggers of the table fields.
Designing a simple table
Our primary master data table will be the Radio Show table. This table lists our inventory of shows that are available to be scheduled.
Each master table has a standard field for the primary key (a Code data type field of 20 characters called No.) and has standard information regarding the entity the master record represents (for example, Name, Address, and City for the Customer table, and Description, Base Unit of Measure, and Unit Cost for the Item table).
The Radio Show table will have the following field definitions (we may add more later on):
|
Field Names |
Definitions |
|
|
20-character text (code) |
|
|
10-character text (code) |
|
|
100-character text |
|
|
Duration |
|
|
20-character text (code) |
|
|
100-character text |
|
|
Decimal |
|
|
Decimal |
|
|
Decimal |
|
|
Decimal |
Table 1.2 – The Radio Show table’s field names and data types
In the preceding list, three of the fields are defined as Code fields, which are text fields that limit the alphanumeric characters to uppercase values. Such Code fields are used throughout Business Central for primary key values. They are used to reference or be referenced by other tables (foreign keys). No. will be the unique identifier in our table. We will utilize a set of standard internal Business Central procedures to assign a user-defined No. series range that will auto-increment the value on table insertion and possibly allow for user entry (so long as it is unique in the table) based on a setup value. Note that Host No. references the standard Resource table, while the Radio Show Type field will reference a custom table that we will create to allow for flexible Type values.
We must design and define the reference properties at the field level, as well as compile them before the validation will work. At this point, let’s just get started with these field definitions and create the foundation for the Radio Show table.
Creating a simple table
The easiest way to create a table is by using snippets. Snippets are textual templates for a specific programming task, such as for creating a new table object. To use snippets, Visual Studio Code needs to understand that our file is written in the AL language. This can be done by saving the file with the .al extension.
To add a new AL file, right-click on the space below the app.json file and select New File... from the context menu. Name it RadioShow.table.al and press Enter:
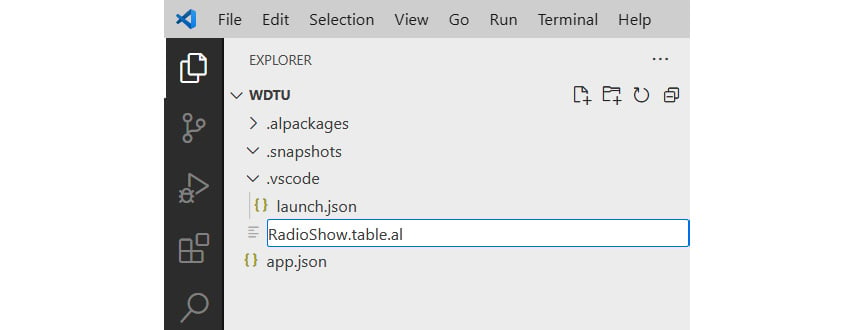
Figure 1.17 – Adding the Radio Show table
Note
As a best practice exemplified by Microsoft, always extend your AL filenames with the <object name>.<object type>.al pattern. You can change the <object name> part at any time later. Try to avoid spaces in filenames. Although using camel case is generally recommended, this book will continue using lowercase object types.
Now, we can use the snippet called ttable. If we type in the letters tt, IntelliSense will suggest this snippet:

Figure 1.18 – Snippets in VS Code
Code snippets are templates in Visual Studio Code that are available in IntelliSense. Snippets make it easier to enter repeating code patterns and we can use them for object definition templates. This snippet creates content for our file and sets the cursor on the place where we need to define the object ID:
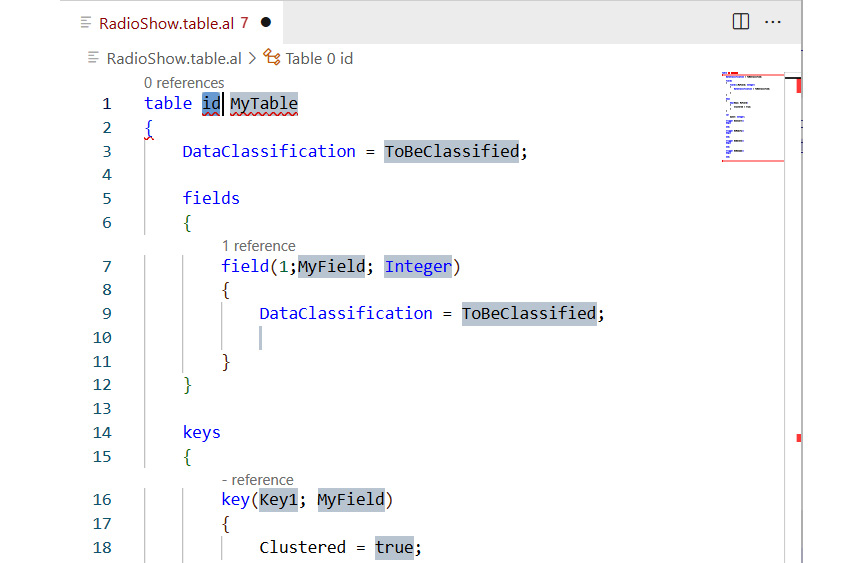
Figure 1.19 – A snippet of the generated code structure
We will press Backspace, then Ctrl + spacebar, and finally Enter to select value 50100. Next, we must press the Tab key to go to the next field, which contains the object name, where we will type "Radio Show". The snippet has already created a field with the default ID of 1. The field name is MyField and its type is Integer. We will change the name to "No." and the type to Code[20].
The next field will be field number 2. Just like for the object ID we just created, you can use Ctrl + spacebar to let the AL language suggest a free ID. You can also place a new field, 3, between field numbers 1 and 2, or resort (not renumber) the fields at any time later.
Alternatively, you can number the field IDs manually, leaving smaller gaps between each field and larger gaps between sets of fields with a particular purpose.
Note
Once a table is referenced by other objects or contains any data, the field numbers of the previously defined fields should not be changed.
The following screenshot shows our new table definition in the .al file:
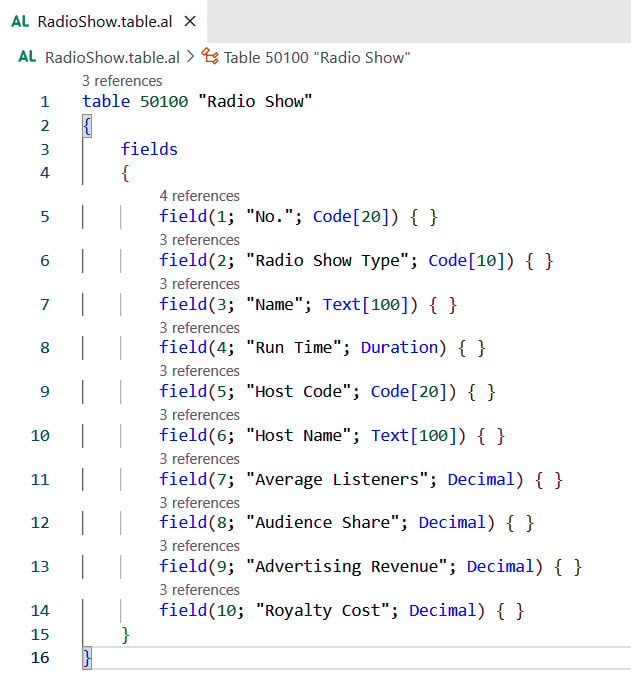
Figure 1.20 – Radio Show table AL code
Note
You can remove anything that’s automatically supplied that you don’t need from this snippet. Here, we’ve removed the DataClassification and keys sections, variable declarations, and triggers. We will cover their usage and details in Chapter 2, Tables.
Pages
Pages provide views of data or processes that are designed for on-screen display (or exposure as web services and REST APIs) and also allow user data entry into the system. Pages act as containers for action items (menu options).
From a user perspective, there are several basic types of display/entry pages available in Business Central by default:
- List
- Card
- Document
- Journal/worksheet
We will review each page type here.
There are also page parts (they look and program like a page but aren’t intended to stand alone), dialogs, as well as user interfaces (UIs) that display like pages, but are not page objects. The latter UIs are generated by various dialog methods. In addition, there are special page types, such as Role Center pages and wizards. All those will be covered later in Chapter 4, Pages – The Interactive Interface.
Standard elements of pages
A page consists of page properties and triggers, controls, and control properties. Data controls are generally either labels displaying constant text or graphics, or containers that display data or other controls. Controls can also be buttons, action items, and page parts. While there are a few instances where we must include AL code within page or page control triggers, it is good practice to minimize the amount of code that’s embedded within pages. Any data-related AL code should be located in the table object rather than in the page object.
List pages
List pages display a simple list of any number of records in a single table. The Customers list page (with its associated FactBoxes) in the following screenshot shows a subset of the data for each customer displayed. List pages often do not allow you to enter or edit data:
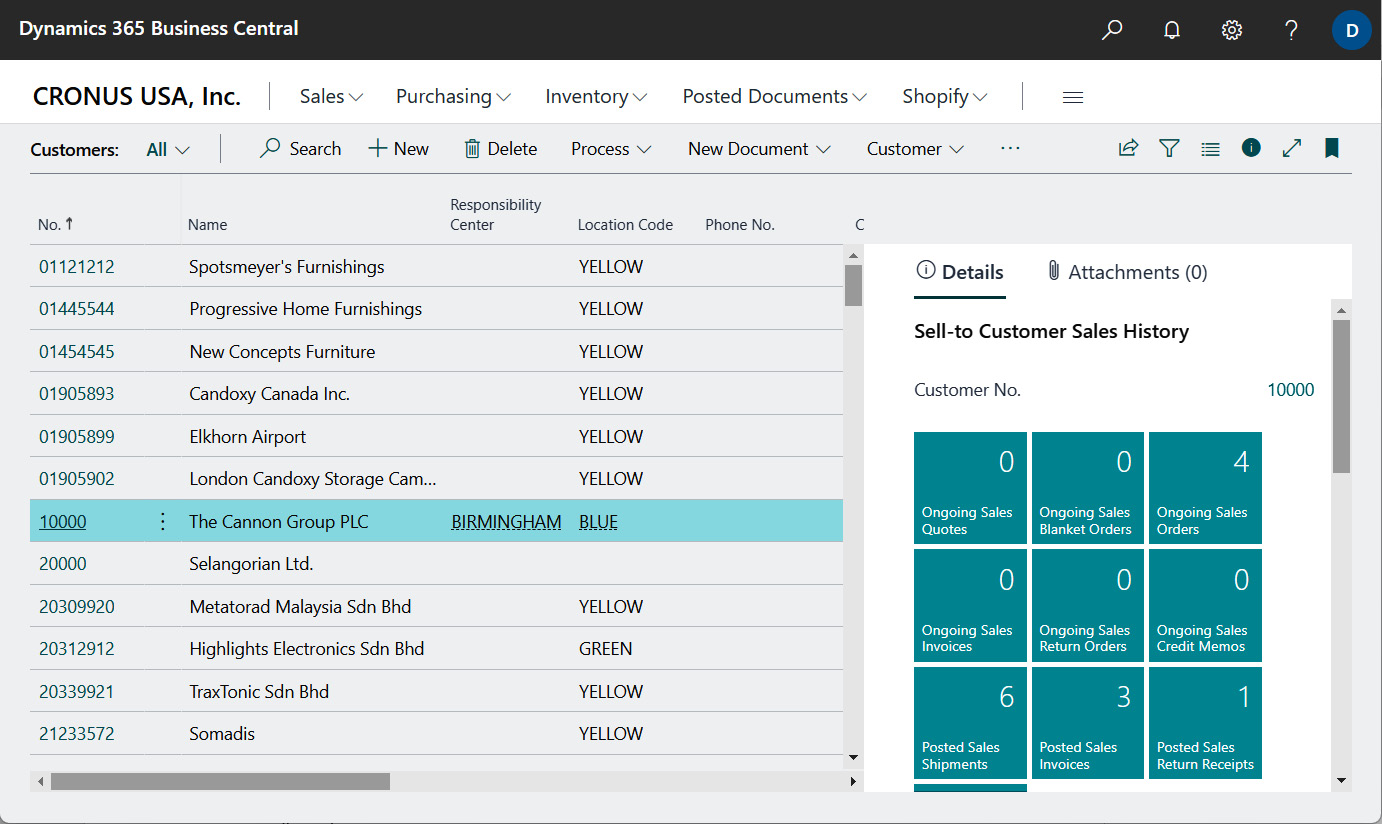
Figure 1.21 – The Customers list page
Card pages
Card pages display one record at a time. They are generally used for entering or displaying individual table records. Examples of frequently accessed card pages include Customer Card for customer data, Item Card for inventory items, and G/L Account Card for general ledger accounts.
Card pages have FastTabs (a FastTab consists of a group of controls, with each tab focusing on a different set of related customer data). FastTabs can be expanded or collapsed dynamically, allowing the data that’s visible to be controlled by the user at any time. Important data elements can be promoted to be visible all the time, even when a FastTab is collapsed.
Card pages for master records display all the required data entry fields. If a field is set to ShowMandatory (a control property that we will discuss in Chapter 4, Pages – The Interactive Interface), a red asterisk will appear until the field is filled. Typically, card pages also display FactBoxes, which contain summary data about related activity. Thus, cards can be used as the primary inquiry point for master records. The following screenshot shows an example standard Customer Card:
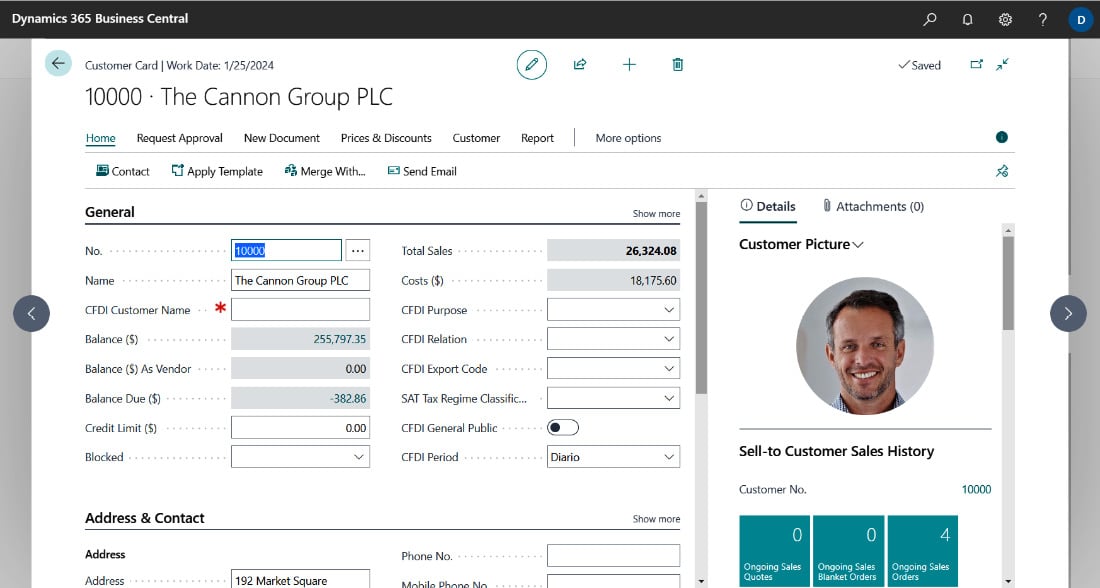
Figure 1.22 – The Customer Card page
Document pages
A document page looks like a card page with one tab containing a list part page. An example of a document page is the Sales Order page shown in the following screenshot. In this example, the first tab (General) and the last four (invisible) tabs are in card page format and show order data fields that have a single occurrence on the page (in other words, they do not occur in a repeating column).
The second tab from the top (Lines) is in a list part page format (all fields are in repeating columns) that shows the order line items. Sales Order line items may include products to be shipped, special charges, comments, and other pertinent order details.
The information to the right of the data entry area is related to data and computations (FactBoxes) that have been retrieved and formatted. The top FactBox (Sell-to Customer Sales History) counts and links various sales documents for the current customer:
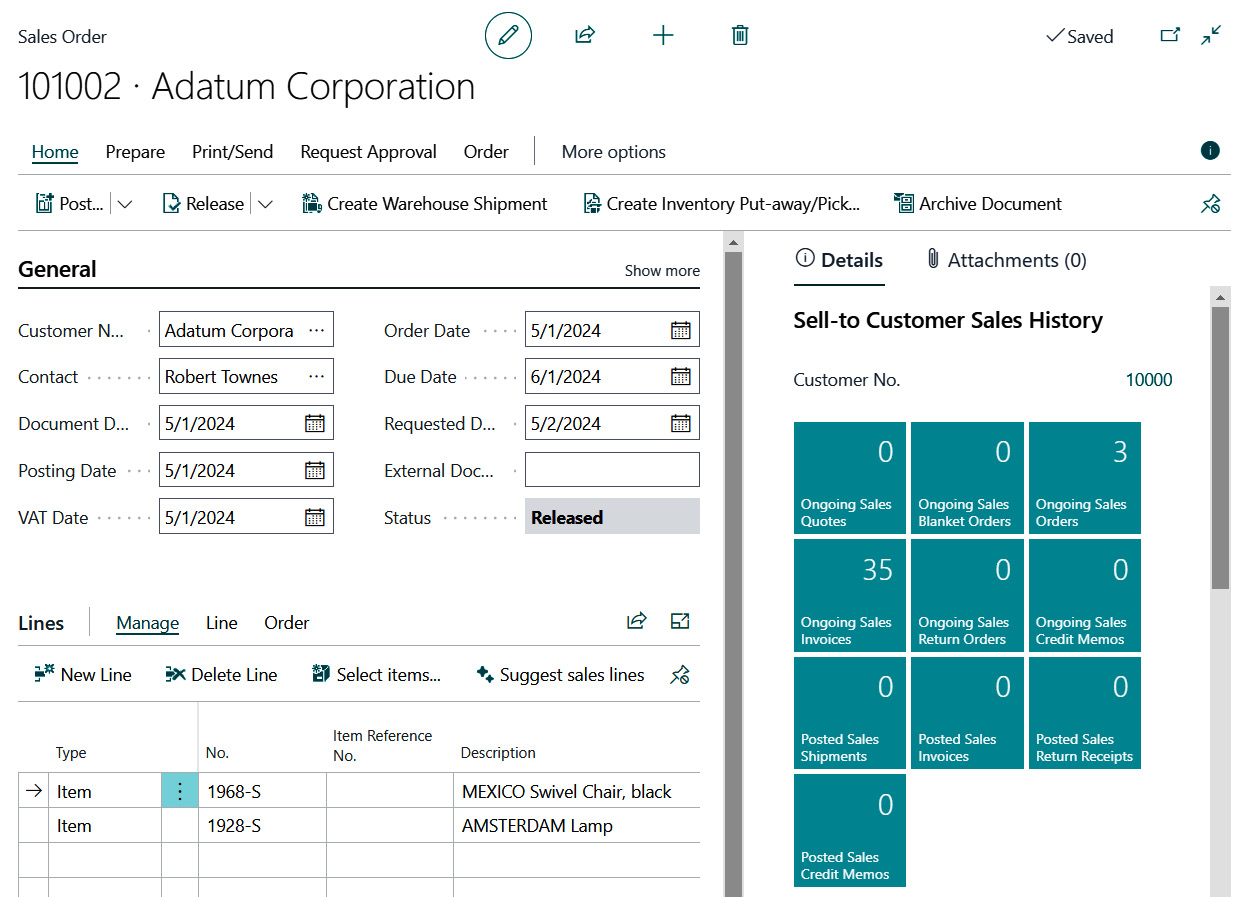
Figure 1.23 – The Sales Order document page
After the short introduction into pages, let's resume designing our WDTU application.
Journal/worksheet pages
Journal and worksheet pages look very much like list pages. They display a list of records in the body of the page. Many also have a section at the bottom that shows details about the selected line and/or totals for the displayed data. These pages may include a filter pane and perhaps a FactBox. The biggest difference between journal/worksheet pages and basic list pages is that journal and worksheet pages are designed to be used for data entry (though this may be a matter of personal or site preference).
An example of the Payment Journals page in finance is shown in the following screenshot:
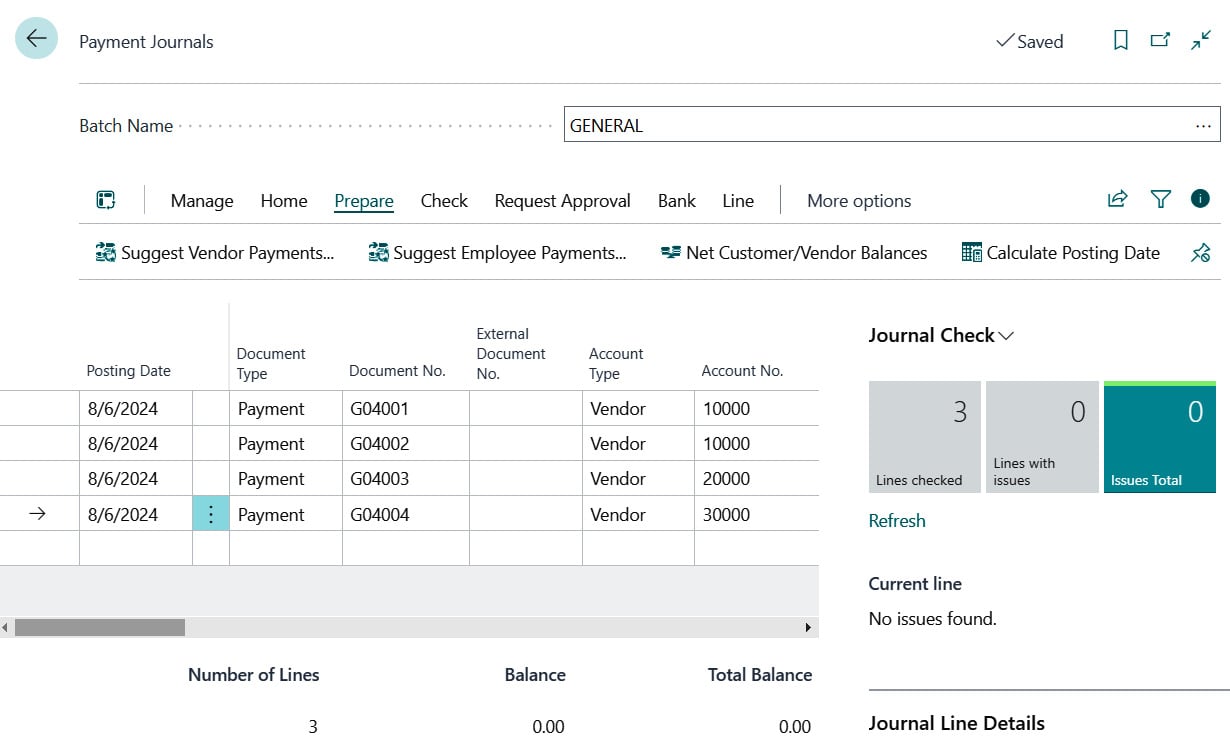
Figure 1.24 – The Payment Journals page
After the short introduction into pages, let's resume designing our WDTU application.
Creating a list page
Now, we will create a list page for the table we created earlier. A list page is the initial page that’s displayed when a user initially accesses any data table for the first time. Since the AL language doesn’t have wizards, we’ll use snippets to create the framework for objects and procedures. Visual Studio Code allows you to create custom snippets if you have repeated patterns that are not available out of the box.
Our first list page will be the basis for viewing our Radio Show master records. From Visual Studio Code, add a new file and enter the name RadioShowList.page.al. Now, we can use the tpage snippet (choose the Page of type List entry):

Figure 1.25 – A snippet page being used to generate a page template
Now, we will set the ID to 50100 and the name to "Radio Show List", as well as change SourceTable to "Radio Show", as shown in the following screenshot:
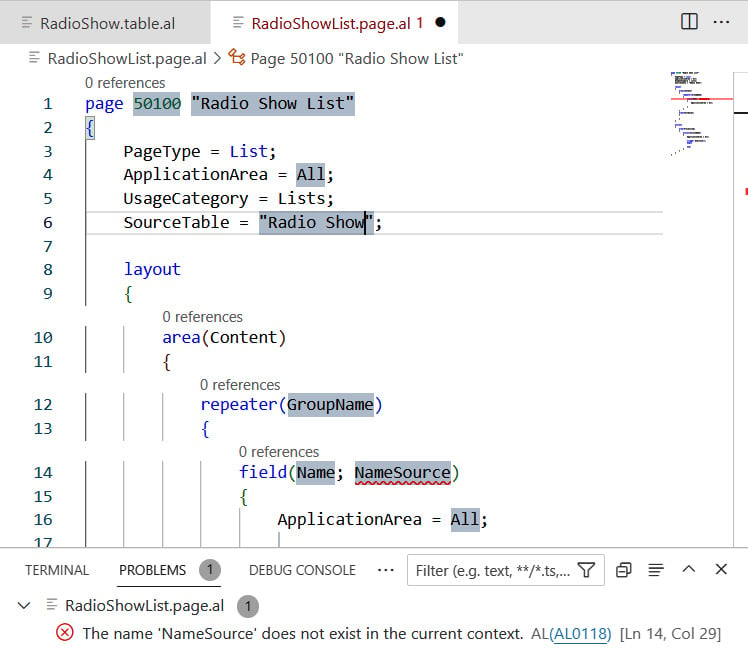
Figure 1.26 – Fill in the information as shown
After doing this, we can see that NameSource is highlighted as a problem, and the PROBLEMS window at the bottom of our screen tells us that NameSource does not exist in this context.
The reason why this problem is occurring is because of the combination of the table object and this page. We joined these objects by selecting the Radio Show table as SourceTable for this page. By joining them, the page object now has a dependency on the table object.
The next step will be to add the fields from the table to the page in the repeater. We will remove the NameSource field to do so.
Page fields are declared as field(Name; Expression) { }. The Name value can be freely chosen and can be called by other extensions later. IntelliSense helps us fill in the Expression value for a SourceTable field: By adding Rec. to the front, the compiler will identify it as a field from the current record.
After that, we can replace the snippet’s GroupName with Group.
We should also remove everything we don’t need, such as FactBoxes and actions:
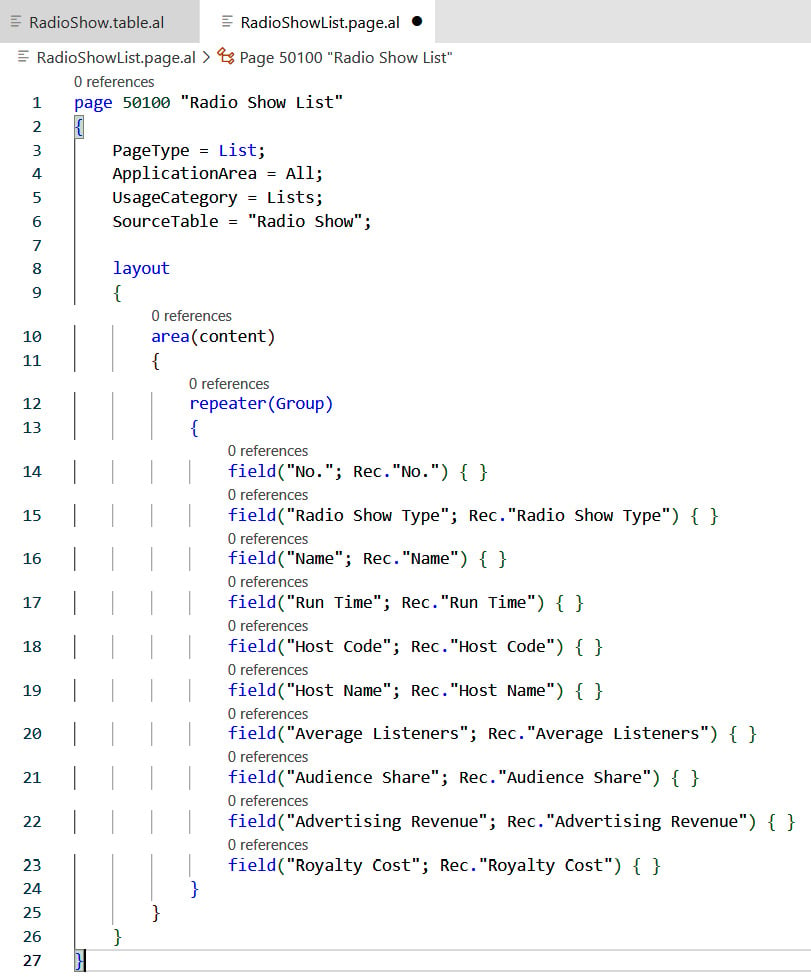
Figure 1.27 – The completed Radio Show list page so far
We can view the page by modifying the launch.json file. Change startupObjectId to 50100 and select AL: Publish without debugging from the Command Palette, as shown in the following screenshot:
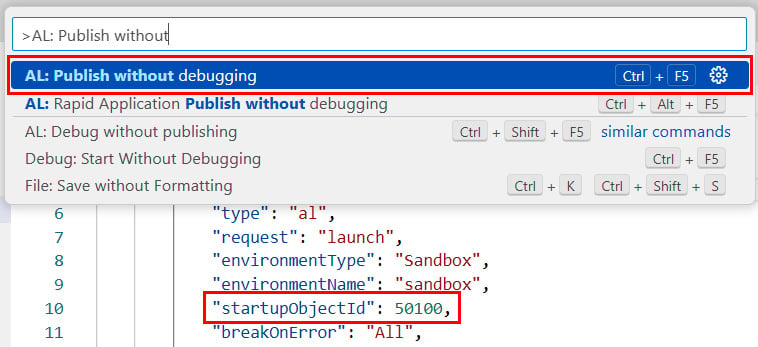
Figure 1.28 – Setting startupObjectId to the Radio Show list page’s object number
This will launch the Business Central application with our newly created page as the startup object:

Figure 1.29 – The Radio Show list page in the Business Central client. Text readability is not a requirement here; the intent is to show the empty Radio Show list
Because our table doesn’t contain any data, we will only see a header that displays the name of our page.
Creating a card page
Now, let’s create a card page. The process for a card page is almost the same as for a list page, but we use a different tpage snippet. Our page number will be 50101 and the name will be Radio Show Card:
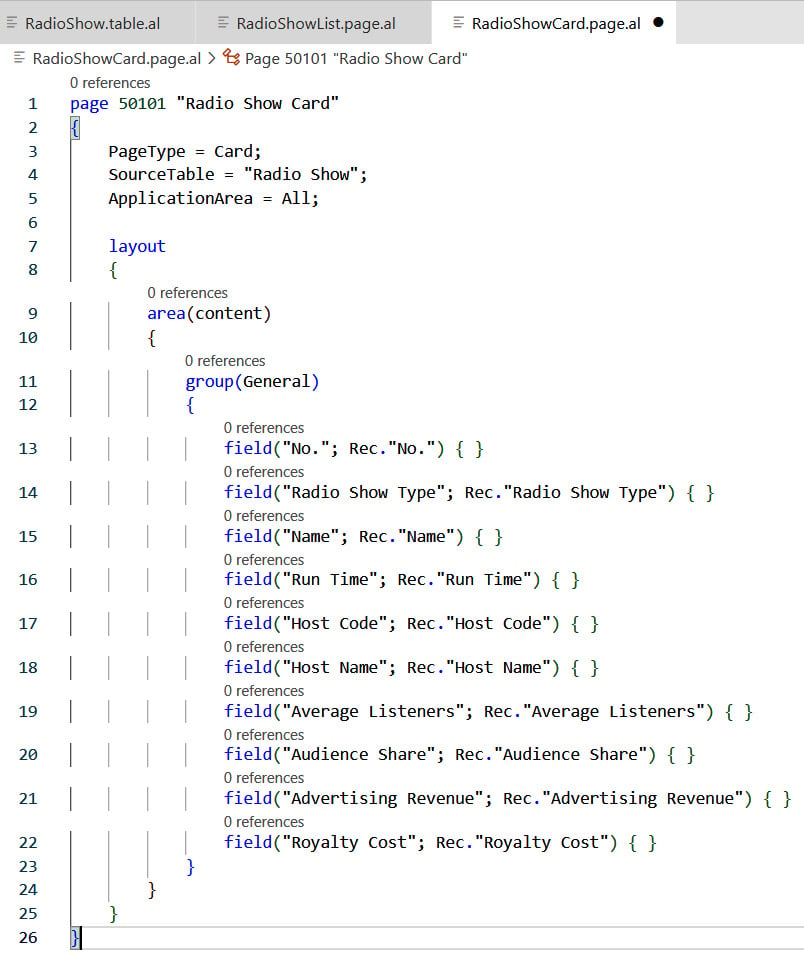
Figure 1.30 – Fill in the Radio Show card page as shown
As we don’t want our card page to be searchable in the web client, we have removed UsageCategory. Additionally, we have renamed the snippet’s GroupName to General; This will be displayed as a FastTab caption to the user.
Note
You can copy and paste most of the definitions from the list page file, or even use File and Save As in Visual Studio Code if you find that faster or easier to use.
Let’s change the launch.json file to this new page and publish the extension again. We can view the page by modifying the launch.json file. Change startupObjectId to 50101 and select AL: Publish without debugging from the Command Palette. The page will look like this:
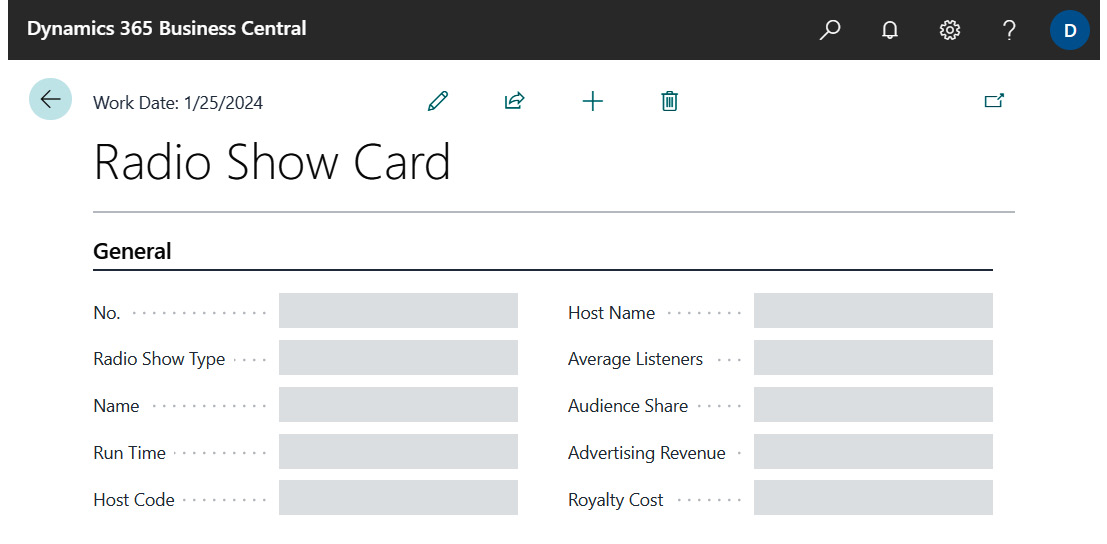
Figure 1.31 – The Radio Show card page in the Business Central client
Creating some sample data
Even though we haven’t added all the bells and whistles to our Radio Show table and pages, we can still use them to enter sample data. The Radio Show List page will be the easiest to use for this.
We will now revert the launch.json file so that it runs the 50100 page, as originally defined, and then publish the extension. In the published window, click New; you’ll see the following screen:

Figure 1.32 – Adding a new record to the Radio Show list page
Enter the data shown in the following table so that we can see what the page looks like when it contains data. Later, once we’ve added more capabilities to our table and pages, some fields will be validated, and some will be either automatically entered or available on a lookup basis. But for now, simply key in each field value. If the data we key in now conflicts with the validations we create later (such as data in referenced tables), we may have to delete this test data and enter new test data later:
|
No. |
Radio Show Type |
Name |
Run Time |
Host Code |
Host Name |
|
|
|
|
|
|
|
|
|
|
|
|
|
|
|
|
|
|
|
|
|
|
|
|
|
|
|
|
|
|
|
|
|
|
|
|
|
|
|
|
|
|
|
|
|
|
|
|
|
|
|
|
|
|
|
|
Table 1.3 – Test data
Creating a list report
To create a report, we will use the report snippet treport and create the 50100 Radio Shows report.
Note
Testing this report will result in an error message occurring if the sample data hasn’t been created yet.
Type 50100 into the Id and Radio Shows into MyReport:
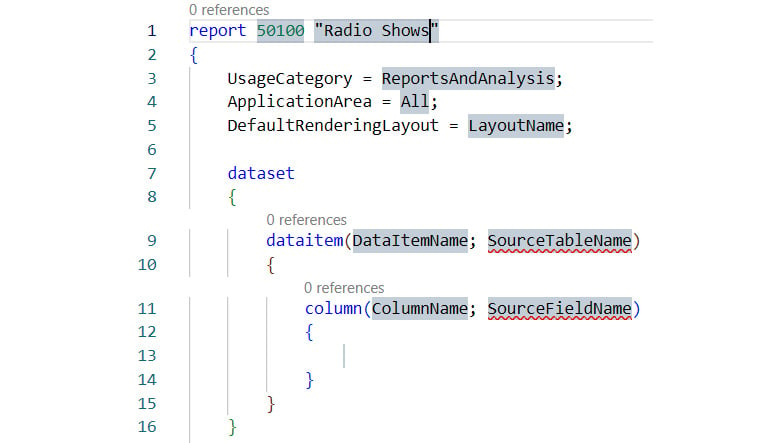
Figure 1.33 – Edited report template
If we want users to be able to execute our report from Business Central, we also need to enable a search so that they can find our report. We will do that using the UsageCategory and ApplicationArea properties. The UsageCategory property will determine where the report will be listed, while the ApplicationArea property will determine the access level a user requires to be able to execute the report:

Figure 1.34 – Properties to show pages and reports in the search
Note
We will learn more about these properties later in Chapter 4, in the Page Searchability section.
The SourceTableName value (visible in Figure 1.32) for our report is the Radio Show table. The columns are the fields from this table. Spaces and special characters are not allowed in column names for reports.
After selecting the columns and removing any unnecessary elements (requestpage and var) from the snippet, our report code above rendering should look as follows:
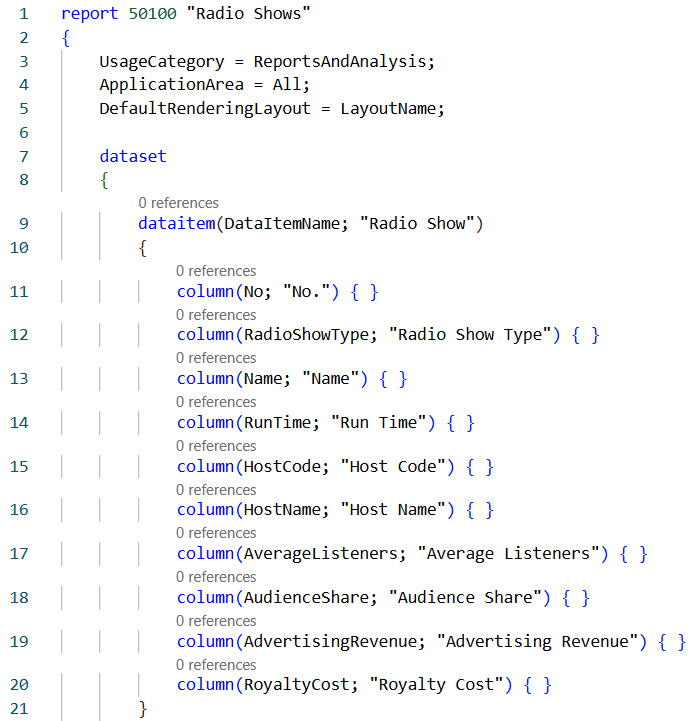
Figure 1.35 – Columns in the “Radio Shows” report
Generating the layout
Now that we’ve defined our dataset, we can create the layout. Business Central supports RDLC, which can be edited in Visual Studio, SQL Report Builder, Microsoft Excel, and Microsoft Word.
There is no limit to the number or variety of layouts that can be defined for each report, though a single rendering layout must be defined as the default using DefaultRenderingLayout. In our example, we will create one of each of the three available types (RDLC, Word, and Excel):
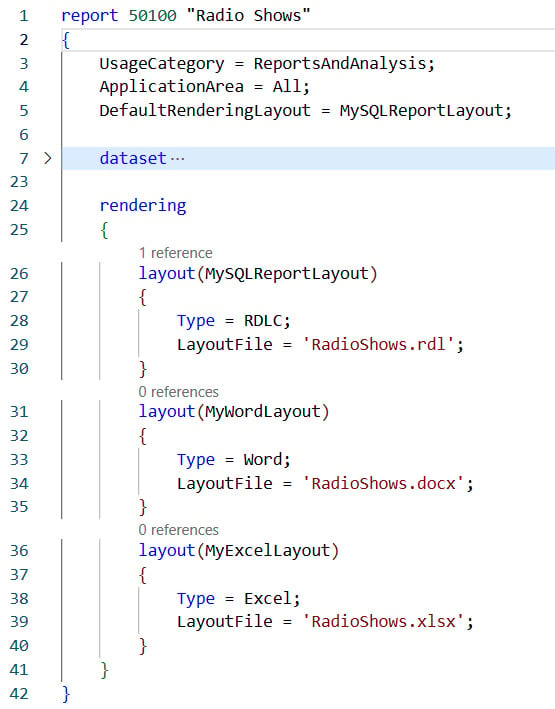
Figure 1.36 – Rendering layouts
To generate the layouts, we need to package our application. We can do this from the Command Palette by running AL: Package:

Figure 1.37 – Building the package to generate the layout
This screenshot shows the generated RDLC, which is essentially similar to XML syntax:
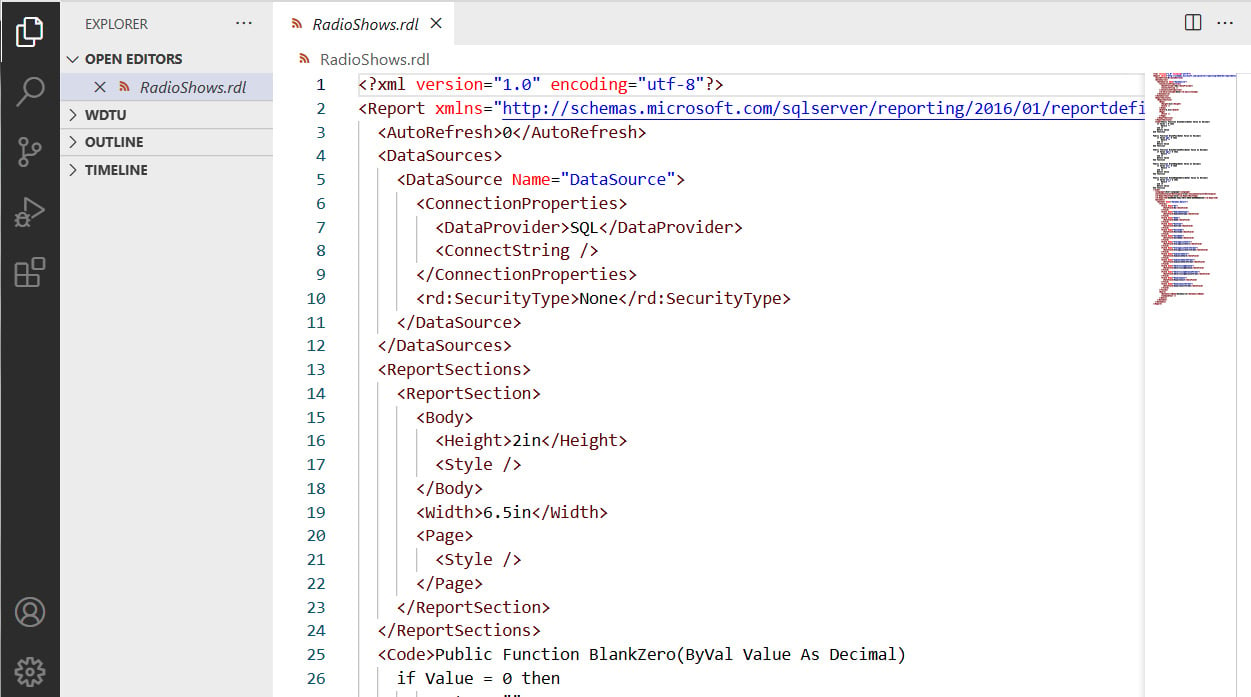
Figure 1.38 – RDLC layout
Let’s see if we can run our report. To do that, we will publish our extension without startupObjectId:
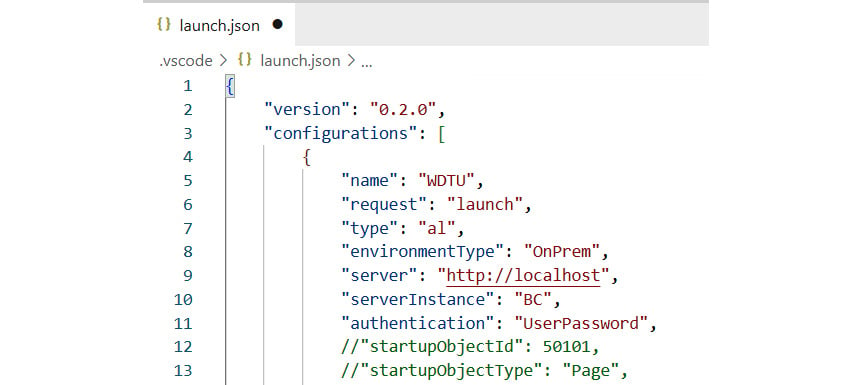
Figure 1.39 – launch.json
In the Business Central session, we will use the search box and type in the word radio, which will show our report:
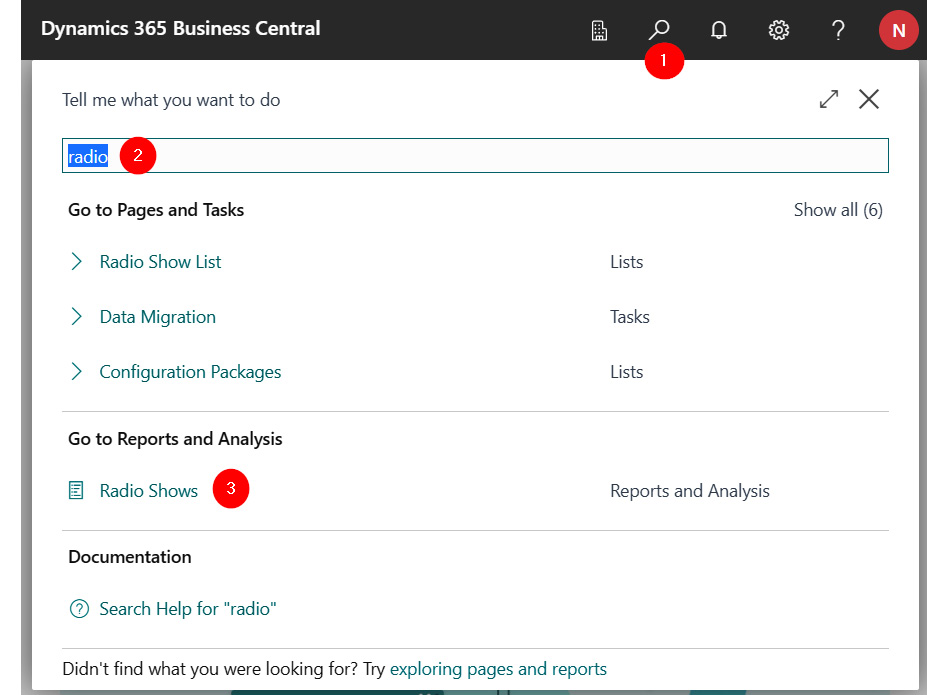
Figure 1.40 – Searching for our new report in the client
When you click on the report and select Preview & Close, you should see an empty layout.
Designing the layout
In this book, we will focus on Excel reports, so we will remove the RDLC and Word files and associated properties in the report. We will use the DefaultRenderingLayout property to make Excel the default report format choice. Follow these steps:
- Right-click on the
RadioShows.xlsxfile and open it in Microsoft Excel:
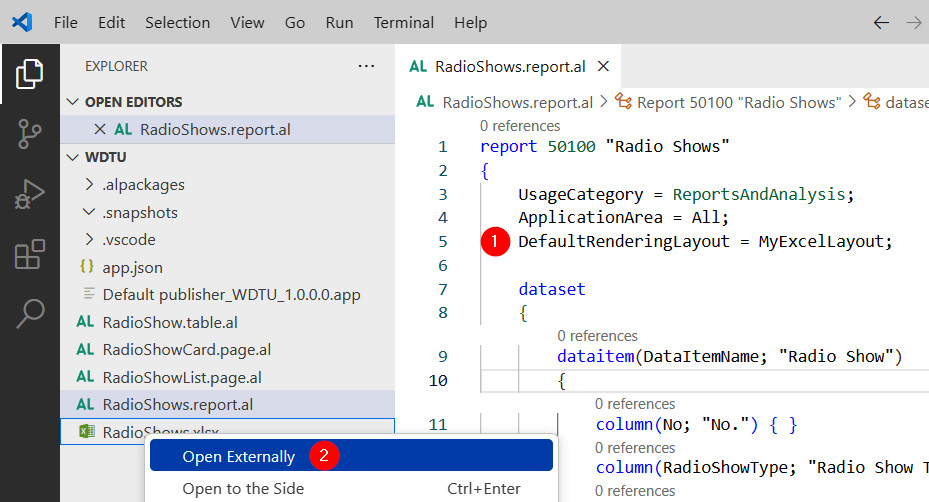
Figure 1.41 – Opening the Excel layout outside of VS Code
Excel will open; you should see the dataset of the Radio Shows report on a sheet labeled Data. Every Excel layout must include two elements: the datasheet and the data table. These elements form the basis of the layout by defining the flattened data generated by the report that you can work with. This data table is the basis of the calculations and visualizations that you will want to present on the other sheets. Don’t change the name, add, modify, or delete the datasheet, data table, or columns as these are controlled by the report dataset definition.
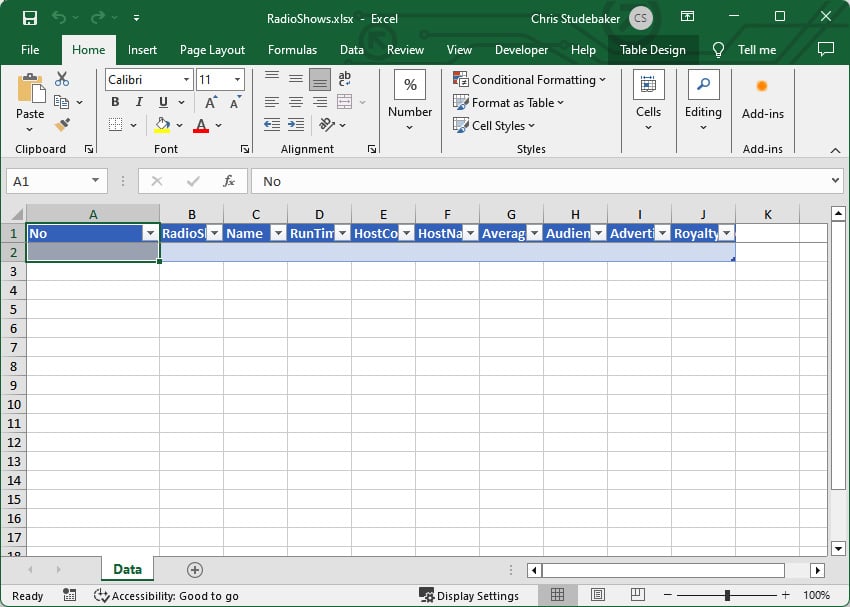
Figure 1.42 – Datasheet in our Excel workbook
- In Excel, click the Insert tab in the ribbon and choose PivotTable:
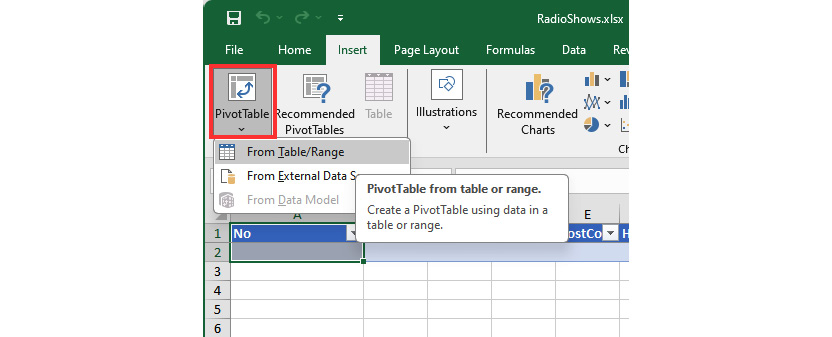
Figure 1.43 – The PivotTable button
- Choose From Table/Range with the default options of Data and New worksheet. Then, click OK:
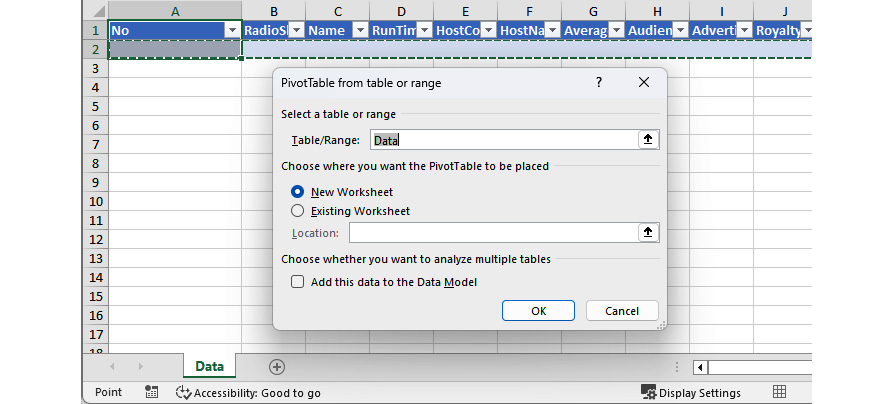
Figure 1.44 – Adding a PivotTable in Excel
- Select the RadioShowType, Name, AverageListeners, and AdvertisingRevenue columns. Drag and drop Count of AverageListeners and Count of AdvertisingRevenue to Values from the Rows box on the right:
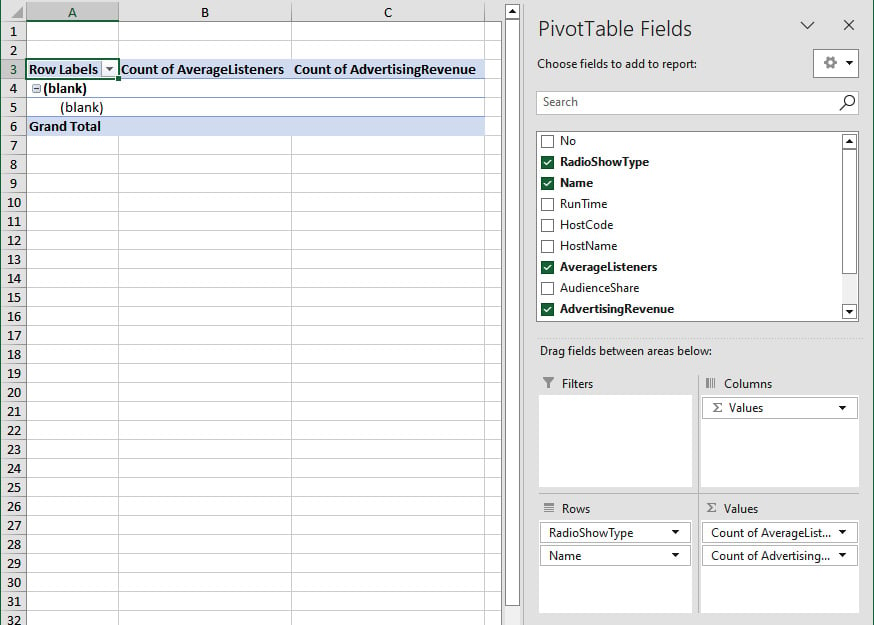
Figure 1.45 – Populating PivotTable Fields
- After saving and closing the Microsoft Excel document, we can publish our extension, search for the report, and select Download:
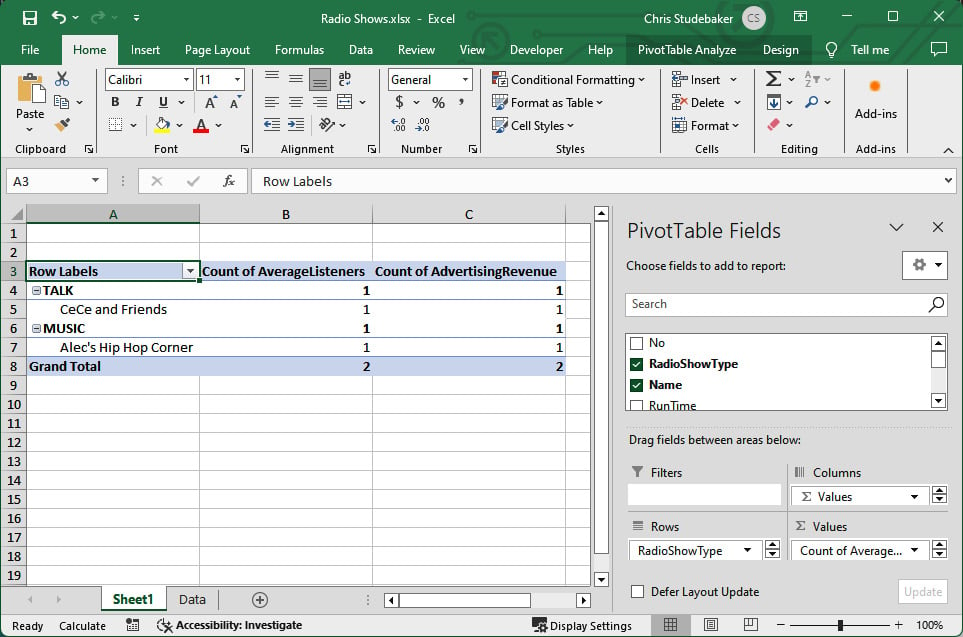
Figure 1.46 – Preview of the Pivot-style report in Excel
There is much more to come. All we’ve done so far is scratch the surface. But by now, you should have a pretty good overview of the development process for Business Central.
Note
You will be in especially good shape if you’ve been able to follow along on your system, doing a little experimenting along the way.


