Your first Fusion web application
It's time for us to break the suspense and get a feel for the smart technology that we are discussing. Are you excited? Good; let us jump start and build a simple Fusion web application. During this course, we will also analyze the generated artifacts by uncovering the magic behind visual and declarative development.
Our use case is very simple, primarily meant for giving you a feel of the development environment and the basic configuration required for an ADF web application to run. In this example, we will build a web application to display the department details from the DEPARTMENTS database table.
Starting JDeveloper IDE for the first time
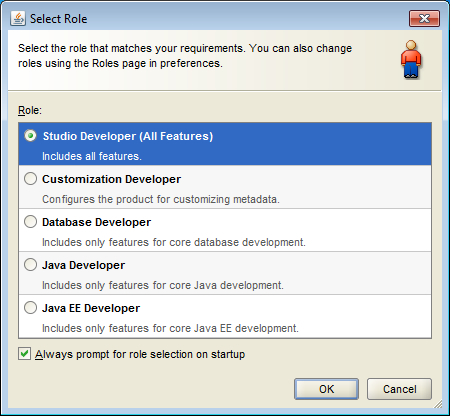
Once the JDeveloper installation is complete, you are ready to launch it for application development. The first time JDeveloper is run, it will prompt for selecting a role that matches your requirement, as shown in the following screenshot:

JDeveloper IDE enables appropriate features to be used based on the role that you select on startup. The default role selected by the IDE is Studio Developer, which includes all the features offered by the IDE. You will use the Studio Developer role for building our first example, which we will discuss shortly. You can switch to a specific developer role if you want to restrict IDE from displaying many other features that are not relevant to the application that you are building.
Picking up the right application template
JDeveloper is packaged with a variety of application templates, which may help us to set up the basic skeleton for applications leveraging well proven architectural patterns. Based on the complexity of the application, you are free to extend this basic structure by adding more projects later in the development cycle.
To create an application, perform the following steps:
Click on New Application within the Application Navigator tab in the JDeveloper. This will display New Gallery with a set of predefined templates targeting various technologies.
For ADF web applications, select the Fusion Web Application (ADF) template and click on OK.

Once you select the Fusion Web Application (ADF) template, JDeveloper will launch the Create Fusion Web Application wizard, which may let you key in the application name and location to store the source files.
The next steps in the wizard will set up the basic skeleton for our application by generating the Model and View Controller projects.
As the names suggest, these projects hold your business services and UI-related sources respectively. While navigating through the setup screens for each project, you are free to change the default name of the project and package name of your Java files. As this is our first application, let us leave the default values set by the IDE as they are and finish the wizard.
Analyzing the generated metadata files
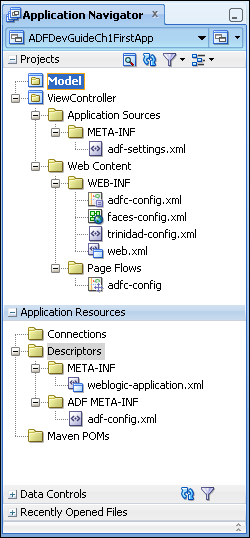
When you finish the Fusion web application generation wizard, the following files are generated in your source folder. Let us take a quick look at these metadata XML files to understand the role of each item in our application.

adf-settings.xml: Theadf-settings.xmlfile keeps the UI project configurations. This file is present in the< project-root >/src/META-INFfolder.faces-config.xml: Thefaces-config.xmlfile contains the configurations for a web application built using JSF. This file allows us to configure managed beans, data convertors, and validators used in the UI, navigation cases, global resource bundles, view handlers, page lifecycle phase listeners, and custom lifecycle factory implementation for the application.adfc-config.xml: ADF Faces is built on top of the JSF with a lot of extra features, which are not covered by the core JSF. ADF Faces usesadfc-config.xmlto keep its configurations. As a Fusion developer, you should useadfc-config.xmlto configure the navigation cases and managed bean definitions. To run your Fusion web application, you may need bothfaces-config.xmlandadfc-config.xmlfiles—which is true even if you have not added any custom configuration entries infaces-config.xml.trinidad-config.xml: Apache MyFaces Trinidad forms the base for the ADF Faces component set. In fact, Trinidad components earlier were ADF Faces components, which were donated to Apache Software Foundation later in the journey. By default, the generatedtrinidad-config.xmlfile contains only the skin family name. However,trinidad-config.xmlcan be used to override the default configurations for accessibility settings, locale settings, state management, and so on.web.xml: Theweb.xmlfile acts as deployment descriptor for a Java-based web application. When you generate a Fusion web application by using JDeveloper, a defaultweb.xmlfile with default settings will be created for you. The default entries include context parameters for configuring the runtime state of the system, security filters, data binding filters for web pages, and resource look up filters. Theweb.xmlfile also includes servlet context listeners for initializing the management and monitoring services for view and model layers.adf-config.xml: Theadf-config.xmlfile contains application-level settings, which manage the runtime infrastructure—such as failover behavior for the application modules, global fetch limit for all the view objects, caching of resource bundles, automated refresh of page bindings, and so on—for your application.weblogic-application.xml: This file is the WebLogic Server-specific deployment descriptor.
Connecting to the database
The next step is to create a database connection that will be used later in the development phase to generate the data model from database objects.
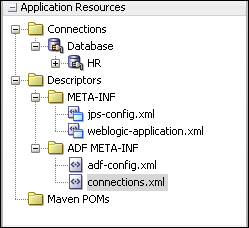
You can create a database connection by right-clicking on the Connection node under the Application Resource tab and then choosing the New Connection option to connect to the database.
We will be using the HR schema in our samples. The HR schema is included with the Oracle 10g or Oracle 11g database. While you define the database connection, key in the credentials set for your local HR schema.
For building a sample application, you can also use Oracle Express Edition (Oracle Database XE) as the database. Oracle Database XE is an entry-level, small-footprint database. All the examples used in this book use Oracle Database XE as the database. To learn about Oracle Database XE, visit http://www.oracle.com/technetwork/products/express-edition/overview/index.html.
What happens when you create a database connection?
When you create a database connection, JDeveloper generates a set of metadata XML files to keep the connection information. Let us take a quick look at these files.

connections.xml: This file contains the database connection detail that we create for development. If your application consumes web services or map viewer services, the corresponding connection uniform resource locator (URL) will also be present in this file.jps-config.xml: Thejps-config.xmlfile is used to store the Oracle Platform Security configurations. The location of this file is configured inadf-config.xml. If your application is not configured to use ADF Security, this file, at a minimal level, acts as a pointer tocwallet.sso, which contains the password for the database connection details present inconnections.xml.cwallet.sso: Thecwallet.ssofile follows the Oracle Platform Security Services (OPSS) specification and it is used as a credential provider in connecting to external systems, such as databases. This file is normally not edited directly.
Generating the data model and business services
The basic infrastructure required for building our first ADF application is in place now. First, we will start the business service implementation by generating the data access layer, followed by the business service layer exposing the services to client.
Our example uses ADF Business Components for building business services where the data access layer is formed by entity objects and view objects. The application module generates the business service layer.
Building entity objects to persist your business data
Entity objects form the data model for your application encapsulating the persistence behavior for items that are used in your application.
Note
An entity definition represents an object in the database such as table, synonym, view, and so on, and an entity instance corresponds to a row from the database object. When you commit a transaction, entity objects are responsible for posting the modified data back to the database.
To generate an entity object, follow these steps:
Right-click on your model project in which you want to create entity, and select New from the context menu. JDeveloper may respond with the New Gallery dialog with a variety of options.
In the New Gallery dialog, expand the Business Tier node, select ADF Business Components, and then select Entity Object. When you confirm the selection by clicking on OK, JDeveloper displays the Create Entity Object wizard.

In the Create Entity Object wizard, you can browse through the schema objects and select the table for which you want to create an entity object, as shown in the following screen shot:

The remaining steps in the wizard's dialog will help you to modify the default properties, such as data types, attribute names, and so on, for entity attributes, and optionally generate Java classes to override the default behavior of entity objects.
In this example, we will generate an entity by selecting the DEPARTMENTS table and modify the default name as DepartmentEO. We will suffix EO with all the entity names in the examples used in this book to improve the readability of the data model. We will skip the remaining steps, accepting the default values generated by the IDE.
Building view objects to shape your business data
Once the entities are generated, the next step is to define a mechanism to populate entities from the database tables. ADF Business Components uses view objects for querying the database.
Note
In a very simplified form, a view object contains a query to retrieve data from the datasource and data shaping logic to be used by the client.
To generate a view object, follow these steps:
Right-click on your model project in which you want to create a view, and select New from the context menu to get the New Gallery window.
In the New Gallery dialog, expand the Business Tier node, select ADF Business Components, and then select View Object. When you confirm the selection by pressing OK, JDeveloper will display the Create View Object wizard as shown in the following screenshot:

In the first step of the Create View Object wizard, you can key in the name and select datasource for the view object. In this example, we will build a view object for the
DepartmentEOentity object that we created in the preceding section. Modify the default name for the view object asDepartmentVO. We will suffixVOwith all the view names in the examples used in this book to improve the readability of the data model. Click on Next to continue the wizard.In the Entity Objects page of the wizard, select the entity object(s) for which you are building the query. In this example, you will select DepartmentEO and click on Next to continue.
The Attributes page displays the attributes from the selected entity objectsfrom the preceding step. You can select the attributes you want to include from each entity usage in the Available list and shuttle them to the Selected list. For DepartmentVO, we will select all the attributes of DepartmentEO by shuttling them to the Selected list.
You can continue with the wizard further if you want to customize the default settings of the view object by altering the default attribute properties that are originally copied from the entity object. The wizard will also let you override the default query in the next step. As the default settings are good enough for DepartmentVO used in our example, we will skip these steps by clicking on Finish.
Building an application module to facade your business service implementation
We carried out the data access layer implementation in the preceding section step. The next step is to expose the business services to the client through the application module.
Note
The application module(s) wrap(s) the business service and data model of your application. An application can have multiple application modules depending on the complexity and logical grouping of the services.
To generate an application module, perform the following steps:
Right-click on your model project in which you want to create an application module, and select New from the context menu.
In the New Gallery dialog, expand the Business Tier node, select ADF Business Components, and then select Application Module. After clicking on OK, JDeveloper will display the Create Application Module wizard, as shown in the following screenshot:

On the Name page, you can key in the name for the application module and optionally modify the package name. This example names the application module as
HRServiceAppModule. Click on Next to continue the creation of the application module.The Data Model page of the wizard will let you expose the view object instances to the client by shuttling the view object(s) from the Available list to Data Model. In this example, we will add DepartmentVO to the application module as the DepartmentVO1 instance, which can be consumed from the client later. Either you can finish the wizard at this stage, leaving the default values set by the IDE as they are, or continue the wizard.

If you continue the wizard, the Application Modules page may help you to nest another application module (if any) under the current one to build composite services. The Java page of the wizard can be used to optionally generate the Java files for the application module, which can be used for adding custom business service methods. These steps can even be performed later during development by editing the existing application module definition.
Note
You can also generate entity objects, view objects, and application modules in a single go by choosing Business Components from the Tables option displayed in the New Gallery window. This feature may save you time, especially when you work on simple applications, proof of concepts, or demos.
What is there in your model project source now?
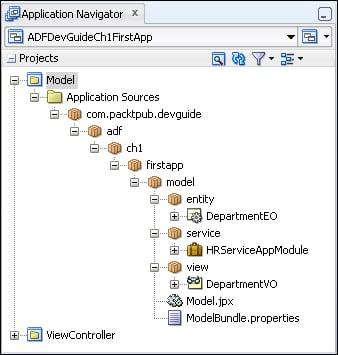
When you finish generating business components from the database tables by following the steps that we have discussed earlier, JDeveloper will generate metadata XML files and optionally Java classes to hold component definitions for entity objects, view objects, and application modules. Let us take a quick look at the model project source for our example generated by the wizard.

DepartmentEO.xml: TheDepartmentEO.xmlfile contains the name of theDEPARTMENTStable that we selected for generating the entity and attribute definitions, reflecting the properties of the columns from theDEPARTMENTStable.DepartmentVO.xml: TheDepartmentVO xmlfile contains attribute definitions copied fromDepartmentEO.this file also contains a query to fetch department records.HRServiceAppModule.xml: TheHRServiceAppModule.xmlfile contains information about the view object instances and optional service method definitions. The view object instance used in our example isDepartmentVO1.bc4j.xcfg: Thebc4j.xcfgfile contains metadata information about the application module such as name, database connection, runtime configuration, and so on.Model.jpx: The<model-project-name>.jpxfile is used by both ADF design-time tools and runtime components. The.jpxfile contains the pointers to business component definitions in themodelproject, where each entry describes the package name and type of business components in the package. In more complex applications, it may also contain metadata for the shared application module, which is primarily used at runtime to share the same data between clients. This file is located in the package folder for yourmodelproject.
When you create an application module, JDeveloper IDE automatically creates a data control that contains all the functionality of the application module. You can click on the refresh icon in the Data Controls panel window to view the data control generated for the application module that you added to the model project.
The data control exposes the following:
View object instances as named data collection
Built-in operations on data collection and custom business methods
You can design a data bound user interface by dragging an item from the Data Controls panel and dropping it on a web page as a specific UI component.
Building user interfaces from the model
The next step is to build the user interface for the business services. This is easy if you use ADF data binding, as we will see in this section.
To create a web page, perform the following steps:
Right-click on the view controller project and select New.
In New Gallery, expand Web Tier, and select JSF/Facelet. Select Page as item. Confirm the action by clicking on OK. Refer to the following screenshot:

In the Create JSF Page dialog, you can key in the name for the page and optionally select a template. We will use the Oracle Three Column Layout template to build the
departments.jsfpage for our example.You can use the drag-and-drop offerings from JDeveloper to visually lay out controls on a page. To build a UI table displaying data from the
departmentsview object, you just need to drag the instance of thedepartmentsview from the Data Controls panel and drop it on the page by choosing the desired display component available in the list. The following screenshot illustrates this feature:
What have you got in your view controller project source now?
It will be interesting to take a look at the ViewController project source at this stage. When you drag-and-drop the departments view object on the page, the IDE generates two metadata XML files to enable the data binding for the page.
departmentsPageDef.xml: The department page definition XML file is used at runtime to fetch the data when you access the page through the browser. This file will act as binding container for the web pages.DataBindings.cpx: TheDataBindings.cpxfile defines the binding context for the entire application. This file acts as the registry for page definition files. It also holds metadata for the business services implementations.adfm.xml: Theadfm.xmlfile acts as the registry of registries, holding pointers to each registry metadata file used in the project. In our example,adfm.xmlcontains the path for theDataBindings.cpxfile.
Deploying and running the application
Wow… congratulations! You are done with the implementation even without writing a single line of Java code! We can run this application either by directly a deploying to the application server integrated with JDeveloper, or generating deployable artifact from the application source and then installing to the target server.
Note
ADF applications are certified against Oracle WebLogic and IBM WebSphere Servers. Oracle ADF essential (free version of ADF) version is also certified against GlassFish 3.1 (or higher).
Running the application using an integrated webLogic server
To run your page by using integrated WebLogic
Server, select the .jsf page in the application navigator, right-click on it, and choose Run. When running a page by using the integrated application server, JDeveloper creates an exploded EAR at a location that has been pre-configured for the
server to look at. Then, the server follows the normal deployment process.
Running the application on a standalone application server
To deploy the application to a standalone server, we may need to prepare the application for deployment. This involves creating deployment profiles for each project and then generating a deployment profile for the whole application, including the required projects. Deployment profiles can be generated by choosing the New Deployment Profile option in the New Gallery window on your JDeveloper.
The last step is to generate the deployable artifacts, such as an Enterprise Archive (EAR) file, for the application by choosing the already created deployment profile. The Deploy option is available in your JDeveloper under the Build menu of main toolbar.
Note
To learn more about deploying an ADF application to a standalone sever, refer to the Oracle Fusion Middleware Administrator's Guide documentation. To access the documentation visit http://www.oracle.com/technetwork/developer-tools/jdev/documentation/index.html and navigate to Oracle JDeveloper and ADF Documentation Library | Administrator's Guide. Use the search option to find specific topics.


