Installing roles and features
Installing the operating system gets your foot in the door, so to speak, using your server as a server. However, you can't actually do anything useful with your server at this point. On a client desktop system, the base operating system is generally all that is needed to start working and consuming data. The server's job is to serve up that data in the first place, and, until you tell the server what its purpose is in life, there really isn't anything useful happening in that base operating system. This is where we need to utilize roles and features. Windows Server 2019 contains many different options for roles. A role is just what the name implies: the installation of a particular role onto a server defines that server's role in the network. In other words, a role gives a server some purpose in life. A feature, on the other hand, is more of a subset of functions that you can install onto a server. Features can complement particular roles or stand on their own. There are pieces of technology available in Windows Server 2019 that are not installed or turned on by default because these features wouldn't be used in all circumstances. Everything in the later chapters of this book revolves around the functionality provided by roles and features. They are the bread and butter of a Windows server, and, without their installation, your servers make good paperweights, but not much else. As we will not be taking the time in each chapter to cover the installation of every particular role or feature that will be used within the chapter, let's take some time right now to cover the most common paths that admins can take in order to get these roles and features installed onto their own servers.
Installing a role using the wizard
Without a doubt, the most common place that roles and features get installed is right inside the graphical wizards available as soon as your operating system has been installed. By default, a tool called Server Manager launches automatically every time you log into Windows Server 2019. We will take a closer look at Server Manager itself later in this chapter, but, for our purposes here, we will simply use it as a launching platform in order to get to our wizard, which will guide us through the installation of our first role on this new server we are putting together.
Since you have just logged into this new server, you should be staring at the Server Manager dashboard. Right in the middle of the dashboard, you will see some links available to click on, a quick-start list of action items numbered one through five. If you haven't already done so, put into place any local server configuration that you may need on this machine through the first link, which is called Configure this local server.
Items that you will likely want in place are things such as a permanent hostname for the server, IP addressing, and, if you are joining this server to an existing domain (we will discuss domains in Chapter 3, Active Directory), you typically handle that process prior to implementing any new roles on the server. But, in our case, we are more specifically interested in the role installation itself, so we will assume that you have already configured these little bits and pieces to have your server identified and routing on your network.
Go ahead and click on step 2, Add roles and features. Another way you can launch the same wizard is by clicking on the Manage menu from the top bar inside Server Manager and then choosing Add Roles and Features from the drop-down list. Selecting either link will bring you into our wizard for installation of the roles, as shown in Figure 2.7:

Figure 2.7: Adding roles
You are first taken to a summary screen about installing roles. Go ahead and click on Next to bypass this screen. Now we get into our first option, which is an interesting one. We are first asked if we want to continue with a role-based or feature-based installation, which is exactly what we have been talking about doing. But the second option here, Remote Desktop Services installation, is important to note. Most of us consider the Remote Desktop Services (RDS) components of Windows Server to be just another role that we can choose when setting up our server, similar to the installation of any other role. While that is basically true, it is important to note that RDS is so functionally different from the other kinds of roles that the entry path into the installation of any of the RDS components invokes its own wizard, by choosing the second option here. So, if you ever find yourself looking for the option to install RDS, and you have glossed over this screen because you are so used to clicking Next through it like I am, remember that you need to head back there to tell the wizard that you want to deal with an RDS component, and the remainder of the screens will adjust accordingly.
At the moment, I am working on building out a new test lab full of Windows Server 2019 boxes, and I am still in need of a domain controller (DC) to manage Active Directory in my environment. Before installing Active Directory on a server, it is critical that I have a few prerequisites in place, so I have already accomplished those items on my new server. The items that I need to have in place prior to the AD DS role installation are: having a static IP address assigned and making sure that the DNS server setting in my NIC properties points somewhere, even if only to this server's own IP address. I also need to make sure that the hostname of my server is set to its final name, because once you turn it into a domain controller it is not supported to change the hostname. I have already accomplished these items on my server, so I will continue through my role installation wizard here by leaving the option Role-based or feature-based installation and clicking on Next, as shown in Figure 2.8:

Figure 2.8: Select Role-based or feature-based installation
Our Server Selection screen is a very powerful one. If you've been through this process before, you have likely glossed over this screen, simply clicking on the Next button in order to progress through it. But, essentially, what this screen is doing is asking you where you would like to install this new role or feature. By default, each server will only have itself listed on this screen, and so clicking on Next to continue is more than likely what you will be doing. But there are a couple of neat options here. First of all, if your Server Manager is aware of other servers in your network and has been configured to monitor them, you will have the option here to install a role or feature remotely onto one of the other servers. We will dig a little deeper into this capability shortly. Another feature on this page, which I haven't seen many people utilize, is the ability to specify that you want to install a role or feature onto a virtual hard disk. Many of us work with mostly virtual servers in this day and age, and you don't even need your virtual server to be running in order to install a role or feature to it! If you have access to the .VHDX file, the hard disk file, from where you are running Server Manager, you can choose this option, which will allow you to inject the new role or feature directly into that hard drive. But, as is the case 99% of the times that you will wander through this screen, we are logged directly into the server where we intend to install the role, and so we simply click on Next, as shown in Figure 2.9:
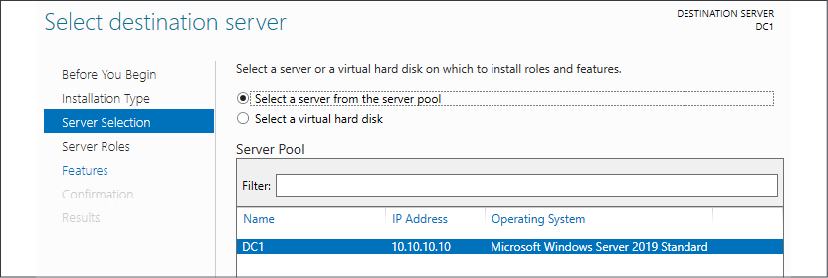
Figure 2.9: Selecting the destination server
Now we have our list of roles that are available to be installed. Clicking on each role will give you a short description of the purpose of that role if you have any questions, and we will also be talking more about the core infrastructural pieces in our next few chapters to give you even more information about what the roles do. All we need to do here in order to install a role onto our new server is check the box and click on Next. Since this is going to be a domain controller, I will choose the Active Directory Domain Services role, and I will multipurpose this server to also be a DNS server and a DHCP server. With these roles, there is no need to rerun through this wizard three separate times to install all of these roles; I can simply check them all here and let the wizard run the installers together. Whoops, when I clicked on my first checkbox, I got a pop-up message that the Active Directory Domain Services role requires some additional features in order to work properly. This is normal behavior, and you will notice that many of the roles that you install will require some additional components or features to be installed. All you need to do is click on the Add Features button, and it will automatically add in these extra pieces for you during the installation process. An example of this is shown in Figure 2.10:
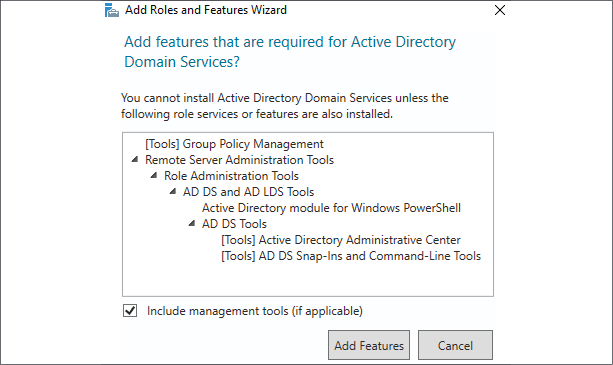
Figure 2.10: Additional features
Now that we have all three of our roles checked, it's time to click on Next. And, just to make it clear to all of you readers, I was not required to install all of these roles at the same time; they are not all dependent on each other. It is very common to see these roles all installed onto the same server, but I could split them up onto their own servers if I so desired. In a larger environment, you may have AD DS and DNS installed together, but you might choose to put the DHCP role onto its own server, and that is just fine.
I am configuring this server to support a small lab environment, so, for me, it makes sense to put these core infrastructure services together in the same box, as shown in Figure 2.11:
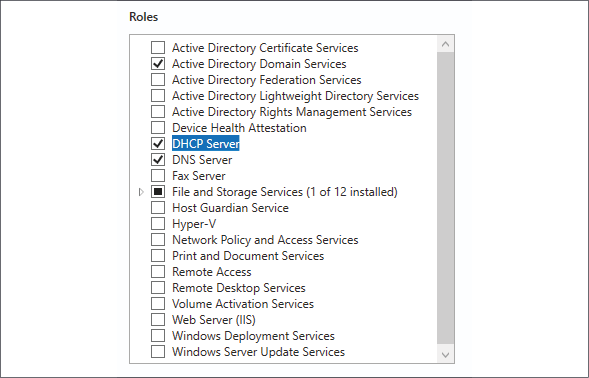
Figure 2.11: Role selection
After clicking on Next, we have now landed on the page where we can install additional features to Windows Server 2019. In some cases, you may have originally intended only to add a particular feature, and in these cases, you would have bypassed the Server Roles screen altogether, and gone immediately to the Features installation screen. Just like with the role installation screen, go ahead and check off any features that you would like to install, and click on Next again. For our new domain controller, we do not currently require any additional features to be specifically added, so I will just finish out the wizard, which starts the installation of our new roles.
After the installation process has been completed, you may or may not be prompted to restart the server, depending on which roles or features you installed and whether or not they require a restart. Once you have landed back inside Server Manager, you will notice that you are now being prompted near the top with a yellow exclamation mark. Clicking here displays messages about further configurations that may be required in order to complete the setup of your new roles and make them live on the server. The roles for AD DS, DNS, and DHCP are now successfully installed, but there is some additional configuration that is now required for those roles to do their work. For example, to finish turning my server into a domain controller, I need to run through a promotion process to define my domain, or to specify an existing domain that I want to join. There are also some loose ends that I need to tie up before putting DHCP into action:
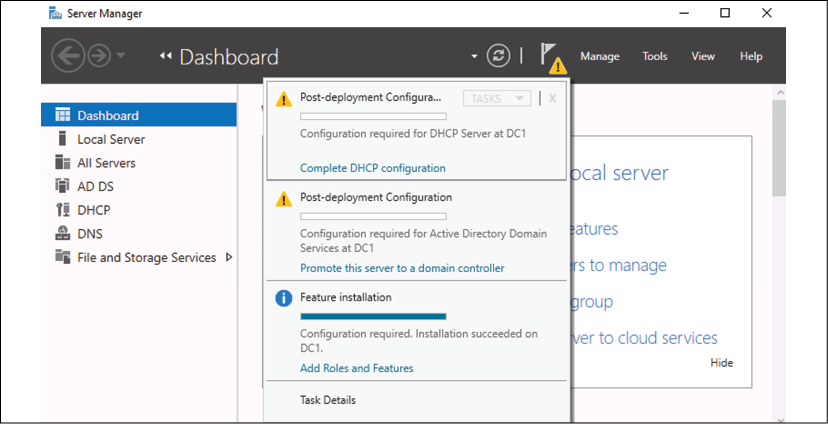
Figure 2.12: Post-deployment Configuration
Installing a feature using PowerShell
Now that you have seen the graphical wizards for installing roles and features, you could certainly always use them to put these components into place on your servers. But Microsoft has put much effort into creating a Windows Server environment where almost anything within the operating system can be manipulated using PowerShell, and the addition of roles and features is included in those capabilities. Let's take a look at the appropriate commands we can use to manipulate roles and features on our server right from a PowerShell prompt. We will view the available list of roles and features, and we will also issue a command to install a quick feature onto our server.
Open up an elevated PowerShell prompt, most easily accomplished via the quick admin tasks menu, accessed by right-clicking on the Start button. Then use the following command to view all of the available roles and features that we can install onto our server. It will also show you which ones are currently installed:
Get-WindowsFeature
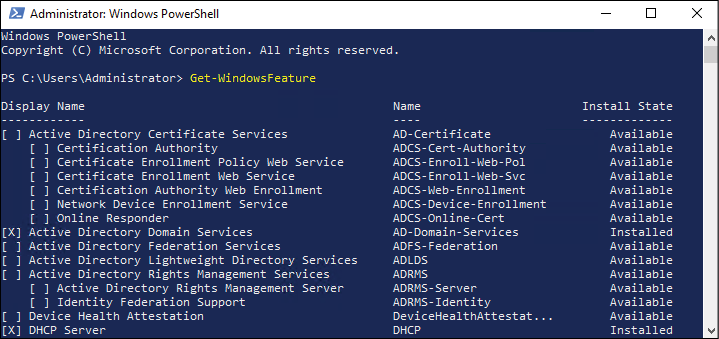
Figure 2.13: A list of all the roles and features available and installed
What I would like to do on this server is install the Telnet Client feature. I use Telnet Client pretty regularly for testing network connections, so it is helpful to have on this machine. Unfortunately, my PowerShell window currently has pages and pages of different roles and features in it, and I'm not sure what the exact name of the Telnet Client feature is in order to install it. So, let's run Get-WindowsFeature again, but this time let's use some additional syntax in the command to pare down the amount of information being displayed. I want to see only the features that begin with the letters TEL, as shown in the following examples:
Get-WindowsFeature -Name TEL*

Figure 2.14: A list of features beginning with the letters TEL
There it is! Okay, so now that I know the correct name of the feature, let's run the command to install it, as shown in the following example:
Add-WindowsFeature Telnet-Client

Figure 2.15: Install Telnet Client
One last thing to show you here—there is also a way to manipulate the Get-WindowsFeature cmdlet in order to quickly show only the roles and features currently installed on a server. Typing Get-WindowsFeature | Where Installed presents us with a list of the currently installed components. If I run that on my domain controller, you can see all the parts and pieces of my roles for AD DS, DNS, and DHCP, as well as my newly installed Telnet Client feature, as shown in Figure 2.16:
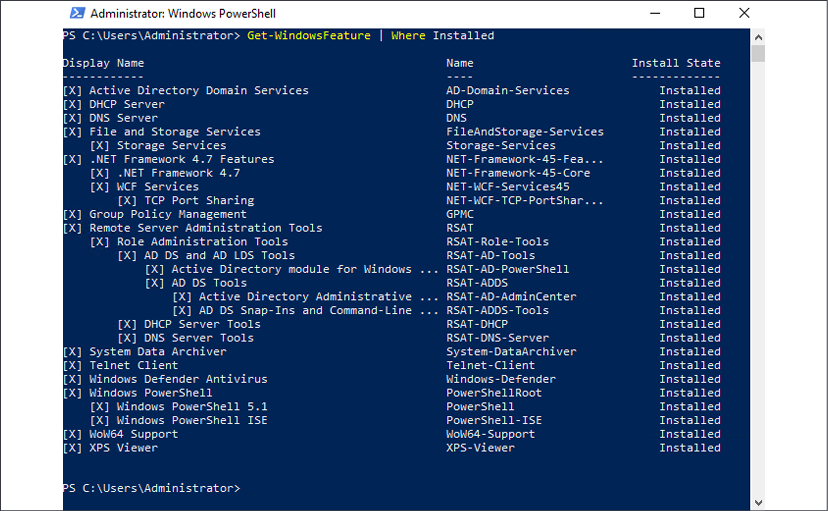
Figure 2.16: A list of all installed components


